Friday, March 29, 2013

Spring has Sprung, where's the bastard (file)

  Spring has finally arrived in Hamilton, Ontario.  The sun was hot enough today and the snow is mostly, mostly gone enough that I started into the warm weather rituals.

  Ritual one: picking the dozens of pieces of plastic crap and coffee cups that have blown into the rose bushes over the course of the winter.  I dread re-cycling pickup day, if it is windy, our yard, roses and fence collects lots of bits of flying paper and plastic.  Shouldn't blue boxes have lids???

  Another ritual for the warm weather is to ride my bicycle, which I did for an hour today.
Scott Sub 10
   It is great to have a new bike upon which everything works properly.  I feel the same way about toys as I do about tools. 

  Another ritual:
   -Cleaning up the gardening tools, some of them were put away with crud on them and so there is rust and crud to be removed.  As well as cleaning, spades, hoes and mower blades need to be sharpened. To sharpen digging tools nothing works better than the Bastard in the title. The Bastard file is too course for sharpening anything in my shop but it is just the ticket for out door tools. 

think spring

     Get outside and clean up.


Wednesday, March 27, 2013

Truing a Square

A couple of blogs ago I talked about squares.  I thought it would be a good idea to remind folks: check your squares occasionally, that may have taken a hit and been knocked  out of square.  On November 24th 2011 I wrote about the failure of an old friend: this was a square that had been knocked out of true.


:   

     I was able to save that square from being cut up for scrap but following the advice from newwoodworker.com.  There is an entry on how to check and repair your square.
  
Empire E2992 Rafter Square Aluminum High Visibility Blue 7-inch
empire rafter square
    This is another approach to the large square question, study but with shorter sides than the traditional carpenter`s square.  A square like this could be used to make squares, like our friend at woodgears.ca has done.  One of these days I am going to copy his example, but because it feels good to work with tools you have made yourself.


Tuesday, March 26, 2013

You Might Be A Woodworker...if .. part 2

   You might be a wood worker if you just like stuff made from wood instead of other materials.  Sometimes I make things from wood because I really want to replace  a plastic something. Other times I make stuff from wood because I just love the look, and feel of wood.

  Do you recognize this small cloth pouch?

   You might be a diabetic if you recognized this small black pouch.  It is the one that comes with you Contour blood glucose meter.  I am diabetic and so handle this little pouch at least twice a day.   I am not happy to be diabetic and really hate having to stick my fingers and draw my blood.  On the other hand, sick, blind and crippled is not a better option.

  Each morning I begin my day by opening the top drawer in my bathroom  vanity and taking this pouch out, and testing my blood.  Each morning my stiff old fingers fumble with the Zipper and more than once the whole thing has ended down on the floor.

  So today....as a wood worker guy.....I did this.


  Now this nice little wooden holder will sit in the top drawer instead of the pouch.  This holder will remind me, that I have a great workshop in the basement waiting for me to come and play, it will also remind me that if I mind my diet, get my exercise and take my medication I should have years and years to play in my work shop.

   I will also be reminded that I am lucky that my trouble is diabetes, there are many many things that are worse.

  It was a silly little project but kind of fun.  I used my forstner   bits to drill the holes.  The wood is a piece of scrap spruce stud  and the finish is orange shellac.  I had a quiet morning and didn't want to take on a big project, but still wanted to play in the shop so this is what I did.

   Some blogs ask people to answer polls.  I won't ask but I do wonder how many wood workers just like to play in their shop and so do little projects like this?

Friday, March 22, 2013

Two Plyers, or 2 Pliers

   My shop is filled with fiddly  little tools, knives, tape measures, square and plyers.

        These two sets of plyers have been designed and developed over the years to do specialized tasks and I have no doubt that they are perfect for those tasks.  In fact I have occasionally used for what they were designed, but ususally I use them for:
Slip Joint pliers are used by me to take tops off of glue bottles and anything else that is slightly stuck and doesn't provide a good grip for my hands.  I expect that I use my slip joint plyers  99% of the time to deal with sticky tops and only occasionally for hold on to large plumbing related fasteners.

Channel Lock Nippers  are used in my shop for pulling nails.  If I can get a little bit of a grip on a nail or brad I just roll the plyers backward and slowly pull the nail out.  Again, there is a tool designed just for pulling nails, but these are great for persuading a nail to leave a board, and if I can't get the nail to move, these plyers cut it off clean and neat.  I like it when a tool is versatile. 


Thursday, March 21, 2013

Pocket Holes, 'cause I like them.

    Clara's Bed Project

detail of leg attached to the side rail

side rails sitting on my KREG clamp table
    I planed the parts of the bed the other day and then had to decided how I was going to attach the legs to the side rails.  This bed is a Jr. Bed for my Grand daughter,  that is just about to climb over the railing of her crib.  Since it is a Jr. Bed it is pretty close to the floor so the strain on the legs will be minimal. I am making the bed study enough so that I can sit on the bed with her and read stories.  Keiran's bed was not my project and it is fine for him, but too flimsy for Opa to side on.

     Aside for the lesson about how digital cameras play with colour,  the bed is also a lesson on what is practical.  I want to spend the time available making a cool head board not fussing around with tenons or dowels, so I used my KREG jig and attached the short legs with glue and pocket holes.  The joint will be plenty strong for this application.  

    Actually I used the previous version of the portable jig to do this job, the tool that would have been best it looks like the new Heavy Duty jig.
Kreg KJHD Heavy Duty Pocket Hole Jig
   I haven't had an opportunity or the necessity to use this jig but I am sure that it works great, all their tools do.

   The Klamp table that was holding the pieces as the stain dried has also been a real boon in my shop.
Kreg KKS2000 Klamp Table w/ Steel Stand Combo

    When it is not being used for is designed purpose, as a great way to clamp face frames, I have a sheet of plywood to cover it and it is where I put things to dry.  My table has casters and I have often used  it to wheel pieces of wood about the shop from joiner, to saw, to planer as well.  You can see by the photo that I installed a drawer and some shelving under the table for clamps, KREG screws and other related bits and pieces.

    The next step in the bed saga is to assemble it and then cut a 3/4 plywood sheet to size to hold the mattress. None of those thin flimzy slats al a IKEA for this bed. I am making a bed that a kid can jump on, and I know she will.


Monday, March 18, 2013

you got to see this.

   Click on the BLOG LIST and go to woodgears.ca, the marble machines are out standing.  I am afraid that the pine bed frame that I am working on appears crude beside the woodworking skills used to make the marble machines.

*Makita LXT235s 18V LXT Li-ion 2 Piece Combo Kit


Saturday, March 16, 2013

Keepsake Boxes Complete

keepsake boxes beside a wine bottle for scale. (10x10x16)


box open, showing top lining and a symbol for Peace.

  These two boxes were a commission that I just finished. A customer asked for two keepsake boxes for her twin granddaughters.  I made the boxes from 3/8 oak with an aromatic cedar floor and 3/4 one piece oak top.  After sanding everything to 400 grit I sprayed shellac, one coat, followed by vigorous sanding again to 400 grit, then three coats of wipe on varnish.

  The name, symbols and butterflies are burned onto thin panels then glued to the boxes.  I found that the oak was a bit tricky to wood burn neatly and so opted to burn panels which let me discard unsuitable results.  I was very lucky to have decided to do a couple of tests because that is when I learned how tricky the oak was to burn cleanly.

   I deliver the boxes on Monday and hope that the customer is happy.


Thursday, March 14, 2013

My Turtle


  Last February I posted a photo of a prize winning turtle from the Hamilton Wood Show.  A little over a month later this is a posting of my latest turtle.  This turtle is just a generic turtle carved from basswood and painted with craft paint from the Dollar Store.  If you have a hankering to try your hand at carving a turtle, check out turtle carving photos.  You will be surprised how much you can do with a hunk of basswood, or clear pine and a utility knife.  Carving does not have to cost a fortune, break the bank or threaten the marriage.  

  I have played away with carving (whittling) for a few months now and really am enjoying it.  I find that the quiet of the work is relaxing as well as developing new techniques to be satisfying. 

   When it comes to building things in my shop there is a strong undercurrent of "what is this useful for?" and "who wants this or where am I going to put it?".  Carving little things like boats and turtles keeps my hands active while providing  lots of quiet pleasure.  I guess it is somewhat like making jigsaw puzzles, a pleasant pastime for some, a useless waste of time for others.  

   If you are going to take up carving I suggest that you get a small tarp or drop cloth to put down where you work.  It just makes clean up easier.

Tuesday, March 12, 2013

Square ?


    Once again Chris Schwarz's blog yields information and raised a thought provoking question.  I guess this happens so often because  he is the professional and I am the basement wood butcher.

TS-2_IMG_5695

Years ago ( says Chris Schwarz)  I worked with a professional woodworker who built all his own tools, used the least-expensive machines available and turned out work that was undeniably world class.
He scoffed at buying clamps (he made his own). He invented precision tools when he needed them. And he could make inlay tools from shop garbage.
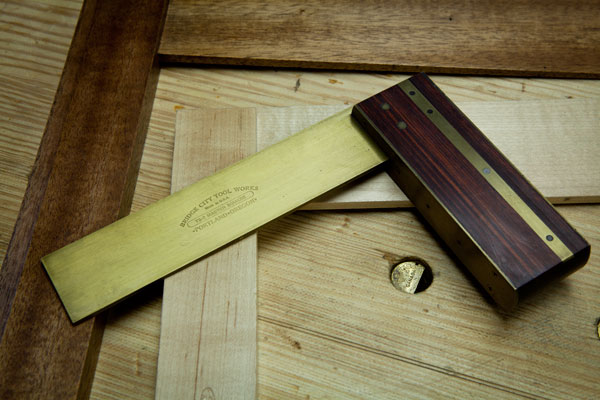
And yet this self-proclaimed cheapskate carried a Bridge City Tool Works TS-2 try square with him everywhere in the shop. It looked nothing like the ones you see on eBay, with their factory boxes and certificates of authenticity. His was almost black from daily use.
One day I worked up the courage to ask him about his try square.  Didn't he think it was at odds with his day-to-day parsimonious philosophy?
“Precision,” he said, “has to start somewhere.”


  The balance of the blog entry in here:  http://www.popularwoodworking.com/woodworking-blogs/chris-schwarz-blog/ts-2-try-square-perfection-made-rare

 It is interesting to see that a couple of other blog authors have written about Squares just recently too.  As we know the square is an instrument used to try and adjust all rectangular corners of buildings and to assist in bringing rude matter in due form.  As we also know, cheap squares, aren't square, and that all squares resent being dropped on the shop floor.  I also learned that occasionally you need to check whether your square is still square, or if it is just close. (see Nov. 24th 2011)


   These are the squares to which I turn when I need to check my 90's and 45's. The small machinist square lives on the drill press, held there by a rare earth magnet.  The slightly larger machinist's square lives on the joiner and the other squares have good safe places to live until they are needed.  The large try square was my Grandfather's and though it is showing its age and experience, it is still dead on square.

    In the shop there are other squares, squares that I know aren't really square but they are close enough for rough cutting with the circular saw.

    When I began my wood working Odyssey I bought a cheap square from a big box store, being honest, it was as accurate as I was and it was some years before I got good enough that I could tell the difference.   However, I may become more accurate sooner if the square was more accurate, we'll never know.

   A piece of advice for a beginner, as with Mr. Schwarz, I suggest you get quality measuring tools and take care of them.  You will only have to do that once in your life.  And when you work you will not have to second guess you measurements, you will be able to concentrate on your technique.


Thursday, March 7, 2013

The Kauri Museum

  I was in New Zealand five years ago and didn't know about the Kauri Museum but wish I had know.  I did get a small piece of Kauri wood for a gift shortly after that trip, one day i will use the wood to make a couple of really nice pens. (it isn't a very big piece of wood).

   Just noted that I talked about Kauri wood last February, I wonder if spring is the season to think about wood?   
  
      I see that on the new products page at thetoolstore.ca there are a bunch of coffee makers and small appliances, I just they know what other tools we need in our shops. ( I have always had a kettle, I can't work long with out some tea.)

new products at thetoolstore.ca


Tuesday, March 5, 2013

The Big Reveal

This is the project with a bit of paint

This is the project put to work, holding my Playbook.


   A while ago I linked to woodworkingformeremortals.com  and showed his "You might be a woodworker" video.  Well, you might be a wood worker if you make your own elephant.

   I bought one of these Black and Decker sanders last week.  The dust collection works a bit, it isn't too noisy and the vibration is manageable.  I think its a worthwhile tool for the clearance price.


Black & Decker RO100 5-inch R.O. Sander

Monday, March 4, 2013

Oak Panels, now a Box


   I could sub title this blog, you can never have too many clamps; I've said that before.
  Last week I glued up eight 3/8 oak panels to be used on these boxes.  In the process I discovered a couple of nice wide  pieces of oak to make the tops and the bottom of these boxes is aromatic cedar.  The plan is for these boxes to be keepsake chests and so I think the cedar will help preserve the box's contents.


 These boxes are make entirely with rabbets and held together with glue.


 I opted to use Titebond II Extend wood glue.  I wanted the extra time to get everything square and clamped before the glue set.


Now I have to leave it alone for at least the whole day, better, overnight.