Showing posts with label square. Show all posts

Thursday, May 19, 2022

Big Flowerpot


Hooray for found wood.  A couple of weeks ago this construction grade spruce was in a pile by a dumpster. I couldn't let it go to land fill.


  What to do with the find?


  What indeed.  A large flowerpot, actually a large wooden pot to cover a smaller plastic pot or, in this case a large pot to be filled with weights to hold  our Norfolk Island Pine from being blown over.   
  This is another project that will cost almost nothing but time. The base is a case off piece of MDF and the sides will be found wood.  I began with a circle and I then cut it into an octagon. My first error was not to mark out the octagon very,very carefully and so all the eight sides are slightly different widths. 

  I made four sides rectangles and 12 inches tall. What then remained was to fit the other four sides.


  I realized as I began fitting the tapered pieces in place that had I made all the square sides the same then all the tapered sides would have been the same and all the angles could have be cut with jigs set on the table saw, or jointer.

  Anyway, I didn't plan that far ahead.  Originally the pot was going to have vertical sides but as I thought about the project I decided it was time to push the project a bit. I cut a 5 degree angle on the bottom of each side which gave me a about a two inch flare for each piece.


  I cut and installed each wedge shaped section one at a time.  As with so many of this type of job.  By the time I was finishing the last couple of pieces they were quick and easy. I hand ripped the boards and hand planed each board. By the 7th and 8th it was easy.  The first couple took a tonne of fussing and fooling.  You can see the copper staples I made to hold the top of the boards together. 


12 inch base, 12 inches tall and 16 1/2 inches  
across the top.


    I cut two dadoes on each side in which I glued a stretched nylon strap to help hold the container together in use.

  I  may do this again. I have the materials and having learned from this experience the next one will take half the time and be twice as good.

  Anyway, mother nature will batter the pot and not care if it is adequate or a work of art.  I like making stuff with found wood.


cheers ianw


Monday, August 3, 2015

Grandson Projects

  Unless you have grandchildren you will not understand this blog. You will not understand the joy that I feel when my Grandchildren want to build something in the work shop with their Opa.

 Keiran and Clara arrived last weekend for a three day visit, after they checked out their new bunk beds and played with the cats,  K decided that he and I needed to build a "cat castle" on which Jr. Cat could play.


 Kieran, who is six, designed this climbing thing on a piece of paper and then searched out the wood scraps with which to build this thing.

 Yes, it is ugly, and mostly not very square ( I opted not to interrupt the flow of work by constantly squaring up the stock, that involve power tools and all K can do is watch) but...Kieran drove all the screws to hold it together. He also learned about corner brackets and pocket holes. Further, I put 
some of this together with nails so that he had to drill pilot holes and then drive the nails with his condo hammer. 

Condo Hammer - Woodworking

  Our Grandchildren don't come here that often so there is not much continuity in Kieran's workshop education.  He began his workshop life helping Opa clean up, a job that his four year old sister has since taken over. We have worked on plenty of projects over the last two years and each time I try and introduce a new thing while re-enforcing known skills. It is pretty tough since a little kid wants thing to happen immediately. K is just now beginning to accept that glue takes time to set.  His initial solution was to tell me to use tape instead of glue.

 Now projects have a plan drawn, he is getting better at that and this time he talked about looking down from the top and from the side on the plan he drew. And he is getting so that he can swing a hammer, that is difficult because he hasn't do much to give him hand strength.

 On the next day we undertook another project. He said he would rather work in the shop than go bike riding since he could bike ride at home but there was no shop in which he could work. The second project was interesting for two reasons.  First he decided that it should be painted, usually paint is too slow and our projects go unfinished.

the green section is cargo bay doors that open!
 The bay doors were painted with a small roller, he then decided that he would go back to a brush, and like so many kids he likes black paint. 

 The second important part of this project was the cargo that he made.


 These are the missiles that are carried in the bottle rocket. K has carefully labelled them C for cruise, R for regular and the ones with wings are LR long range. What makes these little sticks of wood a break through is he cut them all from longer pieces by him self.

 We marked the length of the pieces with a tape measure and a square then we clamped the wood to the bench and he cut the pieces. I have been trying to figure out how to enable a small boy to cut wood and I finally figured out the solution.

Bacho 10-inch x 15-16 Point Reversible Dovetail Saw 010621560
Dovetail Saw


  This small saw and small pieces of wood meant that K was able to cut his own pieces of wood, then he drilled pilot holes for the cross pieces and we glued and nailed them together. 

 I know that this was a maudlin sort of blog entry for some, but nothing matches the joy and satisfaction of working in the shop with my Grandchildren. It brings back memories of the way I worked in my Opa's workshop with him, along time ago. 

cheers Ian (Opa)


Monday, January 27, 2014

Sunny Nook in the front of the house


view facing  north east from the hallway

view facing north west from our galley kitchen


  At the front of our house is an alcove that is famously called a "breakfast nook" on the blue print.  We don't breakfast there but we have made it into a nice little spot that gets a remarkable amount of sun even though it faces north. When I set out to write this blog I was going to talk about how it is more practical sometime to break down and buy from an "Ikea" sort of place and then make adjustments to suit your situation then it is to build from scratch.

   We went out last week and bought the Ikea storage units called Expedit. On Saturday we assembled the pieces and slid them into the nook space.


  I know that Expedit is just boxes and I could have made them in the shop but.... not for anything like the cost that Ikea charged, if my time was worth anything. And while I love wood, the clean and cleanable finish of the melamine is not something that I can do in my shop, so for that reason and the fact that we like the clean lines of the Scandinavian style, Expedit works just fine. We feel that it is furniture that blends in, and is sort of invisible rather than standing out to be seen.

  Having assembled the Expedit and installed the accessory boxes I set about making the unit user friendly.  The boxes are 12 inches deep, great for sweaters and socks, not so great for the random  stuff that collects by the computers at the front door of our house.
  
  I decided that I would make a two smaller boxes to fit inside the cloth accessory box.  That what workshops are for, right?

 
  Then I decided that I didn't what to make a wooden box, it would be heavy, so I recycled the card board in which the Ikea unit was shipped.

   Making the cardboard container was like a shop project.  I had to prepare the material by cutting it to size, just like a wood project.  The layout used my standard shop tools, a large layout square, ruler and pencil, instead of a saw I used my shop knives to cut the cardboard to size.  To make the container more rigid  I made it three layers thick by gluing the layers together with Weldbond glue. I've always thought of Weldbond as the ultimate "white glue".  Needless to say the joints had to be taped since there was not enough smooth bearing surface to glue the edges together like I would with wood.


     The 12 x 13 1/2 x 6 inch box that was glued and taped together sits in the bottom on the cloth box, and on top of it sits another cardboard box. ( 12 x 13 x 4 in)
this is the container in the upper left hand of the third photo. 
  The top box has a handle that I knocked off in the shop from scrap wood  using, a band saw, a wood rasp and two different sanders. Since it have the tools I am like to customize things.  You can see in the top of the photo a three peg rack that holds keys; a bit of scrap wood, three short lengths of dowel and a bit of glue, easy peasy. 

   Now there is a place for all that stuff that hovers around the door, you know keys, note books, shopping bags, wallets, phones etc.  Instead of sitting in a heap on a table by the door it is all safely out of sight in a box/drawer.

   What I discovered as I took the photo to show off the space was something very special:


  In that photo are four things of special significance, two are wood and two are art.

  The art first, deep in the corner is an abstract painting by our daughter-in-law, on the other side of the window are the other two small paintings that compliment the painting behind the palm. Hanging on the wall is an art print of a frog, that I gave Eva for an anniversary gift years ago. The frog is very cool and was created by one of our kid's friends from University so there is a personal connection as well as artistic value.

   The wood; that little brown book case was made for my Mother by her father, at least 60 years ago.  It is a sad little bookcase that was clearly hammered together in a basement workshop with no idea that it would still be around so many years later. The other special piece is the bench that is under the window, my father cut the tree down at our cottage from which the bench is made and shaped and sanded the rough lumber with basic tools to make a bench for my front hallway, about three houses ago. The cottage is gone, as is my Father but the bench will last, like the bookcase to one day be in the hallway of on of my grandchildren's houses.  I love wood.

cheers, ianw

Tuesday, March 12, 2013

Square ?


    Once again Chris Schwarz's blog yields information and raised a thought provoking question.  I guess this happens so often because  he is the professional and I am the basement wood butcher.

TS-2_IMG_5695

Years ago ( says Chris Schwarz)  I worked with a professional woodworker who built all his own tools, used the least-expensive machines available and turned out work that was undeniably world class.
He scoffed at buying clamps (he made his own). He invented precision tools when he needed them. And he could make inlay tools from shop garbage.
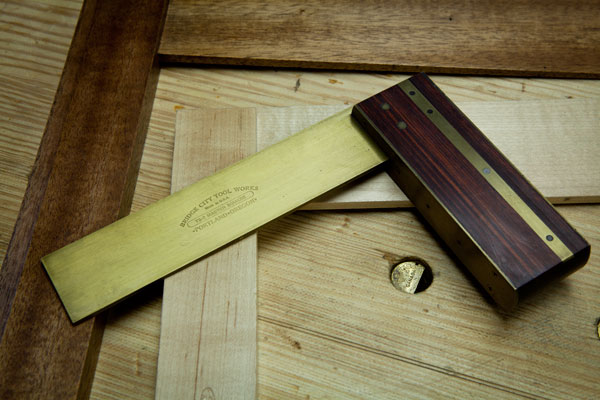
And yet this self-proclaimed cheapskate carried a Bridge City Tool Works TS-2 try square with him everywhere in the shop. It looked nothing like the ones you see on eBay, with their factory boxes and certificates of authenticity. His was almost black from daily use.
One day I worked up the courage to ask him about his try square.  Didn't he think it was at odds with his day-to-day parsimonious philosophy?
“Precision,” he said, “has to start somewhere.”


  The balance of the blog entry in here:  http://www.popularwoodworking.com/woodworking-blogs/chris-schwarz-blog/ts-2-try-square-perfection-made-rare

 It is interesting to see that a couple of other blog authors have written about Squares just recently too.  As we know the square is an instrument used to try and adjust all rectangular corners of buildings and to assist in bringing rude matter in due form.  As we also know, cheap squares, aren't square, and that all squares resent being dropped on the shop floor.  I also learned that occasionally you need to check whether your square is still square, or if it is just close. (see Nov. 24th 2011)


   These are the squares to which I turn when I need to check my 90's and 45's. The small machinist square lives on the drill press, held there by a rare earth magnet.  The slightly larger machinist's square lives on the joiner and the other squares have good safe places to live until they are needed.  The large try square was my Grandfather's and though it is showing its age and experience, it is still dead on square.

    In the shop there are other squares, squares that I know aren't really square but they are close enough for rough cutting with the circular saw.

    When I began my wood working Odyssey I bought a cheap square from a big box store, being honest, it was as accurate as I was and it was some years before I got good enough that I could tell the difference.   However, I may become more accurate sooner if the square was more accurate, we'll never know.

   A piece of advice for a beginner, as with Mr. Schwarz, I suggest you get quality measuring tools and take care of them.  You will only have to do that once in your life.  And when you work you will not have to second guess you measurements, you will be able to concentrate on your technique.


Thursday, November 24, 2011

failure of an old friend

  Sitting on my chair in our living room is an old friend of at least 30 years. I bought this square as an aid to building a shop/studio in the back yard of my parents home, in the early 80's.  That shop remains my biggest project and probably the one that taught me the most lessons.


  That square has followed me from place to place and been used countless times over the years.  I don't know when it began to go out of square, it has been slowly happening for many years I suspect.  I do not remember it being dropped or twisted or abused and so it must have just slowly twisted a bit at a time until now.......it is not square.  So it is not a square, by just  a little bit, probably not enough that it would be noticed when working with construction grade lumber, probably not that far out of square that it would be noticeable on narrow boards.  It is about 1/8 inch out at the end of the long side. An eighth in 24 inches isn't much over the first 4 or 5 inches, but it really showed up on 18 inch shelves.


   Now it is apparent why the last set of book cases posed challenges that I did not expect. I was working carefully, but with an un-square, square. 


   When was the last time that you checked your square to see if it is right on 90 degrees? 


   The happy ending to the story, has evening I got my center punch, hammer and patience and tuned the square.  An advantage of a steel square, it can be trued.