Tuesday, April 28, 2015

Start with the Jointer

  The tool that took my wood working to the next level was my jointer

King, 6in Woodworking Jointer KC-150C

  I bought my jointer to enable me to use rough lumber when I built the crib for my Grand children almost six years ago.


    Popular Woodworking Magazine just ran a short essay on the jointer which reflects much of my thinking, it is nice to have your ideas supported.

  The on-line course that is being offered by Popular Woodworking Magazine is an interesting concept and one that I may explore one day.  At this time I have lots of woodworking books and magazines filled with good information and haven't felt the need to add on-line education, but I am sure there are younger woodworkers that are totally comfortable with the idea.

  I would agree with the essay buy a jointer first, then buy a planner.  It is really nice to have both.

ianw

Sunday, April 26, 2015

Lipstick on a Sow - What a bit of paint can do.


 I made the stack and bundle box from left over plywood, some of the plywood was construction grade and some had been wet. Since I am cheap and never know when  I will have use for a bit of wood I kept some of the plywood piled in my basement for 5 or so years. Keeping materials around can take up space but it can also save money.  The only thing to remember that it is tough to make a pretty project with mismatched and left over materials. My results are usually practical but not very pretty.
   
 The box is a perfect example of this situation, unfinished the box was rough and fairly ugly.  Clearly it was not going to look good stained either so I painted the stack and bundle box solid grey.  The paint was decent quality but a bit dull, I  decided to add red stripes, a little flair and style just for fun. The reason for the colour scheme?  I had a quart of red and of grey paint on my shelf.


  I put down a couple of coats of grey and then masked off the stripes with painter's tape.


  Usually when I use paint aesthetics have less to do with my decision than practically or weather proofing. So I don't really care what colour the paint is as much as whether is good quality.

  A long time ago I started checking out the Opps paints at big box stores.There are often things that got tinted wrong, or that someone didn't like and returned, but as you can see I got perfectly usable grey paint for $3.00/litre, the red was about the same price. For this type of job the paint is the 'lipstick on the sow'. The bundle box is still a sow made from mixed left over wood, but with a good paint job it is a prettier sow.

  If you collect newspaper for recycling or composting or what ever I recommend this project as a space and time saver.

cheers, ianw


Thursday, April 23, 2015

Earth Day Project

  The other day I was looking around our wood shop at the Ancaster Senior Achievement Centre and found an older book of projects.

  The book was published in 1983 but it still had some fun ideas and the one that caught my eye was:


   We collect newspaper and recycle it at our church as a fund raising programme so there is always a pile of papers collecting in our laundry room.  Mostly a disorganized pile of papers.  It is just a cool coincidence that the plan surfaced in time for Earth Day.


 To fit with the Earth Day theme I made my Stack and Bundle Box from left over materials.  I dug around in my shop and found a collection of small pieces of plywood to make a version of this project. Since the wood was left overs I made  a stylistic decision to stagger the sides since I  didn't want to cut things to the short side length.


   I decided that I didn't want my box to be as tall as in the plan, we don't want that much paper laying around.

   Since this is all square corners it is a natural as a circular saw project. I cut the pieces with my circular saw and a straight edge. I have used my 48-inch Empire Bubble Stick ruler for years. I realize that it is not high precision but it is rugged, forgiving and has helped me break down 100's of pieces of sheet stock over the years.

  I think that woodworkers are Earth Day people everyday.

cheers, ianw


Tuesday, April 21, 2015

Pussy willow, table leg project

This blog begins about 45 years ago. My little brother brought a Pussywillow bough home from school and my Mother stick it in the ground in a swampy part of our back yard.


  It grew into a tree, a tall tree with a thick trunk.  Last summer my brother and I cut the tree down, most of it anyway.  The large trunk that remained was nearly 2 1/2 feet in diameter and 10 feet tall. The final coup de grace had to be dealt by a man with a chain saw it was too big for us and too close to the garden shed. 

  Once the tree was cut down and chopped up  we saved a few pieces of the trunk and thicker branches for 'old times sake', I suppose before hauling the rest away. My Mother's city grinds and mulches leaves, branches and other collected natural stuff. Most the the tree was mulched.  I kept a couple of pieces thinking that I would turn them on the lathe one day, I've never turned Pussy Willow, I'll try anything once.

 The other thing that I did with a hunk of the tree was:


make a central pillar for a small glass table top that sits on my Mother's deck.

  Initially I had a great idea for holding the stump so that I could saw the ends off straight.  I planned to put the stump into a heavy plastic milk crate, tie it firmly to the crate and screw the crate to my bench.  The problem....the stump is too big to fit into the crate. I ended up using a collection of straps and clamps to hold the piece of wood secure enough (just enough) to be able to saw the one end off, more or less square.  I'm not sharing the picture of the process because I don't want to ever see it again.  I didn't get hurt, and the stump was more square when I was done than when I began.  I put that in the: any landing you can walk away from is a good landing category. 

  The table top is a round piece of glass and so I had hoped to set the cross arms into the top of the stump.  Holding the stump was of course the problem with that plan too.  Had I been able to firmly hold and stabilize the stump it would have been easy to  cut a couple of dados for the cross arms. But as my Father used to say 'if the dog hadn't stopped to take a leak it would have caught the rabbit'  The cross arms and legs are elm and shouldn't distract from the over all look of the table too much.

   This was a funny job, cutting the top flattish was a bit of a slog and I didn't really get a great result but I have lots of tools and this time I turned to my 4 1/2 angle grinder to fine tune the top.

Milwaukee 4-1/2-inch Small Angle Grinder 6130-33

  There is an abrasive for every job and 3 or 4 times a year I reach for my wee grinder and make a heck of a mess.  I am always pleased at just how much havoc I can reek with such a small tool. This is were I turn when my belt sander's belt is just not aggressive enough. I don't pretend that I am sanding when I use this tool, I am grinding and want wood, or rust or stone to get out of my way.

  I plan to take the table leg to my Mom this weekend.  It is another of those shop projects that are meaningless to all but a select few that are on the inside.  I like projects like that. 

  A while ago I showed you Clara's step stool. She got it on the weekend, likes it and had me explain how I got her name into the wood. She is only 3 12 so didn't think she totally understand, next time she is here I'll show her how I carved her name into the stool. 


Time to relax at the end of a busy day.

cheers, ianw


weeping pussy willow, so cool.


Saturday, April 18, 2015

Circular Saw Technique, Not for the Faint Hearted

  It is a wonderful spring day, that means yard work, cleaning out the garage, tuning up our bicycles and getting my motorcycle on the road.   Those jobs take me out of my shop but I don't mind,it seems as though it has been forever since I was able to work in the garage without wearing gloves.

  While I was drinking my coffee I went looking for something to share with you from the 'net'.  Mr. Jimmy DiResta has many videos and he seems able to do anything. Regularly he welds and works with wood but he also has a video with him sewing a tool bag. I'm impressed.  Today's video is him using a circular saw, in a slightly unusual way and not one that I would have the nerve to try, but maybe the circumstance was unique.

carving with a circular saw!
always use good tools.
Notice the blade,


   I am thinking it is time for some shelves and some bins in the garage, so I got some planning to do.

cheers, ianw


Thursday, April 16, 2015

Oak Curtain Rod Brackets

  We have a new young cat that likes to climb, anything, and his climbing has been pulling the curtain in our front window down, curtain rod and all.  One solution is to get rid of the cat, the more popular solution was to re-enforce the curtain.

    This little project began with two pieces of 3/4 inch oak,left overs from when I did pocket hole demonstrations at wood shows. 


  I used my Mitre Saw jig to enable me to cut the small pieces of wood safely.


   I drilled with holes using a Forstner bit in my drill press and then cut out the balance of the hole on my band saw. 


  I sanded the brackets to 4oo grit and then gave them a quick coat of spray vanish.


  I really thought of painting the brackets white, but painted wood just doesn't speak to me the way clear coated wood does.  I am also particularly fond of oak.


 I put double sided tape on the bracket and stuck it to the window frame.  Now the curtain and rod can't be pulled down by the cat.

  Once again this is a small project,but instead of making two square brackets I spend the little bit of extra time adding some shape as well as sanding the wood especially smooth.  For me there is greater satisfaction in over doing these simple things than just doing  "enough". I worked in the 'that's good enough' world, now I can take the time and do "better than good enough", and that is another good reason to have your own shop.

cheers ianw

Monday, April 13, 2015

Wooden Money Clip

How to Make a Wooden Money Clip


  I was looking around for a small project to use up some of the nice bits of wood I have in my scrap box and found the Money Clip at Instructables

 After watching the video I decided to make a clip or two of my own. 

wooden money clips,
top-oak, bottom-poplar
  I followed the video instructions pretty closely, though I cut the slots with my back saw  rather then the band saw. It just seemed like a hand tool sort of day.  The clips have two coats of shellac and one of varnish. I sanded between each coat and so the clips are smooth and inviting to touch.  I plan to make some more clips and burn designs into the wood, that will make each clip individual. 

  On the weekend my grandson and I made an Imperial Star Destroyer, not a model, a toy.  Kieran knows the difference between a model and a toy.


  I am always bragging about 'K' but also I am interested in watching his continued development as a shop guy.  This time Kieran drew the plan and used a ruler to get straight lines, he has learned to use a ruler at school I presume. So the plan was better than before. 

  More importantly he cut the plywood pieces out using a back saw with very limited help from me.  Once he gets a little more comfortable cutting with the back saw he will be able to make things with very little help from a grown up. 

  To put the control tower on we drilled a pilot hole with his 4 volt little drill. For small hands a screw driver with a hex shank drill bit works best I have found. Even my 12 volt drill is too big for 5 year old hands. 

  Kieran was very proud to explain to everyone that he did 'all' the work, Opa only helped him steer the saw.  He also did nearly all the sanding, though he didn't find it very exciting.  Sanding is still done by hand, he doesn't like the noise or sanders, it time he'll get like the rest of us, we hate the noise, love the speed.

 Pretty soon my Granddaughter is going to start looking to work in the shop.  She is already pretty good at sweeping, and that is where apprentices begin  to learn the trade.

cheers, ianw


Friday, April 10, 2015

Kreg, Kreg and a Pocket Hole Project


and the project.

pocket hole lamp
  The lamp is an interesting use of the Kreg jig and check out how he cuts the 30 degree angles for the sides.  The method is so much better than trying to run the board along the fence for the second cut with such a small bearing surface.

 cheers, ianw

Wednesday, April 8, 2015

Child's Step Stool/Bench

  My grand daughter is too short to reach the light switch in her room which was a trial for her all winter. She had to get a big person to turn her over head light on for her and so I decided to fix the issue for her.  Since I am sure she will be tall enough to reach by next winter I made a step stool that will double as a small bench for her room.

  I thought about what I wanted to do for a while. When making something like this you can make a quick easy throw away piece that will end up in the fire place in a year or two or...invest some time and effort and make a notable piece of furniture that you hope will have a long life.

  Before you begin the project I suggest that you have a clear vision, and so know whether it is a throw away or a keeper and use materials appropriate to the task.  I didn't.


  The stool began in my mind as a throw away, after all she will be tall enough that she can reach the light switch shortly. Since this was not to be a long term thing I used some standard grade 2 x 6 and a bit of pine for the side rails.

  As I worked on the stool concurrently with the pant hanger I decided that I should make a nice little stool and if she keeps it fine, and if not that's fine too. You can never know what thing will catch a person's fancy.


  This is how the step stool ended up.  I used my Bosch Colt to plough 3/8 inch dados and I inset aromatic cedar strips and carved her name on her stool. 

  If you compare first and second photos you can see that I also changed the shape of the legs, after the stool was glued together.  Had I planned ahead I would have cut the legs on my band saw, since I didn't plan it was a bit more of a production.

  First I laid out the design and then used my brace and bit to drill 7/8 inch holes in the legs.  There are times when old school tools are a good solution.  This was one such time.

 Then since I couldn't use the band saw to cut away the waste I turned to my rip saw. I clamped the stool solidly to the bench and used muscle power to make the four short cuts.  

  There was lots of sanding and knot filling before I carved the name in place and varnished the stool/bench.


  At this moment all I have on my work bench are repairs from 10,000 Villages but spring is coming ...slowly and I think I need to make a couple of flower boxes and planters. I plan to continue with basic carpentry and...additional bling.  I liked the process of inlaying the cedar and I enjoy wood burning too.

 cheers, ianw

Sunday, April 5, 2015

Easter Sunday 2015


  Today we are expecting friends and family to a wonderful dinner, skilfully prepared by my talented and dedicated wife Eva. Our Easter feast will feature lamb, several home made breads, appetizers following a Swedish theme and two desserts; each more decadent than the other.  This day begins to demonstrate how blessed we are. 

  Eva is in church, singing in the choir and today I am staying home. My back has been bothering me and I want to be on my best form to enjoy the company of our friends and family.  The long sit at church is very hard on my back.

  I am at home making some last minute preparations, listening to music and thinking.  

   We returned from Uppsala Sweden last week.  Uppsala is a very old city and home to the oldest university in Scandinavia, founded in 1477.  
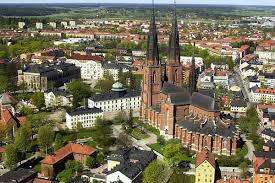
The Cathedral is surrounded by University buildings.
There are other building connected with the university spread though out
the town, including a large teaching hospital.

  One of the buildings we visited was the Museum Gustavianum, which displays some of the University's historic collection of educational materials, as well archaeological findings. 

  The Norse/Scandinavians are an organized and developed culture that has flourished for more than 2,000 years and continues to influence design and culture all over the world.

  When I visit museums and see the everyday objects from house holds now long vanished I can't help but wonder what those ancient people thought and believed.  In what way were their values like ours and in what way different? 

  I have come to believe that they valued "things" and the people that made "things" differently than we do in our modern world. Clearly everyone had fewer things that we do, and so I suspect that they valued their possessions more highly that we do. 
  
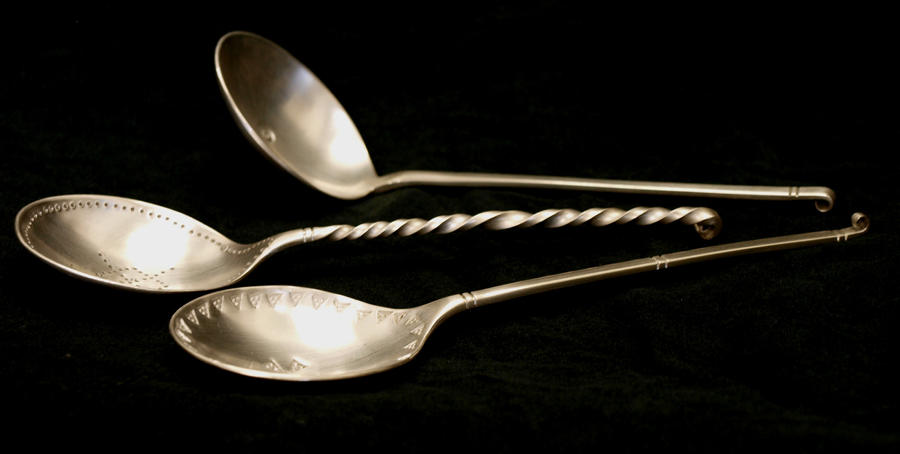
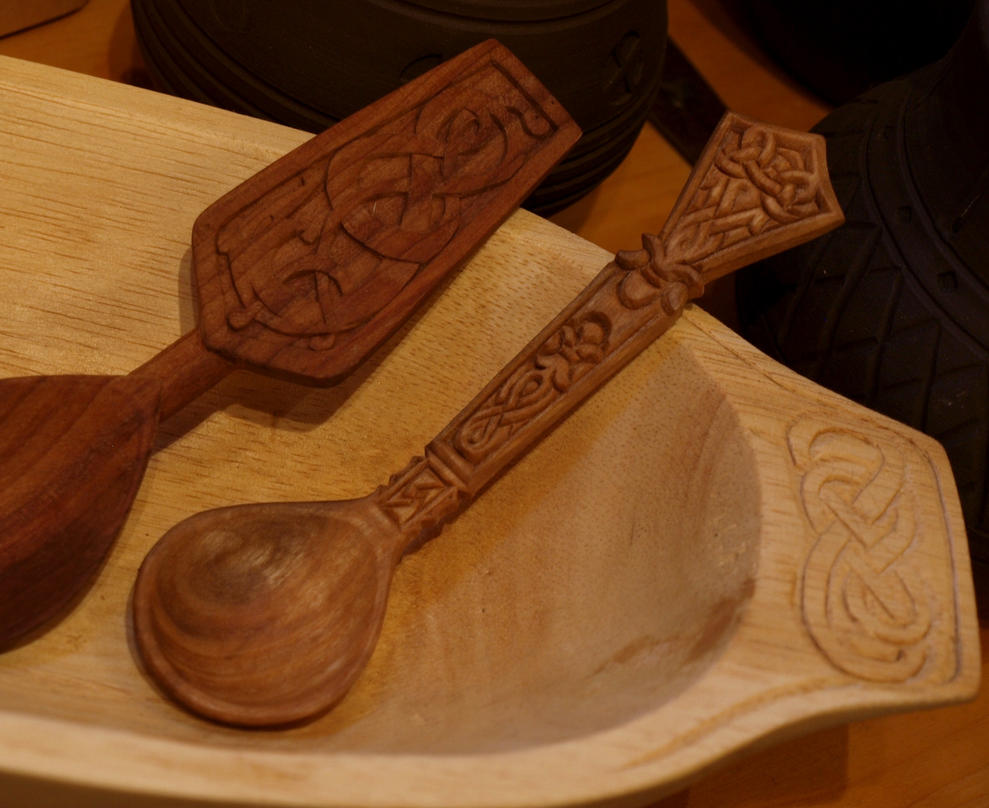
  Museum displays are filled with everyday objects, spoons,knives,pots,plates, leather bags and yes even weapons. When I look at those objects I see nearly all of them are ornamented in some way: shells or stones are inset, wood is carved, everything that could be painted was coloured, clothing is embroidered, or has some type of fancy work added, metal is chased, leather tooled.  All of those things do not add to the utility of an object, but clearly that extra effort was valued and appreciated.


Image result for sami clothing patterns

  The spoons and tunic are modern work, inspired by historic culture.

  It is not reasonable to imagine all the work you do in your shop is 'significant' or going to last generation upon generation.  A good part of the work in do in my shop gets lost in the grass when it falls out a a little boy's pocket, or is out grown as little boy's and girl's interests evolve and change. Some of my most important projects just no longer apply, like cribs and nursing foot stools. Bookcases disappear into the background and toy boxes become so omni present that they are forgotten. 


  Many of the things I do in my shop are repairs. 'Opa Fix' was a commonly heard refrain as the many cars, trucks, planes and boats suffered from day to day wear and tear. A tough loved toy is happier than a neglected toy.


  My most recent project could have been a ten minute job or but I decided differently.  My wife broke the plastic section of a pants hanger and brought me the metal part, as a scavenger I collect all sorts of bits and pieces to use sometime later.

  I could have run a couple of bits of wood through the table saw, drilled four holes and sanded the wood a bit and in no time I could have repaired the hanger.

  The trip to the Gustavianum made me think. Why not treat this small task as though it was not just a throw away, but as something significant?  So I cut the wood, drilled and sanded as usual but then I drew a leaf pattern on the wood, and burned the pattern and water colour painted the leaves as high lights.

  The hanger will not hold pants any better for the ornaments but that is not the reason I added the embellishment. I added the extra because I could, and because it makes a common house hold object beautiful and maybe making common things beautiful will make those things less common.


 I have to attach the video just to show my followers in the south that we are struggling to over come old man Winter even yet.

cheers, Happy Easter,
ianw

Saturday, April 4, 2015

Could be an "Instructables"

  Instructables is a website that features 1,000s of D.I.Y plans and ideas.  There are also many, many videos to support the ideas, which range from fantastic to useful. I subscribe to the site and have tried a number of things and been inspired by many more.

  Today's blog could easily be an "Instructables" post. 


  This project began when I found the broken end of a Bosch Jig Saw  blade while clearing up some shop space. Bosch blades are good, but nothing is indestructible. When I found the bit of blade I thought of the many You Tube videos I've watched of people making knives. So I thought, what the heck.

  I took the piece of jig saw blade, held it with Vise-Grip pliers and shaped it by grinding on my bench grinder. I bought my bench grinder a few years ago and while I only use it a couple of times a year I would be at a loss without it.

  When I replace my current grinder I will buy a low speed version since I nearly always am using the grinder for light duty rather than heavy stock removal.

  When grinding some as small as the jig saw blade it is important to keep water on hand to cool the steel. You can burn and ruin steel very quickly when grinding.

  Once the bevel was shaped with the grinder I made some final adjustment with a file. The next step was to make a handle.  In this case I just cut a kerf in a piece of dowel and slid  the blade into it. Initially I dropped a bit of Super Glue into the blade to help in stay in place while I wrapped the blade end of the dowel tightly with wire. The dowel was pretty small and it is difficult to get wire to stay tight and lay flat.

  Over coming the wire problem is the only innovation to this situation I claim for myself.  I coated the wire and end of the dowel in a liberal layer of plumbers two part epoxy and let it dry. The epoxy is dense and hard and dries stolid workable. Once the epoxy dried I smoothed and rounded it to provide a slightly larger grip as well as secure the blade in place.


  Once the blade was secure in the handle I continued to sharpen it until I got a serviceable pencil sharpening knife from a cast off bit of blade.

  I would make another knife like this if I found another bit of jig saw blade.  Having discovered that I can get a usable little knife blade for my efforts for the next knife I will fuss about the aesthetics a bit more.  

 cheers, ianw

Thursday, April 2, 2015

Desk Shelf from Reclaimed Lumber


    In side the front door of our house is a what was supposed to be a breakfast nook.  We turned it into mini office and storage area. I have a small standing desk with a bulletin board above and storage boxes below. I wanted a bit more space for stuff so thought I would make a small shelf to do below the bulletin board, but I didn't want to drill more holes in the wall.

so this the problem area.

  I follow many blogs and websites relating to wood working and lately a number have been promoting using pallets,(skids in Canada) and other reclaimed lumber.  So this is some rejected wood from a company that rebuilds and reuses wooden pallets. These pieces of wood came out of a bin offering free fire wood in the front of their factory. 

5 pieces more or less the same thickness and not too badly split.

     This is the five pieces of wood after the nails were carefully removed, there were a bunch, and the wood has been jointed and planned.  I often use my belt sander rather than the planner on reclaimed lumber if I am not sure I've cleaned up all the fasteners and bits of metal.


  I don't know what kind of wood I have, it is softwood and looks pretty good once sanded.


  Instead of a shelf to attach to the wall, I made a shelf unit, basically two long boards and two short ones.


   The unit has a bit more thought in it than just four boards. I cut holes into the back of the top board and the back of the legs for room for wires to run.  I also attached rails across the back of the shelves to keep stuff from rolling off the back.

  The end result looks pretty good and makes tonnes more space for my work space.


  This wasn't a very involved project and it certainly could have been done with a few hand tools.  I have a full workshop and so I used tonnes of tools, and I loved it.

  Tools list:
hammer, wrecking bar, nail set, table saw, belt sander, random orbital sander, jointer, and a cordless drill.

 Projects like this only needs a drill, a saw and a few hand tools. 
  
  Hey,when I first started woodworking I was using lumber from skids and packing crates in a shop in my parents back yard. Now I get to pick and choose my lumber, use the best tools I can find, and working with wood still makes me happy.

cheers, ianw