Thursday, August 29, 2013

Walnut Stain- home brewed.


   I have talked about my home made walnut stain before and I am currently using it as part of my most recent project's finish. The amount of colour imparted by one application of the stain is shown in this photo.  The dye (stain) is suspended in water and so I put it on raw wood, and yes, I get a bit of blotching on soft wood.

  Recently I have made a new batch of stain and I will be trying to mix the colour into other mediums, alcohol  and mineral spirits for example.  I am partial to the water based dye (stain) because it is fast drying and easy to clean up.  I am also going to simmer the brown stained goo on a camp stove for a bit to see if the colour can be concentrated more.

walnuts, skin on after soaking for 2 years.
    Lest you forget that home-made can be rough and ready, this is what the stain goo looks like in the container,  trust me, the smell is "earthy", fortunately  the charming smell seems not to linger once the wood is stained.

   When mucking around with stains I like foam disposable brushes.  I am not a throw things out guy, but there is a point where brushes just get too corrupt and you can't be sure you won't pick up colour left on the brush if you use it again.

   I am steadily trying to improve the results of my finishing.  Carpentry is only one part of the equation when you are a wood worker, and usually finishing is the the last part of the equation to receive the dedication that it deserves.


Tuesday, August 27, 2013

A Self Indulgent Blog


   This is Tova Elise Jackson, she is Richard and Jen's 14 week old daughter and my latest grandchild.  Tova's parents live in Sweden and so I will probably only see her once a year for a while.  She is visiting today and so shop things have been put on the back burner. 

   Sweden has a solid tradition of wood craft and tonnes of great You tube  videos to prove it.

Friday, August 23, 2013

High Stool

A very  long time ago I sat on this stool at the dinner table in my Grandparents house once I got too big for a High Chair but not big enough for a "grown ups" chair.  When I was finished with it my brother sat on it.  When my Grand father sold the house and contents and went into a nursing home the stool ended up at my parents house, where my Mother painted it.                                            


    Once it ended up in my house the stool began to live a hard life in my workshop, but there was never any question of getting rid of it.

    Now Kieran is to big for a high chair and not big enough for a "grown up" chair.  It is time to strip the chair and give it the custom paint job that he has requested.  He would like blue with a boat on it, the mouse went nicely with my Mother's cat themed art.

    I always thought that the stool had been purchased for ME.  I discovered that even though my Grama and Grampa thought ( wisely, for old people are all wise aren't we) the sun rose and set on my their golden haired grandson that the stool is actually even old than me.  My Mom says that the stool came from either my Grama's Mom's house or from my Great Father's house, so the stool is easily 60+ years old.

  When I decided to strip the many layers of paint off the stool I turned to my heat gun and scrapping tools of various types.

  The result:


      All the pieces are stripped and ready to be sanded smooth before painting.  I will assemble the stool and then lay on royal blue stray paint.  There were several layers of paint and each of the colours had been laid on thick.  There are many years of wear and tear and a gallon or so of paint trying to cover it up.

    I used my heat gun in the garage with the door open so that the fumes that were coming off the paint was blown away while I worked.   Now a little bit of sanding a and a dab of wood filler and the stool will be as good as new and ready for my children's, children's children to sit on.  I cause you can't guess, that's Why Wood.


Thursday, August 22, 2013

Bench Boxes


  Just recently I was facing a problem that is wonderfully addressed in a blog from Popular Wood Working Magazine.


1kblocks0247
Adjust your work to a comfortable height.

   This blog is dealing with the question of what is the perfect height for a work bench.  I found that my perfect height recently changed and the KREG Klamp table was one solution.

  The bench boxes are also a very good idea and one that I am going to add to my list of things to do in my shop.  A couple of boxes to raise things up should save my back and increase my wood working pleasure.


Tuesday, August 20, 2013

My Version of the Moxon Style Vise

  Readers of this blog know that I love good tools.  I especially love having the right tool for the job.  I was raised hearing my Grandfather and Father say, "it is a poor craftsman that blames his tools".  I try to have quality tools that will not let me down or hinder my work, ( so I only have myself to blame)  but I also have a limited budget and a finite amount of shop space.  The shop space means that I prefer to have speciality tools that get used regularly or tools that a versatile and have multiple applications. 

   Recently I talked about my KREG Klamp Table  and mention how I was considering a Moxon style vise for use while cutting dovetails and other hand saw tasks.

the classic Moxon vise from Bench Craft
    After further consideration, I don't do that much hand work and  a specialised vise would spent plenty of time sitting on a shelf.  There are times when a vise like this would make life easier so I arrived at a compromise solution that I think will work well for the foreseeable future.
    
    I decided to clamp a 12 inch wooden hand screw  clamp to my Klamp Table at one corner and then clamp a supporting board across the table to keep it stable when in use.  Now I have 6 inches of solid vertical clamping.


   If the board is so large that one clamp will not support it alone I can clamp another hand screw to the table with ease and carry on with my work.  

   This is not fashionable, but it is effective and cost effective and doesn't add "stuff" to my shop space.


Sunday, August 18, 2013

From Scrap to Finger Joint Box

   There are a couple of my fellow woodworkers on the net that are making projects from discarded pallets or 2 x 4 lumber.  I think their motivation is eco-friendly and a bit of a backlash against the wood snobs (you know, the snooty folks that only build in old growth walnut...).


   I have seen their work and taken up the challenge. 

 Recently I salvaged about dozen 2 x 10 off cuts ranging in length for 8 - 20 inches from a construction dumpster. The spruce construction lumber is from a local supplier of building materials and I have to say I am impressed with the quality of this wood. In the future I think I will go to this supplier instead of the big box store, even if I just need a few boards. The quality of these 2 x 10 means that I can re-saw them and get workable lumber.

That is a bunch of the boards sitting in the basement waiting inspiration. Needless to say a couple of the boards is a bit cracked and some have a bit of wane but generally good grain and only a few small knots.


This is the result of re-sawing and planing a few of the boards. I re-sawed the boards into nominal 3/4 in thick and then planed them to size. I set those aside for a larger box project.

For the box project I got downright crazy and re-sawed again to 1/4 inch planks. I got four quality planed boards from each 2 x 10. My band saw will not slice 9 1/2 boards, but that was OK since the small box is only 3 1/2 tall.

spruce stud box, 6 x 3 1/2 x 3 1/2


I am fairly happy with the result. There was some tear out when I cut the joints on my table saw. I can't be sure that it wasn't just the nature of the wood, but...the router bit could be getting a little past its prime too.


When it got to be time to finish the box I did something fairly silly. Recently I bought a small tin of wipe on varnish, cheap from a clearance bin, clearly it was past it best before date. The varnish would not dry, so...I scrapped it off and used my old standby, spray on shellac. Actually I am going to keep the varnish, it works as a filler coat just fine.


Wednesday, August 14, 2013

Standing on the Shoulders of Giants

   Once again I turn to Mr. Schwarz for my content, I make no claims to owning this but in this case he is passing on a new trick that he learned while teaching recently.

   Good teachers are always learning, and willing to learn.

edging_jig_IMG_6760


An attempt at a screen shot.
I am getting better with my new computer and the related software.  Next time, even better.

Monday, August 12, 2013

Bench and Back Issues - a resolution


  If you have been following along with the Blog for the last few months you know that I have had a spring and summer filled with frustration and back pain, and frustration caused by back pain too.

   The situation has resolved to where my back hurts most of the time but not too much, unless I spent an extended period of time sitting (riding in the car) or bent over at the waist.(gardening, leaning on my desk, working at my bench  etc.) My computer desk in my office was made into a standing desk over a year ago and now the  lap top that I use away from my desk looks like this:

   Yes, that is a Chromebook on top of a stool, on top of the kitchen island.  That puts the keyboard 47 inches off the floor and means that I stand very erect to type on the computer.  Standing is tiring, but not painful, so this is how it is now.

    In the shop I have a heavy duty rolling work table that I have been using for years. It is a good height for sawing and planing and when I need to do smaller work or carve I would sit on a stool at the work table.

   Sitting is not a good idea any longer and bent over and working is just a recipe for disaster.  The solution was a higher bench top upon which to work.  I have turned my mind to all sorts of solutions, raising this bench on blocks, or building a new top for the bench that is raised.  I even thought of retiring this bench/work table completely. (not a good idea 'cause it has good storage)

   The solution was of course staring me in the face, but I couldn't see the forests for the clutter in the workshop.  I have a KREG Klamping Table:


Kreg KKS2000 Klamp Table w/ Steel Stand Combo

on wheels no less.  Which I have used for several years, and think the world of, but it was too low too.  In a moment of inspired "obviousness" I checked the table and noticed that it was set at its lowest height.  I set in there to have it close to the height of the work table.


   It was just a couple of inches taller than the work table, not enough to make a big difference in the strain on my back......but.....a few minutes with a socket and nut driver and voilà:


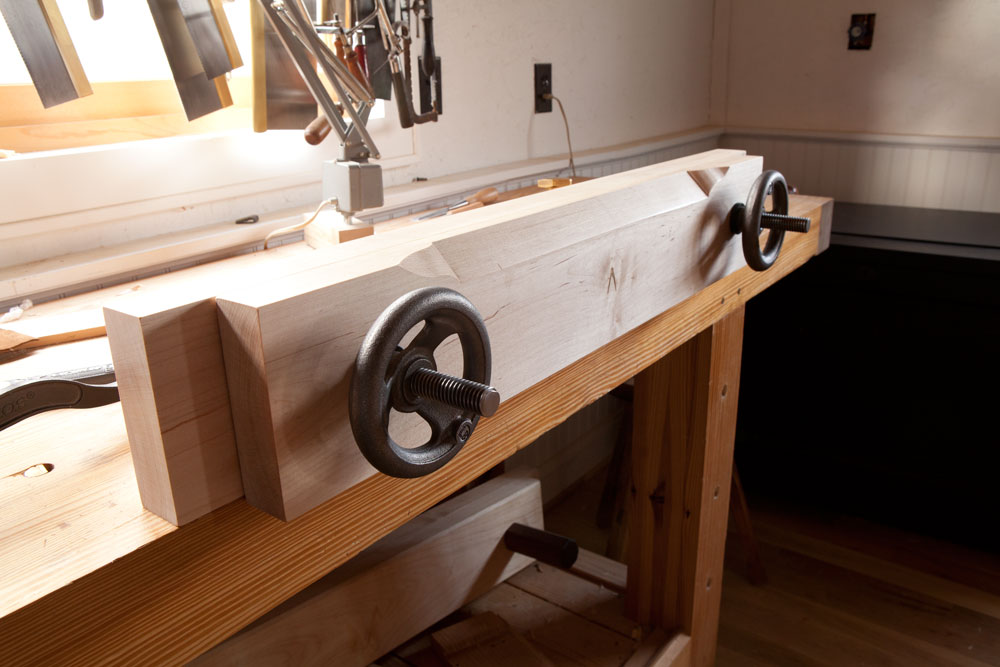
   it is now 7 inches taller than my old work table, a total of 41 inches off the ground and now usable for smaller work and I am planning a Moxon style vise, 

Moxon style bench with high end hardware

   to clamp onto the Kreg Klamp Table to enable me to cut dovetails and other small joints.  That will add an inch or two and now the back stain issues should be "but a happy memory, of a far off time and place" or a least less so than now.

     The solution was at hand all the time and required spending exactly no extra money.


Saturday, August 10, 2013

Wonderful Workshop Helper

   This as another of those Opa videos that just have to be posted.

   Kieran is an excellent sweeper and this time he wanted to learn the names of some of the shop's machines.  He learned about the table saw and the band saw.  That is how I started in my Grampa's shop 50+ years ago.

   We played a game where Grampa said he couldn't find a certain tool and needed me to help him find it.  That way I learned my way around his shop and the name of the tools, while helping him out.

  We had to sweep because we built another bird house together.

   Kieran smearing glue on the barn board before we put it together with Miller Dowels.  This was his first time hammering with a real hammer, and he was pretty good at it too. (not that I am biased in anyway)

   The finished bird house with a proud pair of woodworkers.


Thursday, August 8, 2013

poplar


   My local lumber guy turned me onto poplar four years ago and I have never looked back.

A three candle holder that slides in and reduces its foot print when not in use.

A box with a locking top used to hold cat treats.

     Poplar,  has become a go to wood for me.  I can get it at a good price and in a large assortment of rough cuts, both think and wide. I had a chance at a 2 x 18 by 10 foot board one time.  I just couldn't think of a good use, or how to get it home in my car. Poplar can give good colour though it has a greenish tint that can come through some  stains.
Looking for a tool box?  It will carry other things that pocket hole screws.


Tuesday, August 6, 2013

The Door Gets Its Windows

   I have been writing about this door for at least a year.  To save you from having to check back this is the short version.  We bought a door at the Re-Store, a set of louvres at a second hand store.  I remade the door so that the lower section was louvred and then built a frame for the top to hold 12 window panes made from coloured glass by Eva.


   This is the finished door.  Several of the panes have sea shells embedded into the design.


   This is the pane in the upper right hand corner, the shell is slightly transparent and the effect is quite remarkable, so I think this is my favourite window pane of the whole bunch.

  To hold the panes in place we used some chalking and two very small pieces of trim, one on top and the other on the bottom.  In the trim I drilled two small holes and then drove two nails through the trim into the window frame.  I suspect that disarming a bomb is nerve racking, swinging a hammer near a hand made pane of stained glass is just as nerve racking, (I suspect); the solution, nail sets.  I could not have driven the nails without using the large nail set to get the hammer away from the glass.  The result was 12 window panes installed, no cracks in the glass.

cheers,  Ian W

Saturday, August 3, 2013

Oopps I did it again. cut my finger again that is

   I had a little production line going making 3/8 inch quarter round.  I needed about 30 feet of that stuff to hold the 12 stained glass window panes in the door for our down stairs bathroom.  This door project has been on going for a few months but now the glass is ready and the door and frame painted, all that remained was for me to make a bunch of 1/4 round to hold the panes in place.

   A job like making wee pieces of trim is why I keep off cuts.  I had a pile of 18-36 inch pieces of poplar, 2 inches wide (more or less) and 1/2 inch think.  The process was assembly line perfect.  
First, the planer.
Makita 12 inch Thickness Planer 2012NB

   I make an effort to be careful with the planer so I only plan pieces at least 12 inches long and usually 18 inches and up.  Aside from the safety aspect short pieces suffer from snipe big time.  I planed half a dozen boards and then went to work on the router table and table saw.
JessEm Mast-R-Lift Excel II Router Table 02202
Bosch 10” Portable Worksite Table Saw GTS1031

  First I cut a round over profile on the boards at the router table, at all times showing that whirring blade the total respect that it deserves.   I never let my fingers get close to the blade, never, the router table sort of scares me.

   After cutting the profile I went to the table saw and ripped off a thin piece.


    Then I would go back to the router and cut another profile, and then rip off another thin strip.  

    I was  very careful with the planer, and super careful with the router table and well, I've used a table saw for years.


    Years of experience can just lead to carelessness.  I cut the tip of my left index finger really well trying to get one more thin strip of trim, one too many it seems.  I lost about half of the finger nail and have a serious slice in the ol' digit.  Lots of blood and lots of feeling stupid.  

    This afternoon I  made  a splint to protect the tip from being bumped, which was happening every few minutes.  The splint is a good idea, bumping, not so much.   Another good idea is I put the guard back on the table saw, and it is staying there.  If I can't make the cut with the guard on, I am not making the cut.  I have a router table, a band saw, a jig saw, a circular saw, a reciprocal saw, several hand saws etc. etc.  there will be a way for me to do a job with out getting bitten, again.  This is the worst injury from a table saw and the second in four years, that is a message to smarten up. I guess I was just too obtuse to get the message four years ago.