Saturday, November 23, 2019

A Summing Up Blog

  There is my latest box in it natural habitat.  Its purpose is to reduce clutter in my friend's home and look nice. Mission accomplished, I think.


  This morning's project.  The stars are to soon be painted and festively decorated.  Surprisingly there was some puzzling involved in getting the various boards aligned.  It was one of those times that clamps made life easier.   


  This is a sander/grinder that my grandfather made for my father from bits and pieces and a washing machine motor.  I don't know when this machine was created, its been around as long as I remember.  A few years ago I replaced the plywood disk with a metal one and have used it for a long messy time.  The belt is exposed and something of a hazard.  The other day I was sanding a couple of spoons into shape and nearly caught my fore arm in the belt as I manoeuvred the spoon around.   


 Finally I was modivated  to put that whirling belt behind a guard, having my arm hair removed swiftly and suddenly can be inspiring .  It was a job long overdue.  Next thing to fix is dust collection.  I bought a new RZ dust mask a while ago and love it.  It is the first dust mask that I don't hate to wear that actually fits well enough to do some good.  My lungs are in better shape but the other dust is still an issue.


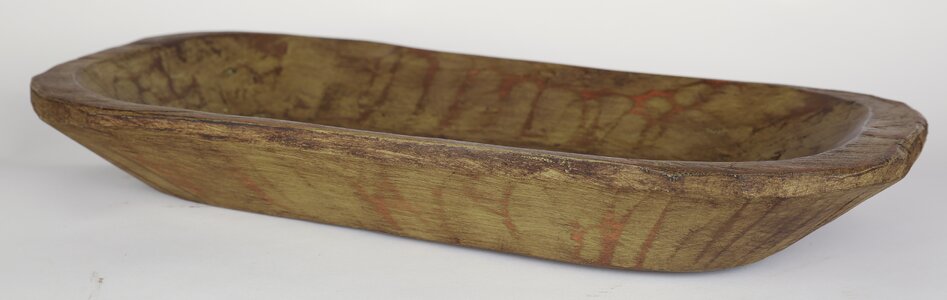
  The last bit of summing up is my rustic bowl.  


  Once I got the inside more or less dug out I flipped it over and used my grinder to shape the ends.  I moved toward power tools from chisels because I found some punky wood and it is easier to sand/grind the wood away that to cut it off.  I was also afraid that using an axe or heavy chisel might break away a larger piece of wood that I wanted.


16 by 8 and 2 inches deep.

  There is the finished bowl getting into the holiday spirit.  If I come  across another log I will do this again, larger would be nicer.

  This is probably a wrap for the season.  December is always filled with family, travel and social gatherings and so I don't undertake much that is noteworthy in the shop before Christmas anymore.  Gone are the frantic last minuted projects of yesteryear.


If time permits I'll share something, it not...Happy Christmas, I hope you, your family and friends have an excellent holiday season and a glorious 2020.

cheers ianw

Related image


Friday, November 15, 2019

Carving a Wooden Bowl.

 This is a project that I had in the back of my mind for a while.  Two years ago I picked up some spruce logs from the side of the road.  The logs were recently cut and oozing sap.  Now after two years under the steps in the garage the wood is nicely dried and ready to be worked.


   Once I scraped the dried bark off I needed a flat surface  for the bowl to sit upon once finished.  I used  the joiner to flatten a small portion by setting the log on the joiner table and making a couple of passes working with the natural shape of the log.

   The next thing  to do was flatten the top side which was pretty uneven after having been split apart.
  

  I set the flat bottom  on the table of my drill press and set the depth stop for the forstner bit to match the thinnest section of the log. Then I the drilled down through the  extra wood until the top was fairly evenly flat.  

   After chipping away any remaining bits around the drilled holes I planed the top of the board enough to make it easy to draw outlines.


  There is plenty of waste wood to be cleared, to  get an even inside shape I set the depth I wanted to go and drilled a bunch of pilot holes.  The centre holes are deepest, the holes on the sides are less so, and the holes on the ends are a little more shallow because I plan to taper the sides of the bowl.  The basic shape is going to be like a pioneer style dough mixing bowl .

Painted Rustic Wooden Dough Decorative Bowl
what I am working toward.

  I have a variety of power tools to clear on the waste wood but so far I have stuck to chisels.  I can rough out what I want without making tones of dust and noise.  A chisel cuts out chips and chunks without making any saw dust. 


  My new  bench set up allows me to clamp this project solidly to one section of the bench while pushing it against the raised work bench which is held on with large C-clamps.  This way the work can withstand heavy chisel work and is at a better height for my back.

  The last glue up with the box.


  Most of this box was glued using lead weights to hold things in place while the glue dried. All that remains is final sanding and a couple coats for spray varnish.

6 x 10 x 3.5 inches

  This is actually a frame in which a drawer sides though from either side.   That way you don't have to reach into the back of the drawer, or pull it all the way out to get to the stuff in the back. The top is maple, the sides and bottom oak and the drawer, exotic mahogany type wood with walnut veneer detail. It wasn't a difficult project, just one that seemed to drift around in the shop while other things took away my attention, you know, things like noses.

  cheers ianw


Friday, November 8, 2019

November 8th 2019 - noses

  I am working on a box and finishing some spoons and working on hand carved noses.


  Last winter our brother in law made snow men from off cut rounds of ash.  We named our snow man Tromso after the city in Norway.


  As you can see he is a noble fellow but...was lacking in the nose department. Et voila.


  He is laying in the shop as his nose dries, also he needs some work on his lower back, to help him hold it together.  The other nose is for his brother Bodo  that lives with my Mother.  I will make the custom installation next week.  By the way, both Bodo and Tromso are interesting cities to visit. Isn't Norway on everyone's bucket list?

 
the natural use for spring clamps

 Yet another box.  This one is made from some sort of exotic pallet wood.  It looks as though it is related to mahogany and will look good with a clear finish.  Under all those clamps are cherry veneer details that I added to the long sides.  Working with pallet wood adds a stage in the work that is not there with new wood.  To get the wood ready I had to do more planing and sanding than with new wood.  Also with reclaimed wood the first step is ' looking for hidden nasties ' .  This time there were no hidden nails or staples, one time there were hidden bits of staple in the material which wrecked some teeth on my fine toothed pull saw. 

  My work style in the shop has slowed down.  Most of my latest projects are hand finished and glue up rather than faster methods, nail, screws, pocket holes, etc and currently the pace and productivity suits me fine.

  cheers ianw
cheers, ian