Friday, February 28, 2014

Bench Top Clamping

  Tom at Tom's Workbench recently wrote a blog featuring the KREG KKS1110 Bench Clamp.

Kreg, KKS1110 Automaxx 3 inch Bench Klamp System 24408

  Tom's post was entitled "Hold it Down" and in that post Tom showed another interesting twist on bench clamping. 

Clamped and ready to go


  He said that he got this idea because he didn't want to cut into the top of his lovely bench. As you can see I do not have a lovely bench, nor do I have any qualms about cutting it's top. 


   My bench's top is 1 1/2 thick plywood and occasionally I sand and fill the rough bits and paint it. Actually it is in pretty good shape currently. I have an less damaged bench for finer wood work but this is the Clydesdale of my wood shop, it does all the heavy lifting.  These are a selection of the various bench top appliances that I have acquired over the years.

Lee Valley Wonder Pup
Lee Valley Bench Blade

hold down made by Daniel Linkenheld 


  Turns out I have an extra plate for my KREG KKS1110, so I think I may follow Tom's example and make a movable clamping point as well.  I would screw it to the bench top if it served my purpose, I can hear the groans of  the bench lovers as I type.  It is not a bad idea to have an extra insert plate or two for custom clamping. 
*Kreg, KBK-IP Insert Klamp Plate 13643
KBK-IP


  I don't abuse my tools, or bench, I just make them work hard.


Wednesday, February 26, 2014

Scrap Wood Bowl


  A couple of blogs ago I showed those photos of construction lumber that is going on the roof of our seniors centre in Ancaster.

  This is what the wood in the right hand photograph turned into:


  The bowl is not flawless, the wood was a bit chippy and so there are a couple of places that are only 95% good, not the 100% for which we all strive.  By the time the finish was applied the bowl is smooth but there are a couple of character marks that are visible.

   I used a dead easy finish on the bowl today.


  I sanded the bowl to 000 steel wool and the put three thick coats of paste wax on the bowl and polished it with a cotton cloth.  I do like waxing on the lathe, all you do is stand there are think smooth thoughts.

   The set up on the lathe was one that I haven't used before.


  This worked well enough that I am planning to keep this additional face plate.  I will put it on my lathe and square it off so that it will spin a little more smoothly the next time I use it.  I picked a backing plate this size, 'cause that is what was available in the scrap box.  I recently dropped off five boxes of off cuts at a friends place where they end up in his fire place. So amazingly I didn't have a tonne of scraps of wood available this time.

   Working on a wood lathe is a seriously messy business but the wood chips are not as big a problem as the very fine dust that the sanding process creates.   
For  this particular project I had a perfect dust collection set up so there was nearly no fine saw dust.


  By laying the business end of my  dust collector on the off side of the bowl I captured nearly all the dust.   That trick will make all my lathe work easier.  I don't mind the big stuff I just wade through it and track it around the house, but I hate getting my nose full of dust. ( I also hate dust masks, my glasses fog up if I wear a dust mask for long).

  The wood has character, and is not too tough to work with, and it is free.  Free is good.

cheers, 


Monday, February 24, 2014

Up Dates on Previous Blogs

I have been working away on a repair/restoration job for 10,000 Villages and here are couple of photos of how the job is going.

  That is one of the panels that needed repair. Not only was it cracked but also out of alignment, you can see how much material I had to sand away to get the two edges level. Sanding naturally removed the original finish, now I had to re-stain the panel as best as I could to get a reasonable match with the surrounding wood.


  You can see the colour match is pretty good although the repair to the crack is still visible. Once I put a couple of coats of shellac and wax the finished repair is going to be OK. I don't know if I had, had endless times and resources  whether  I could have hidden the cracks  completely or not.  To have really made the cabinet look good would have involved  making new panels and the way that the builder had glued and pegged everything together I doubt if I could have got the cabinet apart. Sometimes a job just turns out the way it does.


  This vase has a glass vase inside thereby making it a water proof wooden vase.  I made this vase from the recycled spruce from the senior's centre roof.  Spruce is a distinctive and broad grain but not unattractive, and much to good to be used as fire wood.

  As I was working out today's topics an interesting article showed up in my in box.

" Your First Tool Kit" , I agree with everything that he has included.  That would be a good tool kit to take to a shop that supplied all the standard power tools.  I would add to his list a shop knife,  Robertson screw drivers and a coping saw.


  The last thing to talk about today.

  I made a palette for when I am mixing paints.  The paints that I use on toys and other small projects come in tubes or small bottles. A palette gives me some place to mix and manage the paint I need for the project.  I even got fancy and  put a thumb hole in the palette to make it easy to hang on to.  I made this because I was tired of mixing and fiddling with paint on little scraps of wood or card board.  

Friday, February 21, 2014

Restoration vs. Conservation vs. Repair and Finishing Too, a wood working blog stew


  This is that with which the day began, actually it began with three of these.  The cracks are so wide that I need to fill the gap before I can even begin to think about hiding it somehow.

  The cracks are so irregular that I decided I would soak hemp twine in glue and then i would force the twine into the gap.  I leave the twine to dry for at least 24 hours to make sure it is fully set then I begin trying to fill (hide) the crack.


  You can see the filled gap and the tinted glue. 


I still haven't decided what I am going to do about the big spilt in the top??

   It is a happy coincidence  that these two blogs came up on my computer in the last couple of days.  I like to share things that I find interesting and topical.

   Restoration Vs. Conservation, I am not doing either on this project, this time my work is out and out right repair.  Though I will still be trying to make the finish as best as I can so the repairs are too obvious.

  A Primer Primer  from Tom's Workbench introduced me to a shellac based paint primer. I will be trying that out on my next painted project, like Tom I like painted projects.  


Wednesday, February 19, 2014

Lumber for Free


  Lately I have read several blog where the writers have been on the look out for free wood. Last spring I gathered some 2 x 8 lumber from the framing of a house in our neighbourhood.  I didn't sneak in after the workmen left and help myself to lumber in stacks waiting to be used, I wondered over in the evening and collected a bunch of the off cuts that where in the dumpster.  I picked up a couple of dozen 12 to 14 inch pieces of stud grade spruce.  

  Recently the Ancaster Senior Achievement Centre has been under going a major expansion and the contractors left a big pile of these 2 1/2 inch by 6 1/2 by mixed lengths up to 24 inches, pieces of quality spruce in our wood working shop.


I cut the profile off with my band saw and then cleaned it up with my jointer.


   The quality of the lumber is pretty good. It is being used for the roof of the extension and so it is sort of "tongues in grooves", and it appears to be bolted together since some of the pieces have pre-drilled holes.  I brought a half dozen of the pieces home to work on in my shop and found them pretty good.


  Some of the pieces were really just fire wood by the time I got the checking cut off the end and worked around the bolt holes, but I got some nice pieces none the less. On the left you can see 5 half inch pieces and all but one is clear.  I will make those pieces into a small box and the piece of the left is a glue up that I am going to make into a shallow bowl or tray, I haven't decided yet.

  Initially the pieces I brought home looked as though there would be more usable wood than it turned out.  However, the price was right and with care during prep and finish this wood will make some nice little projects.  Saving money is good and not wasting money is better.  If we didn't use the wood that was left from the roof it would have ended up in land fill somewhere. 

   Even the stuff too rough to use in the carpentry shop will end up in my chums fire place. Waste not: Want not.


Monday, February 17, 2014

Dremel Flexible tool shaft


  Last week I bought another Dremel tool and this time I also bought the compatible flex shaft.

  I have had a Dremel rotary tool for a long time.  So long in fact that it is single speed and doesn't fit any of the fancy new accessories.  Even though the Dremel is an early era tool it has still been useful and well used.  I have used it most often to cut screws and threaded stock for making custom bolts. The high speed cutting disks are fragile but when used with care make a much nicer cut than a hacksaw, and are less work.  I fully expect to keep that old tool on hand for rough and ready jobs while I use my new variable speed tool for fine work and carving.


  Once I had the flex shaft attached to the rotary tool I decided to make a rack from which to hang it.  This way I can use the flex-shaft almost like using a pen.  With a very fine engraving tip I can do much finer work than I was ever able to to with the old style tool. The rack takes one clamp to attach to my work bench, so it is quick to set up and to move around.

  This Model of Dremel has variable speeds and I find that a boon to my carving.  At full speed the tool cuts just to fast for me to keep under control all the time.  When carving the occasional  opps is a big problem. I like being able to reduce the speed/cutting and take extra time to get the fine carving done.  


Wednesday, February 12, 2014

Full On Cabinet Repair


  Last entry was the door to this cabinet.  Now I have the rest of the cabinet home to work on. The drawers are bullet proof, thick heavy wood dovetailed together. The body of the cabinet is a frame filled with raised panels. Sadly the panels are glued and pinned solid, hence, cracked.  If there was ever an endorsement for floating panels, this is it.


This cabinet from 10,000 Villages has not been able to adjust to the huge difference in humidity between it's place of origin, Malaysia and place of sale, Ontario.


cracks on left side, both panels.

the other side only has one panel that is cracked.
 As you can see the cracks go right through and the panel has pulled apart by several millimetres. Like the door these are not just 'cracks', but monster cracks/holes.


 I need to work on the top of the piece too. I just haven't decided what I am going to do.  I know that I can not hope to hide the crack, but I can't really think of how to make a virtue out of this reality.  

 The design of the piece is nice and the wood has great character, it just didn't make the trip without real suffering.


c1_1404_PWM_Cover.indd


    As the Mr. Huey said, it is a bit self serving, but the points he makes are good.


*Freud 7-Piece Forstner Bit Set FB-107


Tuesday, February 11, 2014

Repairs Required, drill bits needed.


  I returned from a day with the Grandchildren with a small bag of wooden toys needing repair. The helicopter's prop assembly got broken, probably not a crash landing since Kieran is pretty careful with his toys. The boats needed dry dock time; you know the standard peeling paint and loose fittings all busy working boats require.  Secretly I am hoping that he will learn that maintenance and taking care is an important part of ownership.

   I have no doubt that the repairs could have been done by his parents but the division of labour has worked out that wood is my responsibility and baking falls mostly to Oma. (These are two areas in which we revel.)

  I was able to fix all the problems in a very short time,
  
  The only woodworking task was the helicopter where I had to make a small piece and drill a couple of fine holes. Everything else is paint.


Gray Tools 29-pc Cobalt High Speed Steel Drill Bit Set
Gray Tools 29-pr bit set

     I have a full set of drill bits similar to this that I have used for years, and my Father for a few years before me, and I think the set came from my Grandfathers shop even before that.  No, I don't expect that any of the original drill bits exist but the holder for the bits does, and I keep it filled all the time.  

   Having bits of various sizes in important for doing repair work.  When you begin a job from scratch you can match drill bits and fasteners, when you are making a repair to something you often have to accommodate existing fasteners, (which are sometimes metric or just odd).  I've found having all of the imperial sizes available means I have all my bases covered, there is always an imperial size close enough for wood working purposes.

10 Pc Diamond Needle File Set
diamond grit needle files

  Another tool that comes in handy when doing repairs is a needle file.  Files like this can be used to make a fine adjustment to wood, patching compound, or to clear away hardened glue.  I repair wood products for 10,000 Villages and regularly use needle files to clear away glue and wood filler before I can make the necessary repair to save a piece from being nothing but fire wood. 


     If you look closely you can see a crack in this panel that I just finished repairing. The panel was cracked through and wide enough that you could see through.  I had to first stuff the crack with jute twine and glue to close the gap enough that I could begin to fill with gab with wood filler.
Weldbond Adhesive (8 fl. oz. bottle)

  I made a paste of Weldbond, water paint and saw dust and used it as a filler paste to complete the repair.  The repair is in no way invisible but.. it will make the cabinet saleable at a discount where before is wasn't saleable at all.  Without being able to take the door panel apart I don't know how I could have made an invisible repair.  Given the degree of damage the fastest and best option would have been to make a new door, but I don't have access to the species of wood used originally and a match would have been impossible.

   cheers, ianw 


Saturday, February 8, 2014

Sliding Lid Box

  Usually I make a prototype of an project that I plan to refine for sale later.  I this case I borrowed an idea from Woodworkingformeremortals.com , thanks Steve.  I think he got the idea from somewhere too.  There is not much new in woodworking projects, boxes have been around for a long time.  

   In this case I figured to make a pencil box. If it turned out perfect I could put it in the shop to sell, if not, I have lots of pencils that could use a new home.

Wooden box isolated on white background. - stock photo


  I was working to the same idea as in the photo but was looking to make something a little more individual. When I was a kid I had a pencil box similar to the one in the photo.
  
love my clamps, Bessey clamps too.


  As you expect I didn't do it exactly the same way as the video, does anyone follow the instruction 100%?

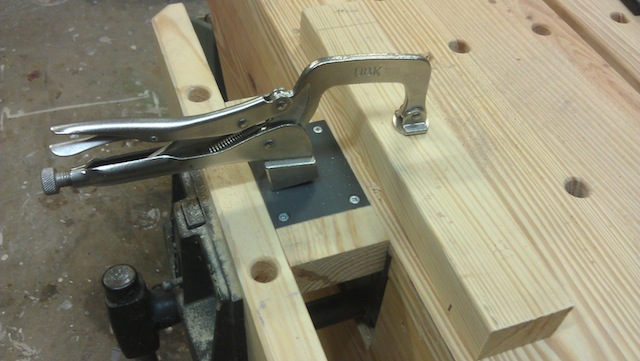
  My old scroll saw ( a new General would be nice) is worn out so I decided to drill out the majority for the box and then clean out the left over material with a chisel.  Sawing the waste material out would certainly be much quicker and more efficient. Next box I will try cutting the inside out with my jig saw.  I made the inner part of the box from soft wood so I glued hardwood sides onto the box. You see it clamped up and drying.

Add caption

The 14 degree dovetail bit made the angle for the sliding lid, using one bit for both cuts means that the fit is exact.  I did find that I had to use a plane to thin the top down just a bit to get it to slide nicely. I felt more confident in taking a whisker of wood off with a plane than resetting the router table and trying again.

  The final result is pretty good.  I would not try and round the ends again, too difficult to get perfect symmetry.  You can also see a couple of glue spots on the side where I didn't clean it up well enough before staining.  That was just because I knew this item wasn't leaving the basement shop any time soon.

   As a prototype I am fairly pleased, it clearly has issues but they are cosmetic so easily fixed next time. .  The advantage of making a test run is that ideas can be tried out and abandoned or modified for future production.  I like using the soft wood for the inside, it is easy to work and easy to sand smooth.  If need be I could prepare a few blanks and cut them out on the scroll saws at the Seniors Centre.  I like the finish and the oak makes a sturdy though thin lid.

   I'll keep you posted when I make another box.