Friday, August 31, 2018

Friday Morning

  The day began with a crash. A large glass vase filled with pine cones crashed to the floor and exploded into about a million transparent shards.  We have been very lucky in the nine years that we've been hosting grandchildren, this morning was the first notable damage.  So before coffee I was picking up the mess and vacuuming up the microscopic bits of glass.

  The cleaning fell to me because Eva was busy.


I know its not wood, but it wants to be.

  This morning Eva is creating a two layer wedding cake that is to look like pieces of birch tree.  The cake is maple flavour and the icing is vegan butter cream and fondant. There is more time involved in decorating the cake than in baking it, including the time in the oven. Pretty much like a shop project.  Building something is much quicker than sanding and finishing it.

  In the shop: 

  The board games are done for the wedding party.  Miranda and William games, with folding legs. 

  What else did I do in the shop in the last couple  of days.  As my back has been giving me trouble the last couple of weeks my shop time is limited to several short stays per day.  One day this week I spent the time sharpening tools.  I have a Work Sharp  system for chisels and narrow plane irons. For knives and gouges I use ceramic stones and the 'scary sharp' system.  I have found that honing with a strop will keep a blade going for a very long time, if you don't let it get too bad.

Image result for leather strop


  I spend a couple of hours this week on house cleaning as well.  I have two tool cupboards that are open.  Without doors the cupboards gradually fill with dust, and all the containers on the shelves fill too.  I took the container boxes and jars down and emptied them out.  While doing this I threw out bunches of short pencils, bits of chalk, string, wire etc. etc. I find that while I am working on a project I do not stop to evaluate weather the small somethings are worth keeping or should be tossed out.   I put the thing back were it came from and leave the deciding to later, sometime later is much later, much much later and the deciding doesn't get done at all. Well, this week I did some deciding.

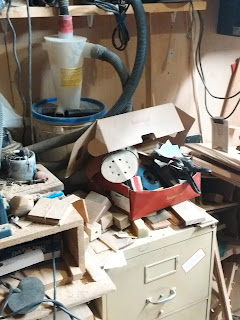
  What follows are graphic photographs of places and spaces in my shop that still require attention. If you are a sensitive soul, avert your eyes.  I am struggling to over come my wood addiction. ( supplemented and augmented by my disorganized nature ).


my small bench has become a dumping ground, again.
 the planes and chisels need a better storage space.

off cuts of plywood, such a mess.

another pile of 'stuff' and a box of
sand paper bits. 

more wood, scraps and off cuts.

In the back ground is the dowel rack in the window, a beginning.
One tool cabinet in on the wall,  I should rebuild it.


  I am working toward making this a better work space.  I now have less time in the shop and so hate to waste that limited time.  Before I could putter around in a mess and not care about lost time, I really hate lost time now.  I guess there is a bright side to back trouble??

  School starts next week.  The kids return home.  Things return to normal, whatever that is.

  Enjoy the final summer weekend folks.
  
cheers, ianw


Monday, August 27, 2018

Day One With A Jig Saw

  I've always said that the jig saw was a versatile  tool for a small shop with limited tools.  The band saw is quicker and maybe more user friendly than the jig saw but space and expense are issue. 

  In my shop today I am making a couple of bean bag boards for Saturday's out door celebration..
Image result for corn hole game diy   I 

  To cut the hole in the board I drilled a hole and then used my Jig Saw to cut the 5 inch hole.  Kieran is here for the week and was helping me in the shop this morning was  first time he saw a jig saw in action. I cut the boards for the party.   

    I showed K how the saw worked and  encouraged him to make some practise cuts to get used to the noise and vibration.  After he got comfortable with the saw,


  he cut out initials.   The 'c' contained his first curved cuts. Since the letters are cut from scrap they needed lots of sanding.  This morning was also his first time working with a random orbital sander.   Those two tools will open up a world of possible projects he can do with limited supervision. 

  Notably, with my grandson using a sander I insisted that he wear a dust mask, he put on his safety glasses without prompting.  I began wood working before woodworkers regularly wore dust masks and safety glasses, so I don't automatically outfit myself in safety gear.  I have no doubt that years of fine wood dust has not done my lungs any good.  I am trying to remember masks, aprons and gloves when I begin work all the time now. I want to be able to work for years to come with my grand children.

  Our current challenge  project is making a sail boat that can be made into a remote controlled unit.
Footy - Bobalong

  These are the plans for a Footy - Bobalong. Footy is the twelve inch class of R.C. boats.  The first challenge we faced was my lack of computer skills, meaning the plans printed about 2 1/2 times too small.  I had  to 'loft' the plans to life size.


  I drew out the plans,  then glued the drawings to foam board and cut out the patterns for the bottom, two sides and deck.

  The compound curves of the little boat are much more complex that I had imaged when we embarked on the project.  Thus far we have the transom glued to the bottom and have experimented with taping the sides to the bottom, with limited success.  This is my first real boat, there are skills unique to this type of project I had not anticipated. 


  I am having serious doubts about successfully attaching the sides.  This may not be a project for a nine year old and a first time builder.

  Lastly I thought I would add a photo of my vise jaws.


   The rubber jaws that were on my vise protected things from being crushed but did not expend above the the jaws.  I have been using the vise to hold my carving projects and decided that wooden jaws would hold the work and protect my edges tools, chisels, draw knives etc. 

  Anyway, there are several projects in the works, a couple drying and who knows what brain wave will happen tomorrow.  As long as my back holds out, life with grandchildren is good.

cheers, ianw


Tuesday, August 21, 2018

Projects for Friend's and Family.

  This week I have been working on my friends kneeling chair.  All that remains is buying the hardware and putting it together.  It is a slow process because we aren't in a hurry and like to drink coffee as much as work.

  Yesterday I dragged my planer, sander and grinder out to the back yard and smoothed out another of the elm rounds that I gathered up a couple of years ago.


approx.  16 inches in diameter.

  My wife is going to use the round as the base for a wedding cake.  I used my electric hand planer to knock down the really high spots and it give me a mostly smooth surface. Stage two was angle grinder with sanding disk.  I used a 40 grit disk to smooth down the ridges that the planer left and trim some of the bark.  To finish  I used my 3 x 21 in belt sander with a 120 grit belt.  My sander is a Craftsman that I have had since I was doing projects in my parent's driveway. ( in the 1970's)  One day the sander with quit but until then, I use it for dramatic material removal, it is effective but not subtle.  
   
    Eva wanted the big crack left alone. The cake is going to have icing to look like birch bark so the wood goes with the theme. Even with all the power I could ask for,  it still took almost an hour of bent-over time to finish smoothing the piece of wood.

  What else have a done?  I finished my latest spoon/spatula.


  This spoon is made from a piece of fire wood I picked up last June while on holiday. The shape is artistic (not so practical) but the wood grain is interesting and the finish is silky smooth. I am developing a real love for spoon making with hand tools.  I can see a collection of artistic spoons in a cool vase as an object d'art that was tactile, not for eye only. 

  I have begun the mate to the above spoon, split from the same piece of firewood.


  Since so much of this spoon is shaped with my hatchet and draw knife all I need is a basic outline of the shape.  As I work the wood, the grain will affect its lines and final shape.  In contrast if I were cutting the spoon out on my band saw I could impose my idea on the wood, of course the spoon would look like it had been made in a factory in China. That's not the look I am going for, need less to say.


  You can see the process a bit in the photograph. I have taken many small bites with the hatchet to form the handle. This is where the grain comes into play. Those feathers want to follow the grain when they peel off.

  Hollowing the bowl is also a tiny bites process. 


  I'm using a narrow gouge and a hooked spoon knife to shape the bowl.  I didn't make my hook knife, I bought it in Sweden from my favourite knife maker, Mora of Sweden. 

  These on going projects have kept me going at about the speed I can manage.  If I spend too much time in my shop I end up with serious back pain again.  I just can't work standing at a bench for more than an hour or two per day anymore.  Lucky this is a hobby and not my livelihood.  Things like spoons and small carvings are good because I can pick them up and work for a few minutes  or half an hour and can stop almost anytime.

  Oh yes, the olive tray.  It's one the bench waiting, again. I will finish it some day. When I do I will share the news with you. (I wanted to say y'all, but I had elementary English class flash backs).

  Cheers, Ianw


Friday, August 17, 2018

An Atypical Week.

  This week there were family things to cause stress and upset schedules but they have been resolved and life returns to what passes for normal.

  I found an interesting You Tube video to share:


   The project is interesting and the quality of the video production is quite high.  I could see trying a project where there was a concrete element to it. I think a patio table might be a natural for a combined effort.

  My  bench is filled with glued up 3/4 oak.  Many of the pieces that I cut out for the kneeling chair are to be 1 1/4 inch thick so we had to rough up, then glue pieces together to get that thickness.  Once the glue is set David and I will square up the boards and plane them to the require thickness. 


  We used nearly every strong clamp in my shop.


  I'm also working away on my pickle tray thing. I have discovered several thing about this project.  I am able to clear wood with a carving gouge quite easily in the dry, dry oak by going cross grain. 

 I have gouges in three sizes and so begin with the smallest chisel which leaves obvious marks but is easiest to use without a mallet. The middle size chisel lets me flatten thing somewhat and the widest chisels can make things pretty smooth as you can see in the photo.  With sharp chisels of the correct size much of this carving task can be done without a mallet.


  The other thing that I've learned from this project is that this is  learner piece.  In the past I've used band saws and grinders and Dremels etc to make thse olive trays. The commitment to  learning hand tools is newly developing thing .  

  Clearly carving this project is slower than using power tools and at least in this case the end product won't be as good as my previous trays.  However this is a sustainable working method.  One can't assume that one will always have a large well equipped power tool shop at hand.


    cheers, ianw
from Eva's Garden


Saturday, August 11, 2018

The Finished Table and What's Next.


   I always like to see my projects installed.  Underneath this three sided black table is a hatch cover to a sump pump, but you would never know it.  For that matter you wouldn't know that this is a funny three legged table.  The client is happy and so am I.
   Now I am onto making a knelling chair for my friend David.  

Image result for make kneeling chair

  David is quite a talented composer who is spending too much time sitting at his computer and hopes this alternative style chair will be a good for his back.  He is helping me make  his chair from a plan that he found on the net.  

 We cut out the pieces from one of the church pews that I got a couple of weeks ago.


  The oak pew sliced up nicely, all that remains is to buy (or make) some large dowelling and various small nuts and bolts. This is one of those projects that will take as long to sand and finish as to build now.

  Speaking of chairs.


 There is another chair from my Mother's house.  I don't remember how long ago my parents bought those chairs,(25-30 years ago) they have lasted well and only required a little bit of attention over all those years.  We are heavy folk and seldom miss a sit down meal so those chairs have lived a hard life.  I love wood and those chairs are a solid example of why. Some glue and clamping and the chair is a sturdy as ever, you can work with wood in a way that is satisfying and special.

  Again I had to take some time out to clean up and put away tools, cutting up the oak pew meant I needed slightly more room to move.  Also I have been seriously reconsidering my wood 'addiction'.  My friend Ron pronounced me a 'wood junkie' several years ago when he encountered my shop in it natural state.  So I have sent myself the goal of cutting up and throwing away at least 10 quarts of wood a week.  My fire place owning friends don't need anymore wood and so I am going to send 10 quarts per week to composting/recycling.  Ten quarts happens to be the size of container I have chosen to fill each week no other reason.  For years I  have kept and used off cuts and left overs.  There are dozens of projects that I have done from the scrap bin, some nicer than others.  I have also kept dozens of little bits to turn on the lathe. (that's never really happened in-spite of my best intentions).  While it is deeply satisfying to make something from nothing but...floundering and tripping over bins and boxes of wood scraps has lost its allure.  Gradually I am going to reduce my addiction and improve my work space. (pictures to follow.)

  Anyway as I was culling some scraps I found two projects that I'd begun a while ago.  I found an olive tray project from an oak barrel stave and a spoon.  Both of these things had been started with my hatchet, and forgotten.  It seemed like a good time to take them in hand.
The olive tray is the last of several I've made over the years.  The first few trays I began by cutting and shaping the staves on my band saw and then using an angle grinder and power sanders to finish. The results were acceptable, the trays were popular gifts.  Oak barrel staves are really nice wood.
  

  I'd switched to hand tools for spoons last summer and this time I decided to work the oak stave with hand tools too. You can see my fabulous hatchet that I bought in Sweden just down the road from the foundry that forged it.  It is a Wetterings #106 and a work of tool art. Their forge is twenty eight kilometres away from my kids house in Sweden I think I need go for a visit the next time I am in Sweden. 

  Scattered about on the bench are chisels, planes, and rasps. The only high quality tools of the bunch are the hatchet and the rasp. The chisels are a mixed bag, some good quality    
( Two Cherries) gauges but others are no name for a wood show.   The hand planes are quite ordinary too.  Most workshop projects don't need tonnes of expensive equipment to complete.


There are speciality vises that will hold none parallel items but for my purposes I get along with an ordinary vise and wedges.  I cut out four wedges with different angles ages ago and when I make one for a particular situation I save if for later use.  

  The other thing I'm working on is another spoon.
basic shape formed with gouges and chisels

  By the time I am finished with scrapers and rasps there will be little need for sand paper.  I like making spoons/spatulas with hand tools, this way there is almost no dust and no noise.  


I will use a draw knife to shape the handle. 

I will share the results later in the week.


Saturday, August 4, 2018

Unusual Project-done and delivered

 Last Friday I had a customer deliver materials for a bedside table that he wanted built.  The  table was for a basement bedroom and was customised for space and to cover an obstacle on the floor. 

  Several years ago I stopped doing 'finished' projects for folks because as often as not the customer decided they didn't like the colour/stain/finish that they had picked out once I had applied it.  Since I am retired and use my shop for my own amusement I can be picky like that now.  

  On this project the customer also bought the  materials I was to use. (no sweat) Since he bought pre-finished sheet stock he knew what he was going to get before the project began.  Pre-finished material does require special handling so that it is not scratched during construction.  I put a large sheet of clean card board down on my bench while I worked.

  I was provided with an excellent drawing out lining the size and design of the table.


  As you can see the table is really a three sided item that fits into a corner.   The thing that made this an interesting and initially challenging project was the material.

  I was provided with two table tops from IKEA.   I pointed out to him when he dropped the tops off that they were hollow which would make for some construction challenges if there wasn't enough wood framing around the edges for me to drive screws into.  
  
  We not only were the table tops hollow, they were not wood, and...there was no framing around the edges to provide me with any place to drive a screw.


  These table tops were cardboard.  The finish is not even veneer, it is printed, miracle product.  Once I got my head around the situation and decided just how I was going to cut the pieces it became a 'glue and clamp' project.  I laid out the three pieces I needed on the two panels.  Since I had no clue with what I was working I marked out and made a test cut.  My fear initially was there would be splintering of the thin veneer, no fear...not veneer. That was also when I discovered that I was dealing with 'corrugated cardboard' with no real structure to it at all.   


  I marked out the three pieces and scored my cut lines deeply with a marking knife. Cutting the materials apart was straight forward with my Japanese Style Plywood Saw,  I wanted a thin kerf  but didn't want to risk my better saws on the plastic miracle product layer.  

  Having cut the pieces out it took three sessions to glue and clamp the pieces together.  Since the entire project was held together with glue I allowed plenty of setting time, usually over night.  Often with Weldbond I only allow a couple of hours drying time and carry on with my project because the bond is okay. This time I left extra  time to be the glue had time to cure.  Before gluing the pieces together I glued 1x2 into the cut edges for support and  because I needed something to screw the French cleat to, so I could attach the open edges to the wall.

  After the three sides were glued together I went back and glued in extra pieces for support.  Adding the pieces into the corners gave me more bearing surface for the glue.  The French cleat was screwed into the 1x2 I added to the cut edge. Incidentally the French Cleat was the customers idea.

  So....how did it turn out?


  My customer is pleased and I think it worked out fine.  It wasn't really a traditional wood working project but where else would someone find the saw or the various clamps to do the assembly?

  Hey, it was fun.  And it is a building material that should be remembered when building some kinds of furniture in the future. The panel is very light for its size and with proper treatment of the edge, sturdy.

cheers, ianw