Showing posts with label squares. Show all posts

Tuesday, July 5, 2016

Moving on with the jewellery box

  I confess that the workshop has not captured my fullest attention these last couple of weeks. Over the long weekend there was family things and riding and other things to distract me.

  Today after a trip to the market, good food, intense heat . I tackled the next step in the box.  I decided that I would make the entire project relying on glue only, no fasteners, not even tiny 23 gauge pin nails. I very carefully trimmed the two sides so they are square and flat. Today I glued the sides to the top.
squares, no clamps.

  I measured everything and then put glue on the sides and used my many squares to hold the sides up and square counting on gravity to hold the pieces in place.  Once the glue set a bit I added two small corner braces.   

  This project is taking a long time for a couple of reasons.  One I am focused more on family stuff right now than on my wood working hobby. And two, this is a project that's plan is not too firmly formed in my mind.  I want a nice box, it should have at least three drawers, one of which will hold various wrist watches and beyond that the details are hazy.  

  As an example of hazy, it was just yesterday that I decided, no fasteners. Many years ago I made a mantle clock with no fasteners, it was kind of cool and a bit of a challenge too.  Having everything rely on glue slows  down the process too.  I am thinking a hollow base with a hidden compartment, for no real good reason expect I haven't made a box with a secret before. The drawers will be 1/4 plywood with a elm face but I haven't decided if the drawers will be divided into sections or not.  The haziness is only possible because I am so familiar with the customer and his quirks.

  We are in drought conditions but hoping for rain on Thursday.  If you aren't a farmer you are probably enjoying the sunshine. I hope you all had a good holiday weekend, both Canadians and their neighbours to the south.

cheers, ian



Wednesday, February 10, 2016

From Rough Lumber To Face frame with KREG

 Legend has it that the KREG pocket hole jig was created when Craig Somerville  was renovating his kitchen and wanted an accurate and easy way to make face frames.

 It is very easy to make perfect face frames with a KREG jig, in fact it is almost fool proof, if you follow the system and make careful preparations. 


  This the completed face frame for the upper section of my new tool cupboard.  The corners are square and strong and it was easy to build with a table saw and a Kreg Jig.

  My frame began as an 8/4 by six inch piece of rough poplar. First I jointed one face and one edge. Then I ripped off three strips that were a fat 3/4 by 2 by 60 inches.

  After I cut off the three pieces I ran them through my planner so they would be smooth and exactly the same thickness.  Then I stood the pieces on edge and put them through the planner so they would be exactly the same width. 

  The next step is to cut the pieces to length. After careful measurement I cut one edge off each board at my mitre saw and checked it for square. I had all ready checked the sides of the boards to see that they were exactly square.

 When you are going to make face frames check the set up of your machines. Make sure the table saw is 90 degrees and make sure your jointer is exactly 90 degrees too.  When you cut the end off your board you now have a perfect end from which to measure. 


  I measured the length for my long sides and cut both pieces at once, that way I wouldn't be out even the width of a pencil line. I did the same thing with the three short pieces too. Now the butt joints will fit perfectly because all the surfaces are 90 degrees and the wood is identical lengths.


  I worked for KREG in Canada for five years. I drilled thousands of holes and made tonnes of butt joints in demonstrations. I still mark where every pocket hole is going to be drilled. I examine the wood, decide which face in out and which face is hidden and then I mark every pocket hole that will be drilled.  Marking the wood reduces the chance of getting the pieces flipped over and the piece being ruined.


  I screwed my jig to a board so that I can clamp it to my bench when in use. You can see I have my shop-vac connected to the jig too. The vacuum clears away the wood chips and makes drilling the hole easier and keeps the bit cooler.  When I have many holes to drill or I want them to be perfect I use a corded drill because the faster drilling speed means smoother holes.

  If your material is not accurately prepared your face frame will not turn out well. The pocket hole screws will pull your joint together tight, and crooked, if your cuts are off by even a little bit.


 I am working on the sections that will be inserted in the frame, actually part of it is drying as I type. You'll see it at the end of the week.

cheers ianw


Tuesday, March 12, 2013

Square ?


    Once again Chris Schwarz's blog yields information and raised a thought provoking question.  I guess this happens so often because  he is the professional and I am the basement wood butcher.

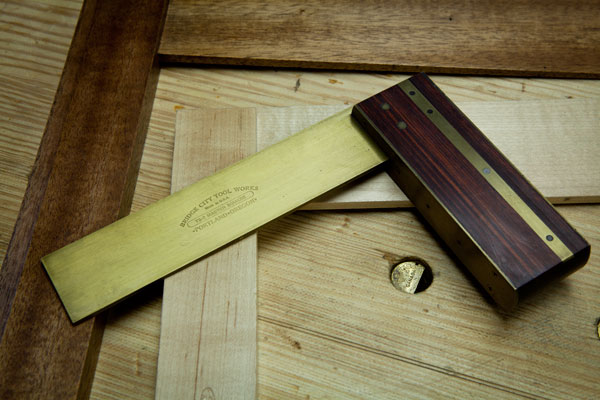
TS-2_IMG_5695

Years ago ( says Chris Schwarz)  I worked with a professional woodworker who built all his own tools, used the least-expensive machines available and turned out work that was undeniably world class.
He scoffed at buying clamps (he made his own). He invented precision tools when he needed them. And he could make inlay tools from shop garbage.
And yet this self-proclaimed cheapskate carried a Bridge City Tool Works TS-2 try square with him everywhere in the shop. It looked nothing like the ones you see on eBay, with their factory boxes and certificates of authenticity. His was almost black from daily use.
One day I worked up the courage to ask him about his try square.  Didn't he think it was at odds with his day-to-day parsimonious philosophy?
“Precision,” he said, “has to start somewhere.”


  The balance of the blog entry in here:  http://www.popularwoodworking.com/woodworking-blogs/chris-schwarz-blog/ts-2-try-square-perfection-made-rare

 It is interesting to see that a couple of other blog authors have written about Squares just recently too.  As we know the square is an instrument used to try and adjust all rectangular corners of buildings and to assist in bringing rude matter in due form.  As we also know, cheap squares, aren't square, and that all squares resent being dropped on the shop floor.  I also learned that occasionally you need to check whether your square is still square, or if it is just close. (see Nov. 24th 2011)


   These are the squares to which I turn when I need to check my 90's and 45's. The small machinist square lives on the drill press, held there by a rare earth magnet.  The slightly larger machinist's square lives on the joiner and the other squares have good safe places to live until they are needed.  The large try square was my Grandfather's and though it is showing its age and experience, it is still dead on square.

    In the shop there are other squares, squares that I know aren't really square but they are close enough for rough cutting with the circular saw.

    When I began my wood working Odyssey I bought a cheap square from a big box store, being honest, it was as accurate as I was and it was some years before I got good enough that I could tell the difference.   However, I may become more accurate sooner if the square was more accurate, we'll never know.

   A piece of advice for a beginner, as with Mr. Schwarz, I suggest you get quality measuring tools and take care of them.  You will only have to do that once in your life.  And when you work you will not have to second guess you measurements, you will be able to concentrate on your technique.


Monday, August 13, 2012

Small Squares

Small Squares


Sizes of the squares, beginning in the upper left hand corner.

a: 4 1/4in. by 3 1/2in.  45 degree parallelogram, a great tool I use often.

b: 3 3/4 in. saddle square from Lee Valley, again a tool that I bought years ago and use regularly.

c: small engineer's square 2 5/8in. by 1 13/16in.  It lives on my drill press for insuring that the table is at right angles to the drill bit.  I learned that lesson the hard way.

d: 3 1/8in. by 5in. engineer's square.  I use it to make sure that the fence on my joiner is square.  It lives with the joiner, that way it is easy to check and so I check often.

e: a pair of dovetail squares, an 8 and a 6 degree that are 4in. by 2 1/2in.  They were a gift from a good friend at this recent box was the first outing for the 8 degree square. It is a nice little tool.

f: 4in. by 2 1/2in. sliding square.  I saved this wee square from death by rust.  I found it in the basement of our old house and it was totally a rusted mess, being a sucker for the underdog I set about cleaning it up and found my effort well served.