Friday, August 29, 2014

Finally the TOOL TOTE

   I have worked away on the workshop tool tote for a while and ended up using a pre-existing box for part it.  I am too cheap to throw out usable materials, recycling is part of my nature. I clamped the upper portion together from four separate pieces of pine and the glued it to the existing box. Cutting the slots in two pieces of wood then gluing the pieces together is quicker and easier than cutting mortises, in my opinion.


Clamped together

  The tool tote, loaded.


    I decided what I would put measuring/layout tools in this small tool box ( 5 1/2 by 11 foot print). I have already used this set up in my shop, I wish I had done this years ago.  Now as I work the squares, pencils, rulers etc. do not end up laying on my bench mixed in with the wood pieces.

  My design has space in the front that is open with a small rail along the edge.  This way as well as tools that are slotted in place there is room for a tape measure and loose pencils. 

  Sharing space with my layout tools is my go-to shop knife, chisel and Dua-Grit rasp. After considerable thought I decided that these were the tools that I reached for most often in the early stages of a project and so they were the ones that got lost amid the pieces of wood or knocked off the bench as I rough cut materials.  Once all the pieces of a project are cut to size this tote will move out of the way and stage two begin.  The only tools from this collection that will be needed at assembly time are the two squares.

on my work table in my shop
  In the Tote I have a Large Combination Square, a Small Adjustable Square and a Stop Rule.  I can now set three dimensions and leave them set during layout. Should I need a fourth set measurement I have a KREG Multi Mark  available though it lives beside my table saw most of the time.  I like to set repeated measurements once and then use that same setting every time, I feel that reduces the chances of small errors creeping into the layout.  It is the same reason that you should use one tape measure for the entire project.

  Another tool I have come to really like for layout are Compasses or Dividers.  They make repeated measurement like laying out lines for slots that need to be routed super easy. 

  Having made a tote for my bathroom gear, and now my layout tools I think it is time for me to make a tool box for my various glues and clamps.  Having the appropriate tools at hand does makes the task go smoothly with less time lost looking for things that have been mislaid.  As I read other blogs I get the impression that for some wood workers the tool belt serves the purpose of a tote.  I won't get involved in construction without a tool belt, but don't like wearing one around the shop, hence the mini tool boxes.

  cheers, ianw  


Wednesday, August 27, 2014

Quarto in a Box

On August 16th  I wrote about making my own Quarto game pieces and today I finished the portable game.


  The pieces are 3/4 square or 3/4 by 1 1/2 inches. The sixteen game pieces fit into the box, with room to spare. I cut the mitred corners on my sliding mitre saw, but this is straight forward enough to cut the corners with a mitre box.


 The entire package is 5 by 5 by 1, a very portable little game.

 Things I learned while making this project.

1. stock dowel doesn't have much visual appeal so I will turn the round pieces from some type of interesting wood like I did with the large set.

2. the thin door skin is chippy. Next time I will use quality plywood for the playing surface.  I may even use a thin slice of solid wood for next time.

3. wood burning the markings onto the game board is the best permanent marking system. 

  There will be a next time, sometime. I like the concept and really like the game. Next time I will make the project from dedicated materials rather than left overs.

cheers,
ianw

Sunday, August 24, 2014

Tool Tote, long awaited. Fooled You..


This is the glue up of my latest tool tote.


  The tote filled with tools.


   Fooled you.  This is a tool tote, but not The tool tote.  As I was working away on my work bench tool tote, I got thinking about the mess on my side of the bathroom counter.

  I seemed to have stuff spread all over the counter top and that just didn't seem necessary.  My solution was to get a piece of 2 by 6 and cut it to 11 inches long, drill some holes and glue a bottom on it.

  Cutting the holes was easy, I used various sized forstner bits. And made the cut out for the talc shaker with the band saw.

  Something I did do extra and would recommend was I put four little dowel feet on the tote to hold it up off the counter. This is in case water gets splashed about, this way the wood will not be sitting in the damp getting nasty.


  It is nice having all that morning gear organized and at hand.

 Have a good day, start with an organized morning.

cheers, ianw


Friday, August 22, 2014

Our Garden, this morning.

a Morning Glory the size of the palm of my hand

Clematis and a tall Yellow flower who will remain anonymous 

Begonias and succulents 

a view of roses and Black Eyed  Susans

 
  We've lived in this house for 6 years and started the gardens from nothing.  I can't even guess how many tonnes of earth, rocks and mulch we have moved in those years.  When I went out to water the garden this morning I was reminded why we did it.

  I do know the name of the flowers, but I can't spell them and Google doesn't have much interest in flowers so it was no help.

   The balance of my day was spent in the work shop and you'll hear about and see the results in the next blog.  Hint, the tote got built and it has a cousin that was designed and created today. 

cheers, Ian W

"If you have a garden and a library, (workshop) you have everything you need.  Marcus Tillius Cicero and Ian W


Wednesday, August 20, 2014

Tuesday was Glue Up Day

  I've been working on a couple of projects lately and since they both required both construction and design they have taken extra time. I am a very slow designer.

  I made a portable Quarto game and then decided that I didn't want to carry it around in a zip lock bag.  I am working on a small box in which the game pieces will fit.


    The glue up is a frame on which the game board is glued.  The quality of glue available now means that if I am patient a project can be solid without any metal fasteners. When I make smaller things I really try to avoid nails and screws if possible.

 While making the 'box' I had a design brain wave (I think) for the method of closure. I am going to use an improvised hinge made from rubber inner tube that is the hinge and the closure device all in one.

second stage glue up with internal stop installed. 


  If my plan works it will be cool.  If it doesn't work, you'll never see it again.  Doctor's bury their mistakes, mine burn in the fireplace.


  The last glue up is the beginnings of my Work Bench Tool Tote, inspired by Jack Houweling.  I really liked Jack's idea but decided to develop my own design, since this tote will hold  layout and measuring tools. In fact I am thinking two totes, one with layout tools and other one holding assembly tools and glue like Jack's. My totes will be small and fit underneath the work table top, if all goes according to plan.

  The next stage is decide the rest of the design. Next blog should will show progress, maybe completion. 

cheers, ianw  

Monday, August 18, 2014

The U.S. Brig Niagara - Wood is Wonderful

Last week the Brig Niagara was in Collingwood Ont.  We'd not gone to Collingwood intending see the ship, the Niagara was just a bonus.

U.S. Brig Niagara

 A tall ship is a special creation, they are often reproductions of great sailing ships from the past, some with steel hulls. Niagara is a wooden tall ship, the best kind, in my opinion.  Not only is Niagara a working ship, and work of art but it is also a piece of Canadian/American history. 

  If you even wondered about an interesting wood working job, think about Ship's Carpenter.  If you google search Ship's Carpenter, there are jobs on cruise ships available, who knew that wood work could take you around the world.

  If you ever wondered whether wood was special, look at a tall ship like the Brig Niagara.

cheers, ianw 


Saturday, August 16, 2014

Quarto - Woodworking for Mere Mortal

  Often I am inspired by something that I've seen on the net.  I have a number of woodworking sites that I regularly visit and recently I went to woodworkingformeremortals.com and watched Steve's video on Making a Quarto Board Game

  Quarto has a couple of positive traits that are not obvious until you play the game.  It is fun, easy to learn and a game is over is just a few minutes. I find it is easier when I can  give a game serious attention for a few minutes rather then for longer periods.  A series of short games seems more social to me.  There is more time for relaxing, drinking coffee and chatting without reducing the quality of game play.


  This is the first set of game pieces I made. The tall pieces are four inches tall and the pieces are over one inch in diameter. As you can see I haven't made a board yet.
  I used spruce for the game pieces, because I had some laying about and I thought the grain pattern would show well when stained.  The cylinders were turned on my lathe using my Easy Wood Tools.  I then stained the dark pieces using Minwax  stain.

  After I made this large set of game pieces I began to wonder about something more portable.


  This set is made from 3/4 inch wood blocks and dowels.  The game board is 5 3/8 inches square and is going to be a great set of travelling game pieces. I decided that I would drill the holes in both ends of the pieces so that none of the game pieces has a top or bottom. It makes setting up the pieces slightly quicker by eliminating errors during set up.

  For both of the set of game pieces a drill press is almost compulsory.  Everything else can be made with the most basic of tools but since the hole in the top is the only feature on the pieces it is best to get it centred, straight and the same depth.

  I am thinking that a small box that had the game board as one side will the next part of this project. I'll keep you posted.

cheers, ianw


Monday, August 11, 2014

Wrapping Up Some Jobs

 During the past couple of weeks I have been dealing with several small jobs all at once. This weekend I got them done.

 First Kieran and his sister came to stay with us for three days and he and I got busy and finished his tool box.


  On his last visit we worked on other projects but on Saturday morning we drilled all the holes and screwed the ends on and nailed the sides on too. This is the collection of tools that fill his box now.  He has a hammer, three pliers, six screw drivers, two different squares, a block plane, black saw (still too big for him), a sanding block and his own cordless drill driver. He just turned five and is pretty good at drilling holes and driving screws.  This was the first time that he had many brads to drive and he also did a pretty good job.  Oddly enough, he doesn't like sanding either, he gets bored. (a typical woodworker).  Usually I hold the drill and he pushes the trigger to drill the holes. This time he was confident enough that he wanted to hold the drill by himself. I don't know who was more proud when he had finished drilling all those holes, by himself, him or me.

  I also spent some time painting, the puppet theatre needs to be ready for next weekend, so it got another  coat of paint and then Eva makes the curtain.


  There is a 3/4 dowel as a handle for moving the theatre about and a 1/4 dowel for the curtain.  The paint is good now, one more coat will make it excellent.

  Spread out on my saw horses are the two rub rails off the Pinzgauer.

You can see the rails in this photo. The rails I sanded and finished with tung oil are clear and will stand out nicely against the typical olive drab paint.

Once the paint was sanded off these birch rails sucked in plenty of tung oil.


  The last job but certainly the one that was most important for world security was the refit of the aircraft carrier. I found a nice piece of Baltic birch plywood and replaced the splintery deck that we'd put on the boat last time.  Rushing the job to keep a five year old happy just meant that it had to be done again.  Have you even noticed how some customers behave like five year old kids, and then are grumpy when the result isn't want they wanted.  I had a painted friend who used to say, you can have it quick, you can have it cheap, or you can have it well done. But you can only have it one way.


  Incidentally Kieran learned it was refit because the hull and the control tower were the same, only the deck was changed.

  My plan is to take a couple of days to work in the yard and to slip away for a couple days bike riding in the warm summer breezes.  It has been an excellent August so far, good for gardens, good for biking and cool enough that we've only turned the air conditioner on one for two days this summer.
  
  When I get back to the shop I am going to look at Jack Houweling's tool caddy plan. I think that he is on to something good.

cheers, ianw


Saturday, August 9, 2014

Garden Project - support for climbing rose

 I knocked off a fast project, once I had a plan in my head on Thursday. We have wonderful gardens upon which my wife spends hours working, and one of the main features of our gardens are roses. At a guess I would say we've got 50 different varieties in our yard and we add a few each season.
 When we first began planting roses we put in 8 or 10 against our east wall and they have done well.  One thing we did was plant a few climbing roses but instead of having them all against the wall and held up with trellises we've moved some away from the wall and they are to be trained on stands.


Two views of the rose stand.  I made it from barn board and cut the top at a 5 degree angle, which spreads the legs out at the base enough.  I interlaced the frame with cord to add places to tie the rose canes.

  We took the stand out and placed in directly over the centre of the rose we wanted to train.

 Once we got the rose tied up you can hardly see the stand. 

  This is another of those jobs that you can do with a few basic tools. I ripped the barn board on my table saw, but a circular saw would have done a good enough job for this project and beyond the saw all you need is a hand drill to pre-drill the wood before holding it together with self tapping screws

  Once the rose gets used to this arrangement it will turn its leaves around and continue to grow up, up, up. Next season it should be a fountain of blossoms.

  Remember: make stuff!

cheers, ianw

this is the inspiration for my stand


Wednesday, August 6, 2014

Puppet Theatre for Clara

  My grand daughter's 3rd birthday is two weeks away and Eva and I are making puppets and a puppet theatre as her gift. This project had to be designed from scratch to suit special criteria.  We wanted the theatre to be portable, hence the handle across the top and it needed built in storage space. 

The front of the theatre,
made from 1/2 inch birch plywood.


The back of the theatre featuring 10
cubby holes to store the puppets.

  When making a project like this using plywood I need two very common but special tools.  First  I use my carpenter's square to determine whether I am working with a 90 degree corner. I've found that when I cut up a sheet of plywood sometimes a corner will get out of square by a couple of degrees.  That error can get multiplied as more pieces are cut. If your square is suspect, here is a video showing what to do. 

  The second tool is a straight edge.  I use my straight edge to check whether I drifted off line when cutting my plywood sheets with my circular saw.  I find that breaking down a large piece of plywood can be tricky without a panel saw.  Even though I use a straight edge as a cutting guide small errors can creep into a long cut none the less. 

  Checking the corners and the edges are true makes for better results down the road. I think that were I a heavy user of sheet stock I would buy a plunge cut saw .

cheers, ianw 


Monday, August 4, 2014

Pinzgauer Woodworking Job?

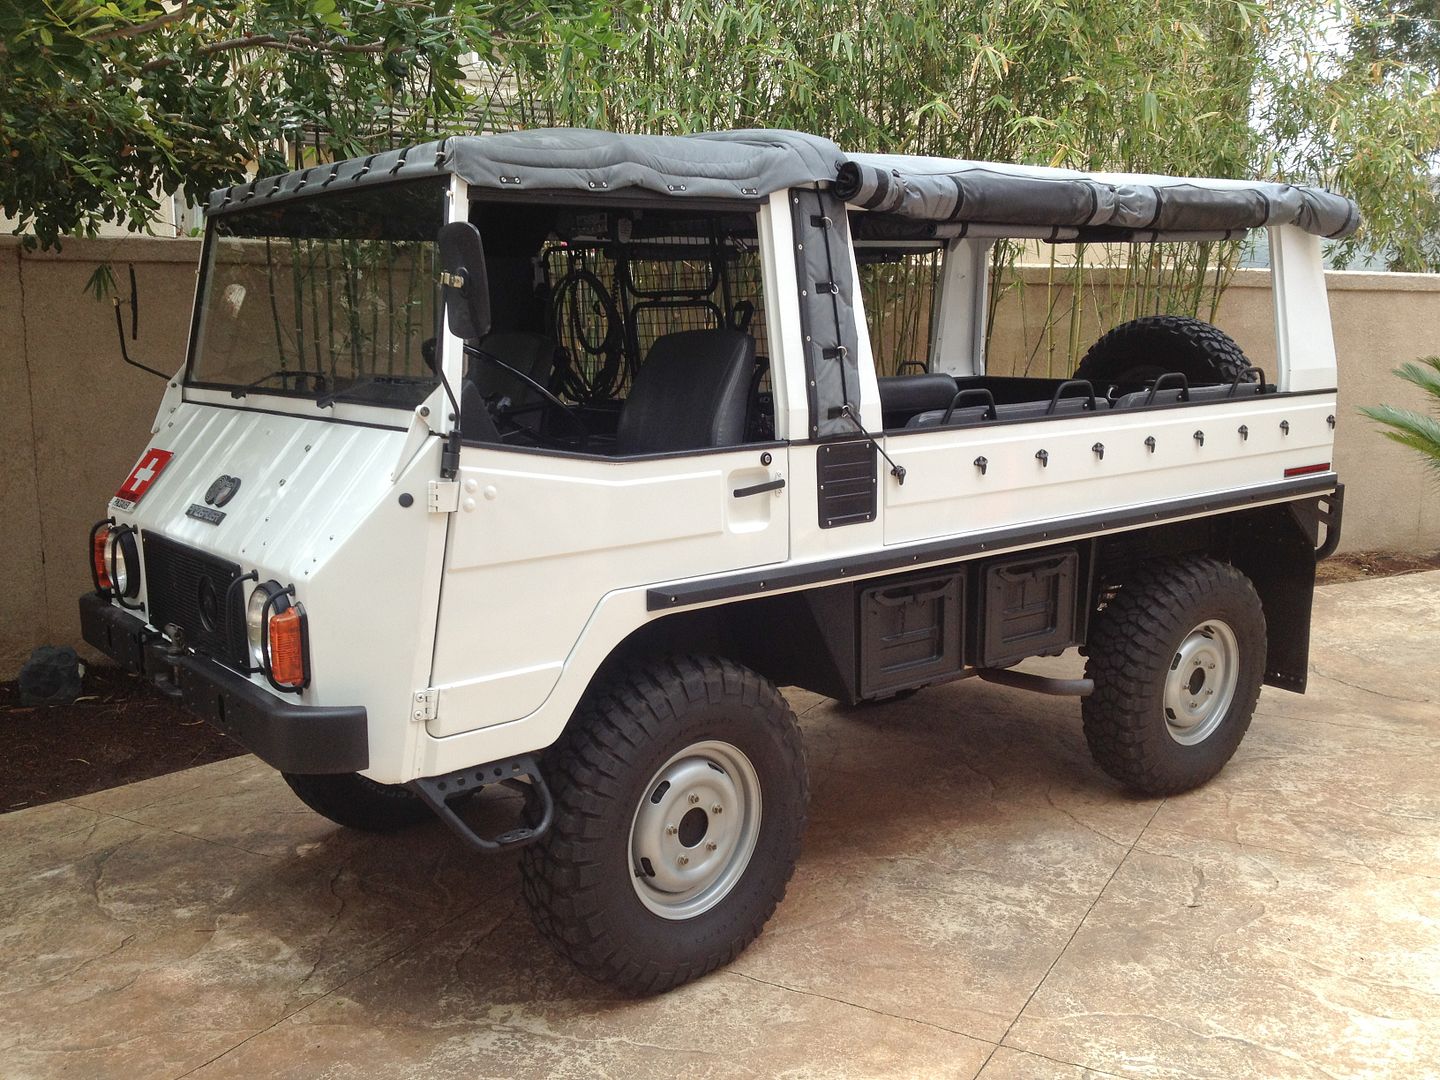
I have a friend that likes to play off road with his jeep and his Pinzgauer


  It seems unlikely that there is any woodworking to be done on a machine like this...In fact there are two 'rub rails' that run down the sides just above the wheels wells.  The rails are made from birch and are about two inches square and 122 inches long.

  At this moment the Rub Rails are on saw horses in my shop.  Yesterday we removed the rails, on which the paint was peeling in one spot and set to work sanding the rest of the paint off. If you are going to try this yourself get a belt sander.  If you plan to do very many jobs like this get a better quality belt sander and work outside.  The paint was on thicker than peanut butter.

  As we worked we discovered why the paint was peeling, it was wet. This is how the wood work gets wet.

   Once the rail dries out completely I will finish sand it and then instead of army green paint the wood will be left to speak for itself finished with Tung Oil.

 I'll keep you posted, the rails are supposed to be re-attached on Friday.
 cheers ian

Saturday, August 2, 2014

Broom ! Broom.

 Occasionally creative work (?) has to stop while maintenance is done. One of my maintenance responsibilities is our two car garage. The garage is home to several bicycles, kids wagons, gardening gear including a wheelbarrow, a freezer, several metres of shelving and a motorcycle.  


all those stones, two yards worth were carried in
buckets from the front of the house. We worked hard and so
did our neighbours. Hidden under the stones is two yards of gravel, ditto.

  Lately we have been working on a big landscaping project which has mobilized all the gardening gear and dragged mud and dust into the garage. Yesterday was the finally day of earth and stone moving and so seemed like a good day to make an effort on the garage. Since the garage is a busy access to the house if it gets too mucked up, the mess gets tracked into the house and unhappiness ensues.

  Cleaning the garage is not a bad job on a nice day.  Late in the season when we put most of the gardening stuff and bicycles out of the way so that we can bring our car in for the winter the garage work is not as nice.( I always leave it 'til it is cold) Yesterday was a good day, the sun was shining and for a change it wasn't too hot. What do you do? Drag most of the stuff out onto the driveway to make room to work (and let the neighbours see what you've got), don't do it on Saturday or someone will stop thinking it is a garage sale, and set to work.

  The first and most important thing for me when doing nearly any job are tunes. Yesterday was Scott Joplin's Greatest Hits of Youtube. Once I get the music right I clear away a flat safe spot for my coffee cup.
without hot beverages,
 there is no civilization.

    Then I am ready to get to work.  I begin by sorting though nearly empty bags and boxes. Our garage is the place were half used bags of potting soil, and fertilizer gather.  Their natural allies are the cardboard boxes that 'we may need one day'.  By the time I was done with the boxes I had a Blue Bin filled with recycle-able material. (a knife like this is the tool for the job). There were several bags of potting soil and an assortment of plastic flower pots that were also amalgamated or discarded.

  Doing that made room for the next stage of the job. I got serious about gathering all the like things together, bungee straps and gardening gloves seem to form into small tribes and hide away in corners from their friends and relatives. By the end of the morning I had herded these two tribes into one place and found 10 pairs of garden/work gloves  (nice gloves) and a 6 quart basket filled with bungee cords of all lengths. This happens because both of us are guilty of not putting things back where they belong when we are done with them, I'm afraid.


 The final act in the drama is the BROOM. Several years ago I bought a couple of good brooms. Not only do they make for smoother and faster commuter flights but they make sweeping the dirt and wood shavings out of the garage easier. A light weight 'sweeping around in the house' broom is just not up to the challenge of the garage or workshop. We also have interlocking stones for our driveway and a frail little 'in door' broom doesn't cut it when there are fallen leaves and light snow to move.

  Another part of the job is to re-stack the lumber that is stored in the garage.  I have a smallish pile of lumber against one wall. Have you ever noticed that the piece of wood you want for the current project is always half way down the pile. Once I retrieve the wood I want, I kind of re-pile things and promise to return soon to do the job properly. I guess soon is a relative term so yesterday I returned to straighten out and re-pile my wood.  

  I knew that the space had not gotten totally out of control because all I needed was a dust pan to gather together the swept up debris.  There have been times when I needed a snow shovel to scoop up the sweepings. I our defence, our garage faces into the prevailing wind and as the sub division's houses have been built bushels of clay and stray bits of building material have blown into our garage for the past six years. I am not Martha Stewart but neither I am Shrek. Since the house are all built, I am hopeful that the only mess to collect our space will be our own.

  In the wood shop I actually have a project that warranted my drawing up a plan and a cutting list.  I am making and Eva is painting a Puppet Theatre for our 3 year old grand daughter.


  Our design is similar to the one in the photograph. The section behind the blue board on ours has 15 cubbyholes to give the troupe of actors a place to live when not employed.

  The pieces are cut out now and since they are mostly Baltic birch I need to thoroughly sand and seal all the edges and faces before they get painted. 

  cheers;