Showing posts with label shooting board. Show all posts

Tuesday, September 11, 2018

Picture Frame

 Working backward, the needle point finished and framed.


  The frame is about 20 inches by 14 inches and 2 inches wide, cedar with two coats of shellac and one of varnish. I cut the mitered corners and used my KREG Klamp Table to glue the frame together.  Once the glue set (over night) I drilled each corner and drove a 1/8 dowel two inches in to reinforce the joint.  The dowel is not invisible.  Once the wood is sanded and finished the tiny spot of contrasting wood is unobtrusive. 


  Making picture frames and small boxes sometimes requires the joining edges to be more refined then they come off the saw so a Shooting Board is the hand tool solution.  Traditionally a shooting board is used with a plane, mine also works as a sanding jig.  The block in the channel is dead square and has sand paper glued to its face.

  Making this frame of soft wood I needed to refine the 45 Degree faces. I didn't have a  fixture for this shooting/sanding board so I improvised, yesterday.

An example using an off cut.

  The head of my combination square gave me the support and angle that I needed to finish sand the angled faces. Today I made a fixture to have on hand next time.

I see I have to make a new board pretty soon,
 this one is getting well used.


there is a dado cut into the
 underside for stability.
  Now I can sand or plane both 90 Degree and 45 Degree ends on this shooting board.


  The jigs in my shop are red (or orange). I see I have to make a new board pretty soon, this one is get well used.

  cheers, ianw


Monday, February 13, 2017

When are Tools more than Just Tools?

  We returned from a very good holiday in Ponta Delgada on the Azores island of Sao Miguel yesterday and this morning I returned to my work shop.  Recently I watched a video by  April Wilkerson talking about her feelings related to moving from her current wood working shop. Aside from the pragmatic aspects of having a shop,  like saving money and the creative control available she talked about personal sanctuary, peace and joy.  

    If we pause to consider our shops and tools fully I think we all have those feelings.  Maybe not all the time, joy is not the feeling I have when struggling with an awkward glue up or when facing hours of hand sanding, but mostly my feelings are positive.

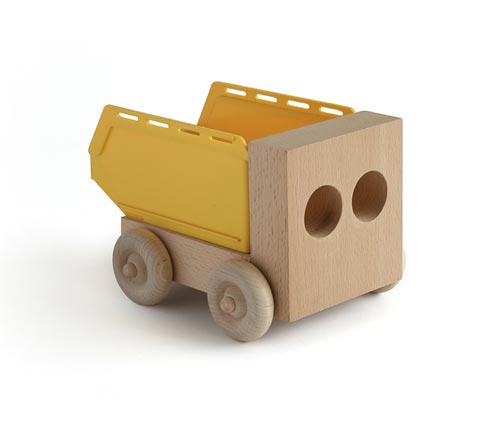
  This morning I was making a couple of little trucks for my Granddaughters in Sweden.  As I was working I realised that I enjoyed our holiday, but I love to be home.  I was aware that I was using tools that were my late father's and grandfathers.  I thought about the really good hand planes that were bought with Christmas gift money from my Mother.  I also looked around the basement at the lovely home my wife and I have made here together, all those feelings: peace, joy and sanctuary were all there.

  Wooden toy trucks is one of the many children's toys I've made over the years. 


Image result for simple wooden toy trucks
I've actually made a few of these.
Go to a clearance store and you can buy the bins for cheap.
  My policy is that all the toys I make are simple, study and meant to be played with until they are fire wood.  And....I don't care if the toys are played to death or forgotten at the play ground, I'll make a replacement if asked.  I don't like to see toys smashed in anger but I hate to see toys  sitting on a shelf in a pristine box,'collected'.

  Today was the first day working without a table saw.  So far....so good.  I was able to break down the boards as needed with my band saw and hand saws. I used my shooting board more this morning that in the last year.  It was actually a quieter more gentle way to work.  I'm not kidding myself, this is small stuff with more sanding than sawing going on.  I'll report later in the week when I get into a heavy duty storage cabinet that I have to build for a stained glass group. (glass is really, really heavy).

  Anyway, I'm off to take care of those 3,275 that that pile up while one is away on holiday, and visit my Mom.

cheers, ianw

Saturday, May 23, 2015

Finished Mini Work Bench

My mini bench clamped to the big bench in my vise. 

  Just about the time I decided it was time to design and build another small work bench I found a piece of a Workmate leaning against a tree awaiting the weekly pick up. The piece of workmate is not real wood but....it does have all of the dog holes pre-drilled and I have a Workmate in the garage so have all the dogs and clamps designed to fit already.

  Construction of my bench involved a 2 x 8 and long screws. While the benches in my last video were used to support hand planing most of the heavy planing in my is done by machine.(you knew I have a hybrid shop). My bench needs to provide support for cross cutting, shooting and edge sanding as well as assembly of small parts. 

Bench hook on the mini bench.

  You can see that the mini bench has two legs beneath it providing support against side ways forces. Holding up the end of the bench hook is a blue box in which I keep the various dogs and clamps to be used on my mini bench.  I made the box to be exactly the correct hight to support the end of my bench hook and shooting board.

  Now I am going to take toy makers bench and my standing bench apart because this latest effort fills my needs better and takes up less space in my shop when not in active use.

  cheers, Ian W


Friday, January 17, 2014

Shooting, Board that is.

  For the most part I work with power tools but occasionally I turn to a hand tools. Usually I use hand tools when there are small parts upon which to be worked.  Many of my kids toys and small boxes are made from pieces too small for me to comfortably hold for cutting on my sliding mitre saw, or to joint or plane with my machines.  Over the course of the last few years I have acquired some fine quality planes and hand saws that make these small jobs safe and enjoyable.

   Recently I bought the shooting sander from Lee Valley and yesterday I got around to making the shooting board to go with the sander.
 
sanding shooting box, orange because I am out of red spray paint.


  Usually the jigs I make for my shop are painted red but orange will achieve the same purpose.  I made the jig from a 1/2 plywood base and a 1/2 platform with trim used for the rail and cross piece. Initially I was a bit sceptical about the effectiveness of the sander and so did not dedicate quality materials to this jig.


  After I assembled the jig and put Minwax Paste Wax on the contact surface I put it to work.  


   Initially I found that if I trimmed the edge with my block plane I could then sand the edge very smooth and square on narrow boards. Smooth usually is also unintentionally rounded, using the shooting board, plane and sander will make it easier to keep the edges straight and square. 

    As with so many tools a shooting sander, and for that matter a shooting plane can be made in your shop but sometimes I am not interested in making tools, just using them.

   Eventually I will remake the shooting board from Baltic birch plywood but for now I am pleased with the result and with what the tool will do.