
Once again I have turned to a real expert, not only in wood working but also a fine and articulate writer to share his ideas with you this time about sanding. He raises another point with which I agree, sanding is not evil and a wood worker that sands is not by definition a poor craftsman.
Mr Schwarz writes:
I’m always bemused by woodworkers who boast that they never use sandpaper.
I usually say something to them such as: “Then I guess you don’t like old-school technology.”
When they look confused, I add: “Egyptians used sandstone to abrade wood flat. Sanding is older technology than planing, which is a Greek or Roman invention.”
As far as I know there hasn’t been a definitive history written about abrasives. And please don’t ask me to write it – I have enough to do on this earth already. So if you need a good idea for a gritty bestseller….
The problem with abrasives is how they are abused in this modern day. Abrasives have almost always been some part of the finishing process, but the key word in that sentence is “part.” Today, most modern shops start with abrasives and end with abrasives. And that’s when they become the lung-clogging, vibrating misery known as power sanding.
So let’s take a close look at a more balanced approach that was practiced in England during the 19th and 20th centuries. It’s explained here by Charles H. Hayward in the book “The ABC of Woodwork.”
“Cleaning up a panel, table top, or whatever it may be is a fairly straightforward job. The smoothing plane cutter is sharpened to as straight an edge as possible, and the plane is set fine with the back iron as close as possible. It is assumed that the wood is already true and requires only to be skimmed to remove marks or tears made by the trying or panel plane. The entire surface is gone over with the grain. In most woods, the tears will come out, though, admittedly, there are difficult woods. So much depends on the plane and the way it is set. The cabinet maker’s smoothing plane has a high pitch in which the action approaches that of scraping rather than cutting, and if this ha the back iron set fine there are only a few woods which cannot be planed. (Remember on this score that the straighter the edge the more closely the back iron can be set.)
“In any case, however, the scraper must foll ow for all hardwoods. It is not only that it will remove any tears that may be left, but it will take out all marks left by the plane. This is a point that is easily overlooked. Then again, in some difficult woods the grain runs in streaks about 1/4 in. or 1/2 in. wide, and it is impossible to plane one with the grain without tearing up those adjoining. The scraper can be bent and used on a comparatively narrow area of the wood.
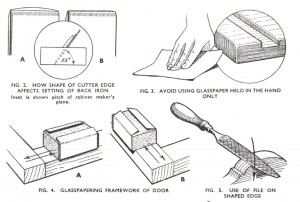
“Glasspapering follows, and a flat rubber (usually of cork) is essential. The purpose of glasspapering is only partly to smooth the surface; it has for its second object that of getting rid of marks left by the scraper. This cannot be done when the glasspaper is merely held in the hand. The pressure is uneven and is not great enough. Furthermore, all sharp edges and corners are liable to be dubbed over, giving a dull, unspirited appearance to the work.”
To summarize: Plane until you cannot improve the surface. Scrape until you cannot improve the surface. Sand until you cannot improve the surface. Finish.
This is the way I’ve worked for many years. I buy a box of #220-grit Abranet every couple years, and that covers all my sanding needs.
And one last detail: Hand sanding is a hand process requiring great skill to execute – especially when it comes to contoured surfaces. So don’t hide your sandpaper when your breeches-wearing hand-tool buddies come over for a beer.
— Christopher Schwarz
If you want to learn a lot more about handplanes, check out my book “Handplane Essentials,” a huge tome on handplane work that encompasses much of my writing on these tools for the last decade. Click here for details.
You can also read many other interesting blog postings by Mr. Schwarz at his blog
to order sand paper on-line: thetoolstore.ca


