Showing posts with label coping saw. Show all posts

Tuesday, September 13, 2022

Gnome Home


  This is one of those silly projects that are inspired by things seen while drifting around the internet.  I saw a post of Gnome Houses as a part of a garden display.  We have a nice garden, which features wonderful flowers,  a large red fish, Captain the lifeboat from Thomas the Tank Engine and Scoop 


of Bob the Builder fame. And some things that were not products of the workshop too.

  Recently I salvaged some wood blown down in a unseasonably strong wind storm.  After filling the back of out car with wood and hauling it to my shop I had to admit I had no plan for the wood. (I just couldn't leave it there to rot).
  
  Anyway a friend with a small chain saw cut some of the pieces for me into basic house shapes and I set out to design and build a home for a tiny fictional character. 

  Believe it or not I had to spend some time imagining what I wanted it to look like when done. 


To get depth of colour behind the window I drilled a hole the size of the window and painted the wood behind it in a dark blue/gray colour. The door and doorstep were added separately  after the house's front was painted several coats of the eye catching pinkish red. Every part of the house is soaked in clear deck sealer so that it can live under a tree in a garden for several seasons without being touched up. (no one likes a home that demands too much ongoing maintenance)   In keeping the the natural style the roofing is cedar shingles. 

  The tool that was most useful in the project that I hardly ever use was a coping saw. The door was shaped on my band saw but its window and that upstairs were cut with a coping saw.  I decided against using a jig saw because I didn't want to drill that large a starting hole and....it was just quicker and easier than getting my scroll saw out and set up.  I really like using the scroll saw but only if I have a larger project that makes it worth the set up time. Hand tools are quieter and often quicker for small tasks, hand tool skills shouldn't be ignored, in my humble opinion.

  Beyond getting the rough shape, all the work on a fun/silly project like this can be done completely using hand tools.

 cheers Ian 

p.s. welcome back to school everyone.  


Friday, April 27, 2018

Organization Box with Limited Tools


  The box and handle have two coats of paint and the next stage is to assemble these two pieces.

  The finishing process is always important but especially important when trying to up cycle wood.  The orange crate is low grade plywood and the wood for the handle has been laying around my shop for a while.  After I pulled the unnecessary staple out of the box I rough sanded the box to get rid of the splintery edges.  The first coat of finish was water based sealer and I really soaked the box well.  After drying over night I gave the whole box  and handle another rough sand with 70 grit paper cutting off the runs and bubbles. Now the wood is sealed and smooth enough to begin painting.  My first coat of paint went on think and heavy, the plan was to fill the cracks and get a solid base laid down.  Again I gave the paint over night to dry, yes I know it will dry in a couple of hours, but I wanted it as dry and hard as it was going to get.  After the paint was dry I really sanded it with 70 grit paper again. The result could be passed off as 'distressed' but it then needs a clear top coat so there is no reduction in total work.     Coat two of the paint is the last coat.  That second coat is put on carefully with an eye to the quality of the final product.  Since I have a smooth and well sealed base upon which to work, the paint looks good and feels smooth.  If you didn't know you wouldn't guess the project began with throw away materials.

   To make the handle I stayed with my target of limited tools.  


  I cut the basic shape with my back saw and instead of rounding the top corners I cut them off at a 45 degree angle and shaped them a little bit with my wood rasp as you can see from the photo above.

  To make the handle hole instead of drilling several large holes with a Forstner bit which a home handy person may not have I drilled four 3/8 inch holes with my cordless drill and connected the dots with a coping saw.  Once it was cut out I used a rasp,file and sand paper to smooth out the edges.  * when drilling with a Forstner bit it is best to use a drill press*

  Next I have compartments to make to hold up various small items.  On my other box I used my band saw, on the box it'll be the hand saw again.

  The tool list to make this project is quite short and can be value conscious.

Drill bit.  Sets can cost a little or a whole bunch.
Rasp, not necessary, use sand paper. from $0.99 a sheet and up.
The paint I used is a $1.00 Opps sample from the Orange Big Box Store.

  If I were going to start from ZERO to outfit a shop I would buy a medium quality Jig Saw , a medium quality cordless drill and drill bit set.  From there my next money could be spent on things like clamps, a block plane, KREG jig etc.  I would add the tools as the projects demanded and pretty soon I would have all the tools a home handy person would need.

cheers, ianw


Saturday, January 20, 2018

The Award for the Best Supporting Craft Material goes to Wood

  My wife is a talented and creative person in the kitchen and glass studio.  Most recently Eva completed a glass sculpture of a cedar ( cedrus) tree.


  As the tree neared completion the question of where and how to mount it came forward.  I had in a back cupboard a piece of walnut that caught my eye in a cut off bin at a wood show, at least five years ago.  Some shops have no extra wood laying about without purpose, my shop has too much wood laying about with no assigned purpose, but sometimes a random piece of wood is just what the doctor ordered.


  To make the sculpture stand on its own I had to set the four glass sections into slots in the wood.  I began by tracing the glass base, each piece was a different length and width. I drilled out sections of the slots and then cut the rest of the slot with a coping saw.  Once the slots were cut I cleaned them up with needle files, rasps and a 1/4 inch chisel.  A coping saw is a good little tool to have in your shop for a job like this.  After the wood work was done I sanded the board to 600 grit and gave it two coats of spray vanish and a coat of wax. 

  A unique piece of glass sculpture reserves an unique base to finish it off.

  
note: measurements in centimetres. 
   The other knock off I am doing while hanging out with our grandchildren this weekend is a puzzle.  There bird cut outs are wood burned and will get a frame  17.5 by 19.5 cm. It is a surprising  challenge to fit all the pieces back into the frame.  My grandson likes to do puzzles. 

  It is great when a wood shop can provide support and entertainment for other people as well as pleasure for me.

cheers, ianw


Monday, February 20, 2017

Wooden Toys for Sweden

I have been working on multiple small tasks in my shop these last few days. I got all the repairs done for 10,000 Villages and will drop them off tomorrow. The job that  I enjoy most is making toys for grand children. 


  Shortly we are headed to Sweden to a while and I am taking some toys with me.  The turtle still needs some colour but the trucks are done.  I left the wooden truck wheels unfinished so thay will be less l likely to mark the floors or tables.  In the past I have painted wheels black, but the paint can come off and leave marks. 

  If you want to make toys and aren't comfortable drawing or designing your own toys the internet is filled with patterns, ideas and videos to get you started.

 When you decide to make toys you will find that the investment in tools is very small. About the only specialized tool you need is a coping saw. Everything else can be done with a few hand tools and sand paper.  

  With my table saw dead I have been exploring other ways of sawing.  I like my band saw, it is quick and for these small projects I have been squaring the ends and edges on my shooting board.  I have also been using my backsaws, I've got a pair, one cross cut , one rip, both saws work great in soft wood.  Kids toys can easily be made from pine, basswood or some other soft wood and so the energy and effort to saw, shape, plane smooth and the toys is really quite small while the rewards are huge.  

 cheers, ianw


Wednesday, April 20, 2016

Making a Pattern

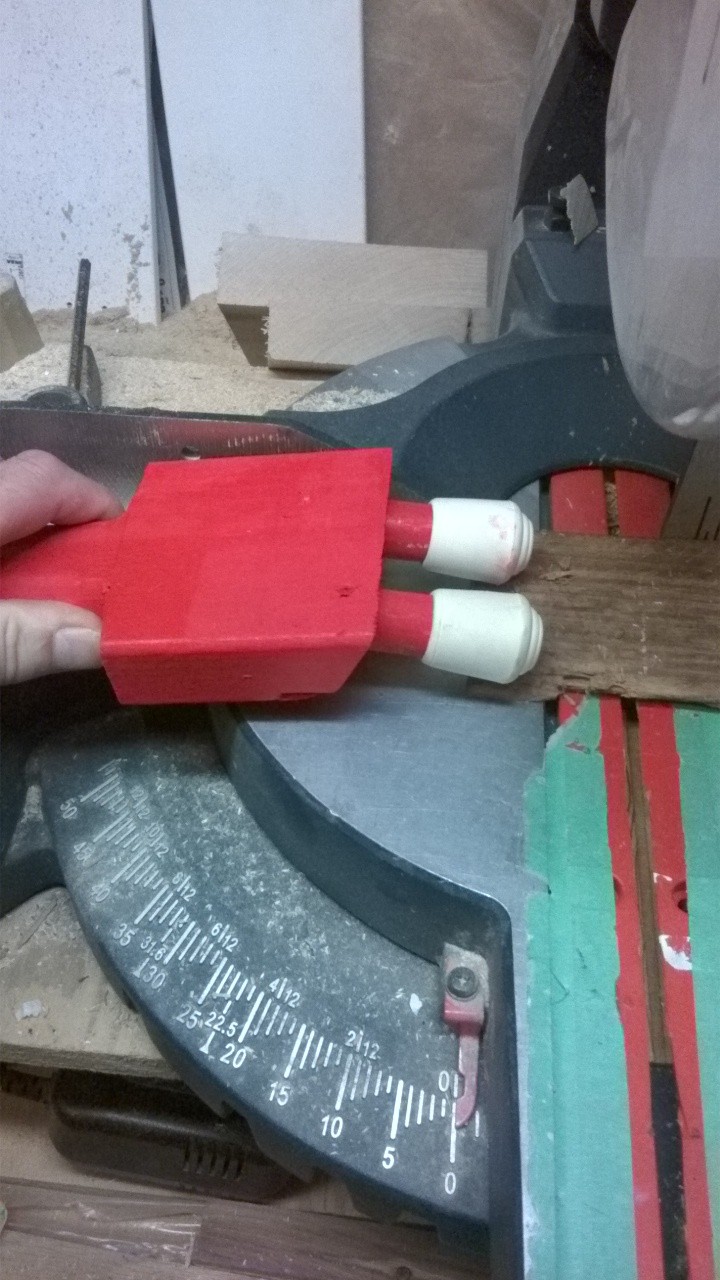
  The first thing to include is my two finger hold down in use as promised. 


You can see this  jig allows me to hold the wood very close to the saw. This situation doesn't happen very often but often enough that it needed attention.

 The other thing I thought I'd show today was the process I generally use for making patterns and templates. 

 Often I am inspired by something I've seen on the net, there are a nearly infinite number of gifted people with an infinity of good ideas to be inspired by, or just copy. When I can I give credit for the idea, in this case I don't know whence the original design came.

   Initially I make some sketches on scrap paper and then a finished drawing in a serious art note book.


  I use these books because the paper is almost as heavy as Bristol board, but with a matte finish. It is 190 grams per square metre vs. 200 - 250 for Bristol board.* In this case my drawing is for a scroll saw pattern.


You could cut this pattern out with a coping saw and a band saw without too much trouble, the scroll saw is just easier.

  Next I make a copy of the pattern using my computer printer on ordinary printer paper. This way I keep the heavy paper pattern in a folder for later use. The light paper pattern is glued to the wood and cut out on the scroll saw.

 In this case I glued the pattern onto a piece of 1/4 inch Baltic birch and cut it out.  Since I like this pattern and expect to use it often I'll trace it onto the wood the next time rather than glue a print out onto the material. Tracing the pattern means I don't have to wait for the glue to dry, or clean it off the project after cutting it out.


Since it is a jig, it has to be red.

  I see this as a small trivet or a large coaster. A larger version could be used to protect a table top from hot dishes. We have a couple of palm trees in our house and this goes with the décor.

 Just by the by, here is a sketch that I did last evening in my note book.


cheers, ianw

p.s. bicycle season has begun here, finally.


Is that cool wood, or what!

* - If you keep your eyes pealed quality artist note books come on sale frequently. I bought my last books on a 3 for 1 sale. 


Sunday, December 22, 2013

Eleven Pipers Piping


  Maybe the Lords a-leaping are dancing a highland fling?

  The shopping days of Christmas 2013 are winding down.  All my shopping was done a couple of days ago and I am quite pleased too.  It appears that Mother Nature wants us to stay home with our loved ones for a bit too, she has covered us in ice and now the wind is coming up, it could be exciting.


  Stanely FatMax® 6-3/4'' Coping Saw 15-106

    The coping saw, I have a band saw, (two actually) and a jig saw and until recently a scroll saw (a bearings has given out) but I still use my coping saw occasionally.  It is at hand and is good for the quick and dirty little deeds, I find it's greatest virtue is that it will work on things that are very small. 

    The project can be clamped into a vise and the curve cut  where it would be too difficult to hold the object and use a jig saw, and maybe too scary to work that close to the band saw blade.  I won't suggest that you buy the cheapest coping saw, nor is the very expensive one necessary unless you are a hand tool only kind of guy. A middle or the road price and a reputable company should do the job just fine.  In the distant past I was taught to loosen the blade in the frame when not in use.
Bahco 6.5
Bahco is a well know company in Europe that makes quality tools, in Europe.


   Another advantage to the coping saw is that it is a good safe place for little beginning wood workers to start their sawing career.  The saw is light, versatile and easy to control, all good things for beginners.  


Stay Cool,
cheers, Ian W