Showing posts with label c clamps. Show all posts

Friday, November 15, 2019

Carving a Wooden Bowl.

 This is a project that I had in the back of my mind for a while.  Two years ago I picked up some spruce logs from the side of the road.  The logs were recently cut and oozing sap.  Now after two years under the steps in the garage the wood is nicely dried and ready to be worked.


   Once I scraped the dried bark off I needed a flat surface  for the bowl to sit upon once finished.  I used  the joiner to flatten a small portion by setting the log on the joiner table and making a couple of passes working with the natural shape of the log.

   The next thing  to do was flatten the top side which was pretty uneven after having been split apart.
  

  I set the flat bottom  on the table of my drill press and set the depth stop for the forstner bit to match the thinnest section of the log. Then I the drilled down through the  extra wood until the top was fairly evenly flat.  

   After chipping away any remaining bits around the drilled holes I planed the top of the board enough to make it easy to draw outlines.


  There is plenty of waste wood to be cleared, to  get an even inside shape I set the depth I wanted to go and drilled a bunch of pilot holes.  The centre holes are deepest, the holes on the sides are less so, and the holes on the ends are a little more shallow because I plan to taper the sides of the bowl.  The basic shape is going to be like a pioneer style dough mixing bowl .
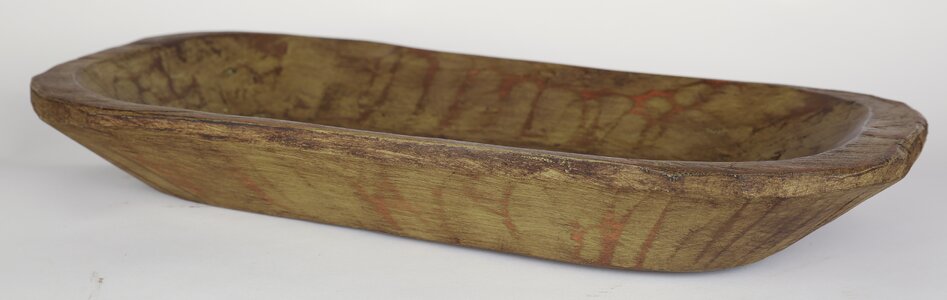
Painted Rustic Wooden Dough Decorative Bowl
what I am working toward.

  I have a variety of power tools to clear on the waste wood but so far I have stuck to chisels.  I can rough out what I want without making tones of dust and noise.  A chisel cuts out chips and chunks without making any saw dust. 


  My new  bench set up allows me to clamp this project solidly to one section of the bench while pushing it against the raised work bench which is held on with large C-clamps.  This way the work can withstand heavy chisel work and is at a better height for my back.

  The last glue up with the box.


  Most of this box was glued using lead weights to hold things in place while the glue dried. All that remains is final sanding and a couple coats for spray varnish.

6 x 10 x 3.5 inches

  This is actually a frame in which a drawer sides though from either side.   That way you don't have to reach into the back of the drawer, or pull it all the way out to get to the stuff in the back. The top is maple, the sides and bottom oak and the drawer, exotic mahogany type wood with walnut veneer detail. It wasn't a difficult project, just one that seemed to drift around in the shop while other things took away my attention, you know, things like noses.

  cheers ianw


Sunday, August 14, 2016

Garden Structure

  I  recently picked up a station wagon's worth of 2 x 4's that had been used for temporary fencing.  The wood had been outside for a year (temporary?) but is still useful for rough projects.

  Today's rough project is a quick but sturdy trellis for our back garden.

Coreopsis
  Against our back fence grows a clump of coreopsis about three feet wide and one foot deep. The clump grows bigger every year.  By now the plants have grown six or seven
feet tall and one good storm with rain and heavy wind blows the stalks into a twisted mess. This happens every year, this year the clump of flowers is big enough and I have the right materials at hand so I did something about it.

trellis, 5 ft. by 3 ft.
  I started out with weather 2 x 4's which I ripped into approximately 1.5 by 1.5 inch boards. Before I let the wood near my table saw I brushed in heavily with a wire brush and double checked the wood for nails and screws.  When I picked up the boards I took time to remove all the nails and screws that I could see, but checked again to be certain.  I like re-using materials, I hate to see wood wasted.


  I used 3/4 inch dowelling as tenons. The up rights were drilled on my drill press and the ends of the cross pieces drilled free hand.  I opted for tenons and all wood construction so there would be no rusting screw or nail heads next season.

  There are many ways to cut dowelling and a variety of jigs that can be built but I have found that a mitre box and hand saw do the job as well as any method.

Stanley Clamping Mitre Box w/Saw 20-600
Stanley mitre box

  Nearly always I am cutting a piece of dowel less than 2 inches long so the 10 inch sliding mitre saw is too aggressive. = (scary).  Dowels can also be easily cut with a band saw, probably my second choice. 

  When I came time to glue the trellis together I only had two pipe clamps that were long enough so I improvised for the third.

c- clamps attached to the rails, Bessey clamp
pulling the c-clamps together.
 A quick and adequate extension.
  When this year's flowers die down I will move the trellis closer to the fence so that next year the wooden trellis will be somewhat hidden by the growing flower stocks.  The flowers between the trellis and the fence can be ignored and the flowers outside the trellis I will tie up.  

  We have a couple of other spots in garden that need extra support and so I will probably make a couple more versions of this trellis over the next while.

  cheers, ianw


Monday, September 12, 2011

Clamps-"c" clamps

"C"clamps have a special place in my heart for several reasons. 


 One, they last forever, and being very low-tech they always work. Good 'c' clamps are not the cheap ones.  Cheap clamps twist under pressure and then there is nothing left but to swear and start over. Cheap clamps don't save any money in the long run, since good clamps last a life time.


 Two, I have a couple of very experienced clamps from my Grandfather's work shop. Proving the fore going comment about good clamps lasting a life time. 

Three, they really, really clamp tight and stay put.


 These clamps are want I use to clamp something semi-permanently. I often turn to 'C' clamps to hold my machinist's vise to my woodworking bench.  The clamps hold as tightly as if I had the vise bolted to the bench.  I also use 'C' clamps to hold my bench sander and small drill press in place.   'C' clamps even hold up a dividing wall in the family room, creating a temporary bedroom.  In a season or two the wall will come down, but while it is held up with 'C' clamps it feels permanent. I have used a 'C'clamp to lock a garage door from the inside too.


 The small clamps are used to hold a guide rail that I use with my circular saw to give me straight lines when I break down sheet stock.  The clamp holds the guide securely and doesn't get in the way.

   You can never have too many clamps.  The 'C' clamp is just one of that crew.