

Once I scraped the dried bark off I needed a flat surface for the bowl to sit upon once finished. I used the joiner to flatten a small portion by setting the log on the joiner table and making a couple of passes working with the natural shape of the log.
The next thing to do was flatten the top side which was pretty uneven after having been split apart.

I set the flat bottom on the table of my drill press and set the depth stop for the forstner bit to match the thinnest section of the log. Then I the drilled down through the extra wood until the top was fairly evenly flat.
After chipping away any remaining bits around the drilled holes I planed the top of the board enough to make it easy to draw outlines.

There is plenty of waste wood to be cleared, to get an even inside shape I set the depth I wanted to go and drilled a bunch of pilot holes. The centre holes are deepest, the holes on the sides are less so, and the holes on the ends are a little more shallow because I plan to taper the sides of the bowl. The basic shape is going to be like a pioneer style dough mixing bowl .
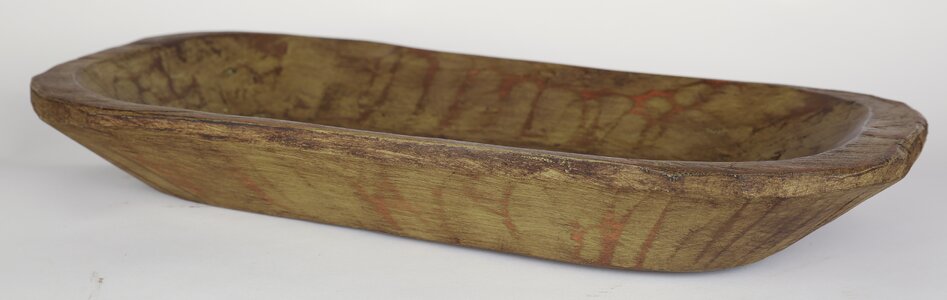 |
| what I am working toward. |
I have a variety of power tools to clear on the waste wood but so far I have stuck to chisels. I can rough out what I want without making tones of dust and noise. A chisel cuts out chips and chunks without making any saw dust.

My new bench set up allows me to clamp this project solidly to one section of the bench while pushing it against the raised work bench which is held on with large C-clamps. This way the work can withstand heavy chisel work and is at a better height for my back.
The last glue up with the box.

Most of this box was glued using lead weights to hold things in place while the glue dried. All that remains is final sanding and a couple coats for spray varnish.
 |
| 6 x 10 x 3.5 inches |
This is actually a frame in which a drawer sides though from either side. That way you don't have to reach into the back of the drawer, or pull it all the way out to get to the stuff in the back. The top is maple, the sides and bottom oak and the drawer, exotic mahogany type wood with walnut veneer detail. It wasn't a difficult project, just one that seemed to drift around in the shop while other things took away my attention, you know, things like noses.
cheers ianw
No comments:
Post a Comment