Showing posts sorted by relevance for query kieran. Sort by date Show all posts

Friday, September 7, 2012

Kieran the Helper

  Regular readers will be used to me talking about my Grandson in typical Opa type glowing terms.  I adore the little guy and his little sister too, Kieran gets onto the blog because he is older and can be in the workshop with me.  She will begin showing up soon, she is a real fire cracker.
  
   I very strongly believe that children love to copy adults and want to please them,especially when they are small.  That is when they need to be brought into the shop and included in the action.  Yesterday Kieran and I cut some boards with a hand saw as well as swept the floor.

    Kieran helped me sweep my shop, and to his credit he hung in there sweeping as long I was sweeping.  He didn't just spend two minutes at, he worked away steadily until the job was done.

and Kieran

Tuesday, February 12, 2013

pint sized truck II

   Last week I began the mini truck project, in the hope that I would have it finished while our grand children were here and so Kieran would continue to be spoiled by Opa and Oma and get yet another gift. 


  The challenge was scheduling shop time around play time and nap time and snow shovelling time. On Friday I shovelled the driveway and side walk three times and our wonderful neighbour blew the driveway once with this John Deere snow blower.  Kieran loves the Green and Yellow.


  At any rate the truck got finished this morning, 24 hours late.  The children returned home yesterday and I have spend the morning picking up toys and being amazed at how huge and empty our house has become.


    The red pick up truck is 1 1/4 inches long by 3/4 wide.  I am pretty sure that the ratios are not up to international specs, but I don't care.  This is to be a pocket truck for Kieran to carry around.  I think we would call it a good luck charm, but I don't think he would understand that idea yet.  

   Every project as things to teach, even a little project like this one.

a: it still takes time for paint to dry, the small amount doesn't effect the curing time much.

b: sharp tools and a fine toothed saws are a real must, maybe more that with large projects since a tiny flaw seems to be magnified on a tiny project.

c: get the thing mounted on a support as it is in the photo right away.  I fiddled around trying to paint it holding it in my fingers initially, a clumsy move, once I screwed the gimlet into the bottom of the truck it was 100% easier to paint.  That seems so obvious now.

d: seal the wood with sanding sealer first, then undercoat in a neutral  colour paint, sand and then start final colours.  The coverage was much easier and the colours deeper in tone.  I used spray shellac over the craft paint, it has two coats.

e: I will make the next one from maple or birch, this one is pine.  Pine is easy to work but it doesn't hold hard edges very well, and some of the detail would look better with hard edges.

f:  Don't get in a hurry, no project is improved by haste.


    A foot note, I am working on my wife's computer, thanks sweetie, mine is #%%#$* again.

    Don't forget Valentine's Day folks, we couldn't do what we do without the support of our Valentine Sweethearts.

Saturday, July 11, 2015

K is a good helper

  I confess to having project envy sometimes.  I see photos and videos of other woodworkers making heirloom projects with heirloom hand tools and I admire their workmanship and am stunned by the beauty and cunning of their projects. Most of my wood working is more basic than theirs but it does have its own special rewards.

  Our kid's house is to be heavily renovated shortly and to get their building permit the city had protective fencing built around the big trees in their yard. Since the job was ordered by bureaucrats and completed by drones the fencing blocked access to the back gate,the garden shed and the garden. So last Monday Kieran and I got busy and cut a couple of gates into the government fence so that the rest of the yard would be useful.


 I cut the sheet stock with my reciprocating (or noisy) saw and K held the shaking fence for me. He was a big help because without him the fence would have shaken to the point where I wouldn't have been able to complete the second cut.

 My recip saw is another of those tools that sit in their cases for months but when the time comes there really isn't a better tool for this job. 


  Kieran is wearing the hard hat, gloves and tool belt given to him by my old university chum Clive. A big shout out to Clive, K loves his work gear. We cut a section out of the fence in front and on the other side of the big tree. 


 After cutting the section out we added wood around the edges to create a frame that stiffened the piece and gave use something to drive screws into when adding the hinges. I started the screws and then K used his 4 volt screwdriver to finish them off. He worked steadily and drove dozens of screws, he is a six year old with real focus on his tasks. 


  Yes, I still have project envy, this project was not very fancy but the heirloom part is the proud little boy with his tool belt, work gloves and hard hat. And he was a real help, that extra pair of hands was invaluable when cutting the sheet stock and hanging the gates.

cheers Ian and Kieran

Monday, August 3, 2015

Grandson Projects

  Unless you have grandchildren you will not understand this blog. You will not understand the joy that I feel when my Grandchildren want to build something in the work shop with their Opa.

 Keiran and Clara arrived last weekend for a three day visit, after they checked out their new bunk beds and played with the cats,  K decided that he and I needed to build a "cat castle" on which Jr. Cat could play.


 Kieran, who is six, designed this climbing thing on a piece of paper and then searched out the wood scraps with which to build this thing.

 Yes, it is ugly, and mostly not very square ( I opted not to interrupt the flow of work by constantly squaring up the stock, that involve power tools and all K can do is watch) but...Kieran drove all the screws to hold it together. He also learned about corner brackets and pocket holes. Further, I put 
some of this together with nails so that he had to drill pilot holes and then drive the nails with his condo hammer. 

Condo Hammer - Woodworking

  Our Grandchildren don't come here that often so there is not much continuity in Kieran's workshop education.  He began his workshop life helping Opa clean up, a job that his four year old sister has since taken over. We have worked on plenty of projects over the last two years and each time I try and introduce a new thing while re-enforcing known skills. It is pretty tough since a little kid wants thing to happen immediately. K is just now beginning to accept that glue takes time to set.  His initial solution was to tell me to use tape instead of glue.

 Now projects have a plan drawn, he is getting better at that and this time he talked about looking down from the top and from the side on the plan he drew. And he is getting so that he can swing a hammer, that is difficult because he hasn't do much to give him hand strength.

 On the next day we undertook another project. He said he would rather work in the shop than go bike riding since he could bike ride at home but there was no shop in which he could work. The second project was interesting for two reasons.  First he decided that it should be painted, usually paint is too slow and our projects go unfinished.

the green section is cargo bay doors that open!
 The bay doors were painted with a small roller, he then decided that he would go back to a brush, and like so many kids he likes black paint. 

 The second important part of this project was the cargo that he made.


 These are the missiles that are carried in the bottle rocket. K has carefully labelled them C for cruise, R for regular and the ones with wings are LR long range. What makes these little sticks of wood a break through is he cut them all from longer pieces by him self.

 We marked the length of the pieces with a tape measure and a square then we clamped the wood to the bench and he cut the pieces. I have been trying to figure out how to enable a small boy to cut wood and I finally figured out the solution.

Bacho 10-inch x 15-16 Point Reversible Dovetail Saw 010621560
Dovetail Saw


  This small saw and small pieces of wood meant that K was able to cut his own pieces of wood, then he drilled pilot holes for the cross pieces and we glued and nailed them together. 

 I know that this was a maudlin sort of blog entry for some, but nothing matches the joy and satisfaction of working in the shop with my Grandchildren. It brings back memories of the way I worked in my Opa's workshop with him, along time ago. 

cheers Ian (Opa)


Friday, November 21, 2014

Friday's Jobs

  Many people are filled with grand plans and noble ideals.  I'm not.  Today my great hope was to not to have to put on socks.  I wanted to spend the day wandering about our house and maybe do some work in the wood shop too. 

   One of today's jobs was finish off Kieran's submarine bank.  Kieran drew a plan for me two weeks ago.


  The submarine has two compartments and one side is glued on while the other side is held on with screws. Kieran wanted to be able to get the money out, I didn't want it to be too easy.


  The real job of the day was making a picture frame for a painting by our friend  Rhonda.  I made the frame from elm.  Elm is a wood that has wonderful character, but is stringy and working with it can be a challenge. 

  When I was cutting the rabbets on the back of the frame sections the wood came away in strings and choked the dust collection system on my Jess Em router table. 

  After I got the elm cut to length I used my KREG Klamp table for assembly.


   The picture frame is finished with tung oil and once it is dry, the glass  cut and the painting installed I will post a picture for you to see the result.

  Here is a link to an instructable making a wooden picture frame using biscuits.


Monday, November 26, 2012

A Very Special Workshop Project

   There are a number of ways for a project to stand out in my mind.  Sometimes the project is the first time that a new skill is finally conquered, sometimes the project is something I'd wanted to make for a long time but not had time or materials.  I have projects that I are bench marks in my development as a wood worker and so stand out like graduation ceremonies. Then there are projects that are special because I've done then with a Grandchild.

  A while ago Kieran and I made a bird house together.  He pushed the trigger on the cordless drill and helped hammer the bottom of the bird house into place.  That project was a pleasure to make with him.

   Kieran is six months older and so last week Kieran and I made three small wooden airplanes to go on his LEGO aircraft carriers. He was able to do more things than on the bird house and so the project felt really good to make.


   These planes were the most basic of projects but.....this time he helped me cut the strips of wood with a handsaw.  We are learning about safe handling of sharp tools. Then he helped me sand the bits of wood,( discovering how to make the edges smooth to the touch)  as before he pushed the trigger while I held the drill ( he has got very good at that part of the job) making the holes for the tacks.  Finally, he helped me drive the tacks into place, this is not a hand cut dovetail jewel box made from rare and exotic wood, and I wouldn't trade the planes or the experience for the world.

Friday, May 23, 2014

Paddle Boat for Kieran

  My Grandson is crazy about boats. As Eva and I worked on the water feature in our back yard my mind wandered back to my Cub Scout days and a boat that we made as a craft at camp.  Kieran has decided that toy boats must go into the water and so this boat should fill the bill.


  The paddle wheel is powered by rubber bands and it actually goes along in the water.


  I remain  inept at  making videos but occasionally a movie is worth the trouble it brings. 

   Making the basic boat was an easy project and one were you could  include a young person in the process.

basic size, 11 by 4
  When it comes to making circles I usually find a can or a jar that is the right size.  To make the elliptical shape for the bow of the boat I turned to my Red Neck French Curve .  The shape is the top from an oval box which once held a full bottle of whiskey.  I saved the top for uses such as these, but the whiskey I gave to my favour charity. 

   Once I cut out the hull shape I decided that I would get a little carried away and so I added a keel and rudders to keep the boat going straight in the water.  The extras are only because Kieran knows about the and will look for a keel, trust me, the boat's performance doesn't require the keel.
 

  It is glued with Tite-Bond III, so I am hopeful that the pieces won't fall off, too soon. When they do we will effect repairs in dry dock.

   As I was making this project I was struck by how use full my band saw proved to be.  I am beginning to think that the band saw is the unsung and under rated tool in a small project shop. 

  A bunch of years ago I helped a buddy move his shop and at that time I was surprised to see that he did not have a table saw, but he did have a very good band saw.  When I asked him about his choice he told me that the band saw served his needs best.  My friend was and is a very fine craftsman, maybe I should have taken notice 25 years ago!!!

  Time to play in the water.

cheers, ianw


Wednesday, December 10, 2014

Boat Box

  For Christmas this year I am making some things for my Grandchildren, not a big surprise.  I am making them treasure boxes since they are at the age where they have begun collecting things, shiny stones, beads, leaves etc. and I am making them each a place to put their found treasures.

  The project I am working on now is for my Grandson, who is crazy about boats.  A couple of weeks ago I made him a submarine savings bank.


 For Christmas I am making Kieran a boat shaped, band saw box in which he can keep his treasures safe.

  My plan is to carve and shape the hull some and  so I am making it out of basswood.  Basswood is soft and easy to work with either hand or power tools.  It also take paint very well.


 I joined and planed three pieces of 1 inch basswood and then glued them together with quality wood glue.  Usually the glue sets enough in a couple of hours but since I was going to be working this wooden billet fairly heavily I left it to dry over night.

 This is not a true band saw box because it did not cut the front or back off of it. I will add a bottom and a deck separately. The deck is going to lift off completely to give entry into the box.


I  used my band saw to cut out the inside of the billet and then glued a transom into the cut away section. Unusually there is a knot in the basswood but that won't be a problem, it will be mostly carved away when I shape the hull.  Any irregularity will be filled and painted so the flaw will be invisible.


 If you are planning to try a project like this I suggest that you keep the insert so that the thinner walls will be supported as you are carving, grinding and sanding the hull. I did not carefully plan my cuts when making the submarine and so didn't have the cut out to support the hull while I was shaping it, which made for a slower and fussy job. 

  Unlike most boats the inside will be visible and so finishing inside will be almost as important as the finish outside. 


  This is the box that I have already made for Kieran's sister Clara.  Which inspired him to ask for his own treasure box, Clara likes animals, and Kieran likes boats. They live in the big city away from all animals and boats so I don't know where their interest came from.

 The purple box began with a carved top that I make a box to fit, again the top is basswood. I have become a big fan of basswood, it is about as soft as pine and much nicer to work with, less prone to splinter and the finish doesn't blotch either.

 Keep working, Christmas is getting closer every hour.

cheers, ianw


Friday, July 25, 2014

A Very Important Project.

Today Kieran, his sister, Mum and Oma are having 'A Day Out With Thomas'.

Thomas Tank Engine 1.JPG

 While they are out for the day I have been working on a very important project.  For Kieran's Fifth birthday I promised him that we would build a real tool box and begin filling it with real tools so that he can work with Opa in the shop. His birthday was at the beginning of the summer and this is the first time he will be here with time to work in the shop. 


  The tool box is 16 by 6 by 8 inches.  The ends and bottom are made from 1/2 Baltic birth plywood and the sides are 1/4.  I have cut the whole thing out and marked all the spots that need to be drilled for assembly.  Drilling is something at which K is good. He also likes to use a drill to drive screws, the box will be partly glued and screwed and partly glued and nailed.  Once assembled he needed to sand the assembly and then we'll finish it with shellac. 

  To keep the handle small but sturdy I am using 1/2 copper pipe rather than a wooded dowel.  I also kept the tool box narrow so that a small person could carry it without it bumping their leg.

  In an ideal world he and I would have cut the parts out together but sheet stock is awkward to handle, and is dealt with best by bench tools.  A keen 5 year old would not have had a positive experience in the shop doing the cut out stage. He would have been stuck sitting on a chair watching the work get done.   Maybe down the road he and I can make a tool box from real wood and he can do all the work.  He has done some cutting with a hand saw and used a block plane once, developing those skills requires time and stronger hands than the little boy has, yet.


  There is nothing radical about this tool box, he will now have a version of the tool box his great Grandpa had, (its in the shop), his Opa has, his Uncle Leroy made in public school wood shop and next we'll have to make one for his Daddy. 


  This is the selection of tools that will go in his tool box to start him off.  Kieran was quite excited to think that he was going to have 'real' tools so he could help in the shop. Most of the tools are not new but all of them will help him build and fix things until he finds his way in the world and decides what he needs for his shop.

  I hope that it rains tomorrow so he will want to play in the shop with me.

cheers, ianw


Sunday, October 6, 2013

The Three Latest Shop Projects

  I have always said that it is important to make things in your shop that people want.  Sometimes a self indulgent project is nice but...for me nicer is making something that is useful and finds a good home.

  A couple of Christmases ago I made a clock from a kit for my wife.  I opted to use the kit because I had never made a clock before and was pretty sure that I needed the help.  I also expected that I would only ever make one so was looking for an easy learning curve.

    In this recent case it didn't need the help but I bought kits anyway because it was a good short cut.  The kits saved me from having to cut up a bunch of tiny pieces of wood.


   My wife and I were in the local Dollar Store a while ago and I saw wooden toy kits for $1.25 each.  Lets be clear, the wood is crap, the glue is also crap but the design isn't too bad and all the pieces are pre-cut. The most important thing with these kits is that they can be built by an Opa and his Grandson, which we did this weekend. 

    We made a sail boat, and a F-18 as well as a helicopter .  I bought a couple of extra helicopter kits and plan to adjust and improve the kits then assemble them of the kids at church.  


   This is an instance where it is cheaper and quicker to buy prepared materials than to fiddle around in the shop to produce the parts.


     The F-18 is waiting to be painted, I know it is an F-18 because Kieran says so. I sprayed the helicopter and the boat but was told that Kieran wanted to paint the F-18 with a brush and then he would be the painter and I would be the helper.

   Building these cheap little toys has been a good learning experience for Kieran and I. These little kits have taught him that wood glue takes time to dry so you have to plan the stages of your project and wait, wait, wait.    He has also begun to learn the types and names of clamps. This type of project uses an assortment of clamps and in some case clothes pins, which makes a good small, light weight spring clamp.


Monday, October 5, 2015

Mixed Blog

  I am still spending most of my day laying around trying to avoid back pain. Our Canadian Grandchildren were here for Saturday and Sunday and I wasn't able to play with them as much as I would have liked. However Kieran and I were able to get the USS Enterprise finished to his liking and that made me feel better.

front view complete with Kieran's torpedo tubes and
phasers attached to the top of the bridge


  I shaped and whittled the various parts while sprawled on the couch in our basement. It is pretty tough to whittle laying on your back without getting wood chips up your nose, just believe me on this.

  I shaped and sanded the pieces and on Saturday Kieran glued them together and then decided that there needed to be a place for the photon torpedoes, hence the rather odd looking box underneath the bridge. We looked on-line for pictures and he decided on the paint and then fairly carefully painted his Enterprise. It would have been better if he could have helped make the pieces but he seemed pleased to assemble it and then add torpedoes.

  On Sunday I awakened to an attack from the phasers that had been made from construction paper and tape. This kid tapes everything, he will be the duct tape king one day.

  The lesson to be relearned here is that all the toy needs to do is provide a focus for the child's imagination. As adults we can get hung up in the details where a child doesn't need details as much as general ideas and then they are off to the races. The Enterprise flew missions all weekend.

 On another note completely, my blog has now had over 100,000 visits. That is years of from 2,000 to 3,000 visits a month. In the world of Youtube videos  100,000 is small cheese but as a blogger with a fairly narrow focus I'm pleased.

 And I also have a really, really good video to share. This video is long but it is packed with tonnes of good shop tips. I particularly like that the shop tools are the sort of tools that a normal basement shop would have. For example the table saw is small and basic, with out sliding tables and fancy mitre gauges. 

Small Shop Tips 


   This is a video filled with ideas, and jigs that will make it easier to build projects both large and small. Sit back, get your favourite beverage and enjoy what Jim Cummins has to say.

  Cheers, Ianw


Monday, April 13, 2015

Wooden Money Clip

How to Make a Wooden Money Clip


  I was looking around for a small project to use up some of the nice bits of wood I have in my scrap box and found the Money Clip at Instructables. 

 After watching the video I decided to make a clip or two of my own. 

wooden money clips,
top-oak, bottom-poplar
  I followed the video instructions pretty closely, though I cut the slots with my back saw  rather then the band saw. It just seemed like a hand tool sort of day.  The clips have two coats of shellac and one of varnish. I sanded between each coat and so the clips are smooth and inviting to touch.  I plan to make some more clips and burn designs into the wood, that will make each clip individual. 

  On the weekend my grandson and I made an Imperial Star Destroyer, not a model, a toy.  Kieran knows the difference between a model and a toy.


  I am always bragging about 'K' but also I am interested in watching his continued development as a shop guy.  This time Kieran drew the plan and used a ruler to get straight lines, he has learned to use a ruler at school I presume. So the plan was better than before. 

  More importantly he cut the plywood pieces out using a back saw with very limited help from me.  Once he gets a little more comfortable cutting with the back saw he will be able to make things with very little help from a grown up. 

  To put the control tower on we drilled a pilot hole with his 4 volt little drill. For small hands a screw driver with a hex shank drill bit works best I have found. Even my 12 volt drill is too big for 5 year old hands. 

  Kieran was very proud to explain to everyone that he did 'all' the work, Opa only helped him steer the saw.  He also did nearly all the sanding, though he didn't find it very exciting.  Sanding is still done by hand, he doesn't like the noise or sanders, it time he'll get like the rest of us, we hate the noise, love the speed.

 Pretty soon my Granddaughter is going to start looking to work in the shop.  She is already pretty good at sweeping, and that is where apprentices begin  to learn the trade.

cheers, ianw


Monday, August 11, 2014

Wrapping Up Some Jobs

 During the past couple of weeks I have been dealing with several small jobs all at once. This weekend I got them done.

 First Kieran and his sister came to stay with us for three days and he and I got busy and finished his tool box.


  On his last visit we worked on other projects but on Saturday morning we drilled all the holes and screwed the ends on and nailed the sides on too. This is the collection of tools that fill his box now.  He has a hammer, three pliers, six screw drivers, two different squares, a block plane, black saw (still too big for him), a sanding block and his own cordless drill driver. He just turned five and is pretty good at drilling holes and driving screws.  This was the first time that he had many brads to drive and he also did a pretty good job.  Oddly enough, he doesn't like sanding either, he gets bored. (a typical woodworker).  Usually I hold the drill and he pushes the trigger to drill the holes. This time he was confident enough that he wanted to hold the drill by himself. I don't know who was more proud when he had finished drilling all those holes, by himself, him or me.

  I also spent some time painting, the puppet theatre needs to be ready for next weekend, so it got another  coat of paint and then Eva makes the curtain.


  There is a 3/4 dowel as a handle for moving the theatre about and a 1/4 dowel for the curtain.  The paint is good now, one more coat will make it excellent.

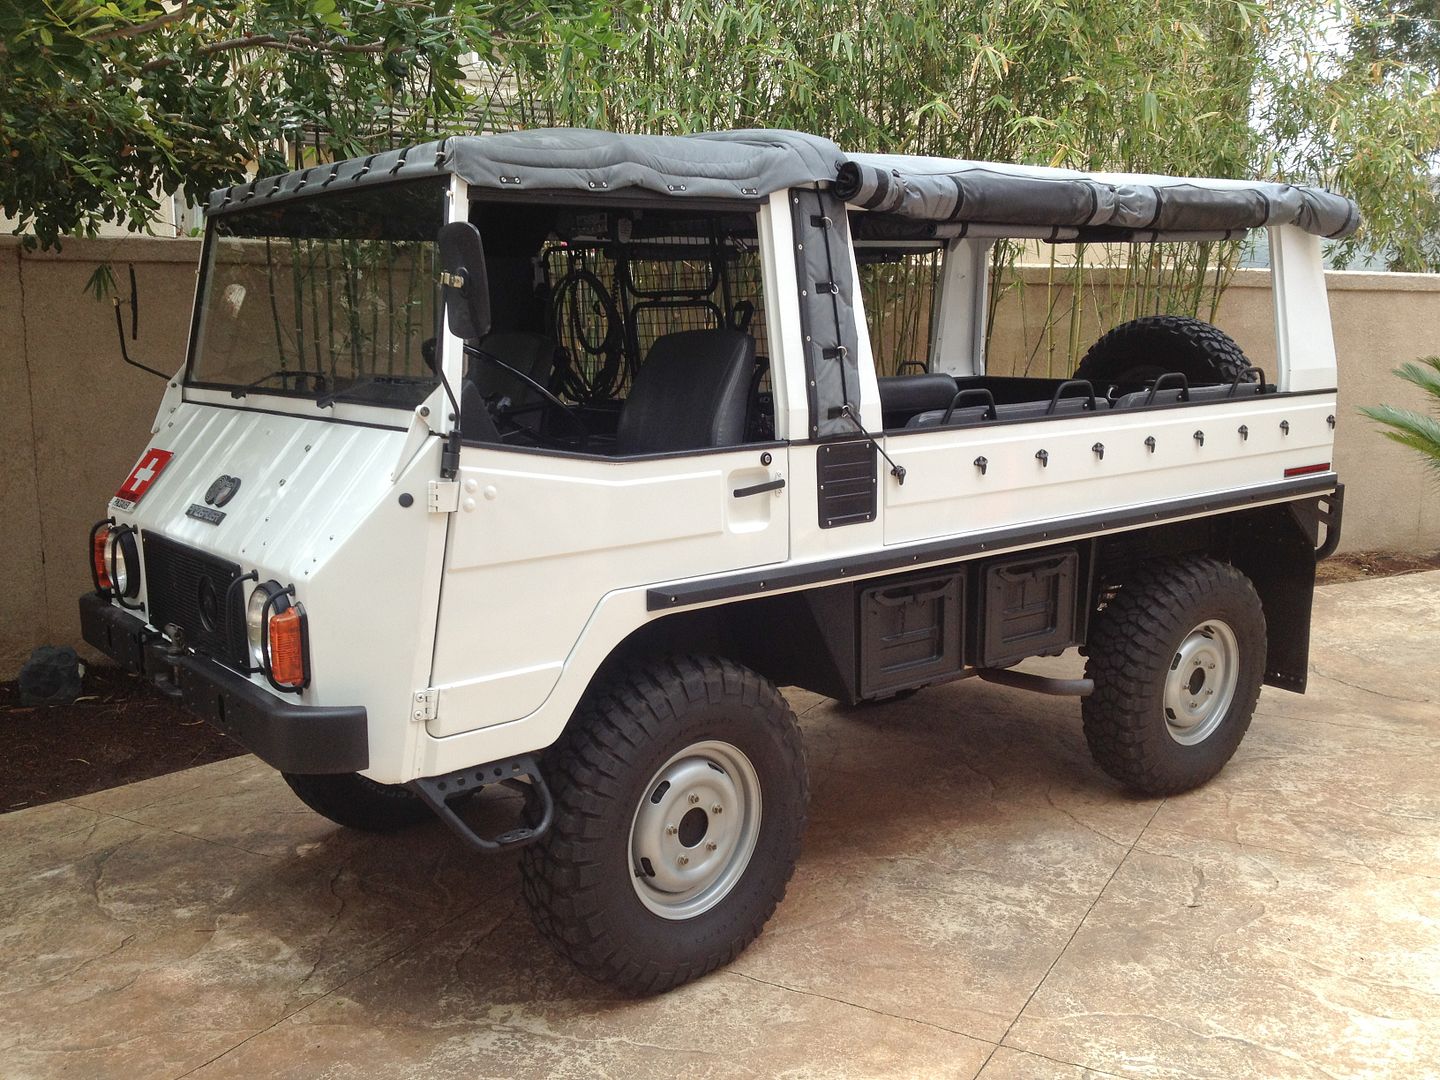
  Spread out on my saw horses are the two rub rails off the Pinzgauer.

You can see the rails in this photo. The rails I sanded and finished with tung oil are clear and will stand out nicely against the typical olive drab paint.

Once the paint was sanded off these birch rails sucked in plenty of tung oil.


  The last job but certainly the one that was most important for world security was the refit of the aircraft carrier. I found a nice piece of Baltic birch plywood and replaced the splintery deck that we'd put on the boat last time.  Rushing the job to keep a five year old happy just meant that it had to be done again.  Have you even noticed how some customers behave like five year old kids, and then are grumpy when the result isn't want they wanted.  I had a painted friend who used to say, you can have it quick, you can have it cheap, or you can have it well done. But you can only have it one way.


  Incidentally Kieran learned it was refit because the hull and the control tower were the same, only the deck was changed.

  My plan is to take a couple of days to work in the yard and to slip away for a couple days bike riding in the warm summer breezes.  It has been an excellent August so far, good for gardens, good for biking and cool enough that we've only turned the air conditioner on one for two days this summer.
  
  When I get back to the shop I am going to look at Jack Houweling's tool caddy plan. I think that he is on to something good.

cheers, ianw


Monday, November 18, 2013

Where Woodworkers Come From

  I have always liked fixing and making things. When I was a kid I took lots of things apart and tried to put them together, never once did I let lack of knowledge stop me from forging ahead.  Actually that still doesn't stop me.

  Attitudes, tastes and amusements are often shaped early in a person's life and a positive attitude toward maken' stuff needs to be instilled when a person is little.

   Kieran is 4 1/2 and getting to be a very serious and focused builder


  This is a playground for children to play on.  It wasn't long ago that Kieran was mostly interested in knocking down the things that other people built, now he is a builder himself.

   If we don't want our good tools to be scrapped once we are done with them we need to encourage the next generation to be builders.  Blocks are where builders begin.


Thursday, January 2, 2014

2014, Happy New Year

   Happy New Year to all your folks out in Internet Land.  I hope that you had an enjoyable New Year's Eve, Eva and I did and equally we hope that you are looking forward to a healthy and prosperous 2014.

  2013 was a bit of a tough year for me with my extended back pain issues.  The back is not cured, but at least it is understood now and should be controllable.  


     The view out our window on New Year's Day was similar to the above photo, there was lots of snow and as we were up north away from our house in the city, the snow was white and crisp and undisturbed, a chilling beauty that is best admired from inside.

   All this snow has been tricky for my back but I've managed Okay so far.  On several occasions I have had help with shovelling.


   Kieran is 4 1/2 and 1/3  of my wonderful grandchildren, and the oldest.  One day over the holidays I went out to shovel snow and he came to help me.  We shovelled for nearly an hour and he did not stop to play, he worked steadily the whole time.  

  K's shovel was one of my last projects for the year.  The handle comes from a cheap plastic children's shovel where the blade had fatigued and broken.  Being the cheap skate that I am I decided to keep the handle (a good length) and put a new scrapper blade on it.

   I decided to fix the shovel for a couple of reasons.

1. I hate plastic mostly, and wanted to show the kids that wood was good.

 And mainly I want the kids to grow up considering the idea that things can be repaired, not just thrown away.

  It would have been quicker and easier to go to the $ store and get another shovel that would have lasted a season or two and then been thrown away because it to was broken.  I want Kieran, Clara and Tova Elise to learn that the easiest way is not always the best way and that a repaired item can often be as good as  a new one. 

  I don't see any honour is battling along with inadequate  tools, but I do see honour is caring for and repairing things if they will still do their jobs.