Showing posts with label block planes. Show all posts

Thursday, July 7, 2016

Hand Made Trim

   I need to make a base next.  I used elm to create the base.  Elm has character and a miserable grain that is stringy and does not lend itself to nice case work.  I knew that but ignored myself. 

box base clamped on
 my mini bench topper.
  Since this is a no fastener project I decided to use my beading tool to add a bead on both the top and front face of my base. I could have cut slots with my router and shaped the piece a bit after the fact. 

   What did I learn? I learned that next time I will choose my wood more carefully.  The front board of the base has a knot on the edge. Were I not beading the edge it wouldn't matter as much. And if this project was for someone else, I would have had to begin again.  Since this is my box, I'll fudge the finish on the front and hide the wee problem. I also learned that I really like working with the beading tool and will use it more in the future.  (it is a bit slow, or at least I am slow using it)

 My work with the beading tool is self taught.  I scratched a shallow bead on all sides (6 beads) and then set the blade for a deeper cut and did all six slots again.  I also found that sometimes the scrapper worked better on a push cut than on the pull.


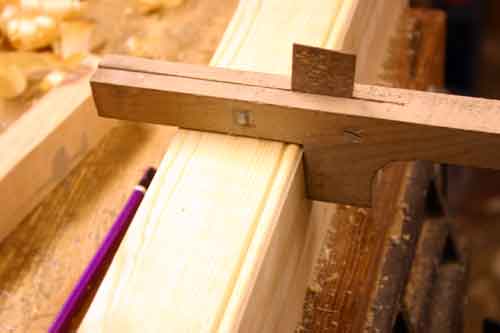
 The other thing I did but doesn't really show in the photograph was use a hand plane to created the 1/4 inch round over.  I laid it out with my marking gauge.


and planed the corner to the marks with my block plane.


  I have to next decide and make the drawers I am thinking four. One deep, two not so deep and the top drawer very shallow. That is for tomorrow.

cheers ianw


Wednesday, May 27, 2015

On the Bench


 My workbench is again, chaos. On the bench are carving tools, files, sand paper, shellac, brushes, planes, saws and knives. Not to mention a large coffee cup and a cutting board drying in clamps.

   The cutting board is fairly obvious, this board is maple and about 11 by 17 and 1 inch thick. I glued it together last evening and set it on the corner of the bench to dry. Hooray for Bessey clamps and water proof glue.  

  The other project that was drying over night was a brooch carved out of bass wood and painted with acrylic paint.


   I think those two projects reflect the real nature of my workshop. Projects of all types and sizes come out of my basement shop, and I wouldn't have it any other way.  It has been a few months since I produced a cutting board which is fine, I was getting bored of the process.  Lately I have been working on these little carvings because it is relaxing and gives me a chance to play with design ideas.

  Art and design is funny.  What you make may become popular or not,  and the quality of the work is not as important as the "look".  If the right person sees your piece and likes it, then it will sell and maybe even become popular, and if it isn't seen by the right person.... your piece collect dust.  There is no way of guessing what is going to happen.

  When I work on something small it still needs lots of tools.  Anything made of wood requires the same preparation, the wood has to be square and smooth. Shaping wood for a book case needs saws, planes, files and sand paper, so does shaping wood for a 2.5 inch brooch.  I use more hand tools when working on things like the brooch, I like that because it is quieter produces less fine dust.  I also chose hand tools because I feel it is safer. 

  A workshop footnote.
  Last evening I was ripping 3/8 strips off of mahogany planks with a friend and we began the process by reminding ourselves about shop safety.  With more than 100 years shop experience between us and both with all our fingers we still talked shop safety before settling into serious band saw time.

  The shop will get cleaned up, and it will get messed up again too. I think it is called the circle of dust.

cheers, ianw


Saturday, December 6, 2014

Oak Feet, and the tale of Two Planes.

 This holiday we are expecting a real gang for a couple of dinners.  Our dinning room table will not be adequate  for the crowd and so we'll use a second table as an add on. In the past we have put these tables together and ignored the uneven joint that comes from the tops not aligning. Finally I got around to matching the table top heights. Initially I thought I would cut 3/4 inch off wooden legs of the other table. The prospect of hauling the table down to the shop didn't attract me much, so instead of lowering one table I decided to raise the other. Such an obvious and easy solution, why didn't I think of if sooner?? 


 This afternoon I picked a piece of oak out of the rack, jointed, squared and planed it before cutting four squares to use as feet.

  Initially I drilled a two inch recess into each foot with a Forstner bit.  The recess means that the table leg is not likely to fall off its foot as the table gets moved around.


  I chamfered the edges of the feet with my block plane. Cutting across the grain in the very dry oak did cause some tear out, but not enough to be a problem once I planed with the grain. When doing something like this always make the cross grain cuts first, just the same as you would if you were using a router table to chamfer the edges.


  You can see the rough vs. smooth finish.  For many years I have had two block planes on my bench, one plane is set to cut quickly and the other has the blade set to take a shallow cut with a narrow throat opening. I also have two  smoothing planes set up the same way.  With pairs of planes I almost never have to take time out to set blades, I'm sure that it doesn't save much time but I find it efficient not having to reset the blade as I work none the less.


   The plane in front is the fine cutter and the one in the back is for rough stuff.  I have written about my old block plane before, it's been dropped, broken and repaired.  It wouldn't be 'my' shop without it.


  I got these planes a decade ago when I was the national importer for Anant planes. The 'R' and 'S' are there for obvious reasons. Though these are reasonably priced tools I have not felt moved to replace them, with a plane I think it is mostly about the blade and how sharp you keep it.( my humble opinion).

  Christmas is coming, I hope the presents you are making are coming along as planned.

cheers, ianw