Showing posts sorted by date for query kieran. Sort by relevance Show all posts

Monday, August 29, 2022

Summer's End Projects

  Kieran and I worked on his sail boat model and finally the paint is dry and the boat is its stand. He designed all aspects of this project and did nearly all the work.  I was just a technical advisor in the back ground.


  K and I have made many boats in the workshop. This project is his most careful and most finally finished yet.  The boat is based on real dimensions and actually sails, the hull and dagger boat keep the boat on an even keel, with the sail up without any extra ballast. I am so impressed and pleased.

  While Kieran was shaping, sanding and waiting for paint to dry I was making a small picture frame.  I have a very talented sister in law and we wanted to frame one of her small paintings, an original painting deserves an original frame.

I began by making the frame stock on the router table.


  I always find the biggest challenge is clamping the mitre corners together while the glue dries.


put waxed paper down on the work surface so 
you don't glue your project down by accident.

   I am using my Kreg Klamp table, a bessey clamp and my lead gravity clamps. Bessey has clamps for all occasions, they're not cheap but are also a lifetime investment.  Don't buy cheap clamps, they will let you down at the most inconvenient time.  

   A while ago I started strengthening my picture frame's mitred corners but using a dowel to reinforce the joint.  I do that almost all the time now, it improves the joint and doesn't really show.


  Once the frame is sanded and varnished the dowel is not visible, In this case the wood, which was reclaimed has a couple of small flaws in it adding colour, wood can have character in our house so it is not a problem.

  With luck the weather will cool and working inside will be more pleasant soon.

cheers ianw


Wednesday, August 24, 2022

Laser Sailboat Model

 In the summer, while at camp Kieran learned how to sail using a Laser sailboat. During this visit he and I made a wooden model of his summer sail boat.


  K looked on line and got the basic dimensions of a Laser class dingy and so we set out to make a scale model.  The hull is quite shallow and so 1 inch bass wood was all that was needed to make the hull. 


  A combination of small planes, chisels and sanders were used to shape the hull. A wedged board held the bow of the boat while Kieran worked shaping the hull.  Interestingly the bottom of a Laser is flat.


  The cockpit was initially  cleared out by drill press using a forstner bit. I ground the tip off a 3/4 inch bit years ago so that I could get a flat bottom, and have used it many times. The the final shaping was done by hand with chisels. 


  Sanded, sealed and drying before paint. The mast and boom are to scale and on deck you can see the material that will be used for the dagger board and rudder.  All the wood is sealed with wood conditioner. Incidentally with the dagger board installed the model floats on a very even keel and is disinclined to tip over. 

  There remains several coat of high gloss white and a stand to show the boat to be made.

cheers ianw


Wednesday, August 17, 2022

More Gecko Stuff

  On July 30th I posted a blog featuring the travel box for Nacho the Gecko that Kieran and I made while he was here.

  He then went home for a week and while he was gone. I decided to make a solid home for Nacho that could be left here. We had a card board gecko house that K had made a while ago. A gecko likes a cool damp environment, he is misted several time per day, good for a lizard, not good for his card board cage.

 I followed the basic size and shape of the card board effort and used softwood lumber and screening to make a home away from home for Nacho.


 I made the frame from 7/8 inch spruce construction lumber and used screws and glue to assemble the frame.  My gravity clamps are holding the screening down while the glue sets.

the finished unit

  The finished unit fully decorated and ready for habitation.  I have it on good authority that he likes his home away from home. 

  Another D.I.Y task I completed this week was the deck sealing of the out door benches at the Ancaster Senior Achievement Centre.  Couple of years ago the centre was renovated and a very nice court yard was added.  In the court yard are three U shaped benches made from 2 x 4 lumber.  The contractor varnished the benches, which looked nice for about a season and a half. Now the varnish is gone and the wood is exposed. I spent nearly three hours thoroughly cleaning and soaking the boards with deck sealer.  It is one of those volunteer things that guys with shops, drop cloths, brushes and gear can do for their community.


  I think that we should support our community and if I can be supportive while doing something satisfying it is a win/win.

cheers ianw   


Monday, June 27, 2022

Large Flower Pot Cover

  Few things are more enjoyable than making something that someone needs.  My daughter has a container plant on her deck that gets blown over regularly so the request was made for a large wooden box to contain the plant pot and ballast against the wind.

  The only thing more enjoyable than making useful things is making it with the help of a Grand Kid. This weekend my grand son and I used reclaimed lumber to make a big box.


The base of the box is 15 inches square with 15 inch sides. 

 The skids I picked up last week are now turned into something useful. My grandson did the majority of the work on this project. He cut a skid apart and did most of the measuring, drilled all the holes and drove all the screws. 
 

  My role was to be the extra set of hands that held things while he drove screws, or measured. This was a great project in which he added the use of two new tools to his experience.

  I introduced the bandsaw and drill press a few years ago but this time I thought he was ready for the sliding mitre saw and belt sander.


 My grand son is a big boy just finishing grade seven, also he is thoughtful and cautious, so I am pretty comfortable showing him power tools, knowing his nature.  First we talk about safety, what to do and what can go wrong.  Then I give him a slow motion demonstration of how to use the tools.  On the sliding mitre saw for the first few cuts I held the wood for him so he could concentrate totally on the blade. By projects end he was making cuts by himself.  Things aren't to the point that he can use those tools alone in  my shop but I'm confident that he can manage without me having to hover over his shoulder.


  The belt sander smoothed the worst spots on the box and we then used gel stain to sort of even out the colour.

  Not only was this a great way to spend a while in the work shop it continued Kieran's  workshop evolution.  In the past he was impatient to finished and never bothered to sand or stain/varnish his work.  The sanding wasn't great but it is a step toward greater pride of purpose. 

  Next time more attention to detail will make for a more attractive result, I am sure.

cheers ianw


Monday, March 21, 2022

March Break in Ontario

  Last week was March Break for our school age grandchildren. After nearly two years of off and on visiting we were able to have a proper multi day visit.  When an eleven year old and a thirteen year old visit it changes the routine of the house, dramatically. In a good, though tiring way.

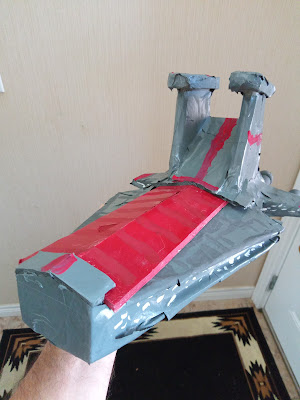
  Our Grandson arrived with a plan in his mind to make a Venator Class B Star Destroyer. There were pictures on the internet and that was all we had to work with.

the red cargo doors slide apart to reveal an actual 
cargo space designed as a pencil case.
Yes, this is actually a pencil case. And on the rear end
there is a small drawer for erasers and a sharpener.

  Kieran has plenty of experience making models from kits. This was the first time that a model was designed and constructed from scratch.

  We first drew up a plan.  That was a fairly involved task since the Star Destroyer was not just a skin but a three dimensional creation with usable  inner space.  

  After the drawing stage we had to decide what was made from wood, for strength and what was foam core, for lightness.

  Then, four hours of drawing, cutting and forming the pieces.  To put this together we used 5 sticks of glue in the hot glue gun, and two sheets of foam core. K did nearly all of the marking and cutting with very little help from me.  I showed him how to best use his work space, and how to cut safely with a utility knife but was mostly just there for moral support.

  Once the shell was finished the whole thing was covered in papier-mache. A day to dry and then paint, both spray paint, (his first time) and lots of poster paint details.

  My Grand daughter spend several hours making doll house furniture with Eva. They make bed and tables and lamps, the sort of thing a doll house that will be home to a family of dinosaurs
 needs.   
  Altogether a really good week's workshop time.


  My work shop is a power tool/hand tool shop. I pick the method or mix and match according to the situation. Carving spoons is a prime example of that. In my garage yesterday I found a piece of poplar under the stairs. The wood was badly cracked so only useful for firewood or...a spoon.  In this case, I split the log with a axe and mallet, then used my jointer to flatten the face, rather then doing it with a hatchet and planes. Also, I used my band  saw to cut out the rough shape of the spoon.  That is brute work with an axe so I often choose the power solution. The initial stages work well with power tools, it gets the heavy work done quickly leaving quiet hand tools to finish the spoon.


  The next stage is all hand tools. The draw knife is perfect for shaping the handle and the hooked knives hollow out the bowl.  My rasps further refine the outside outside shape. Over the course of the project I use various other shop knives but the hook knives are only used to carve spoons.


  With just a couple of hours of causal work the stout spoon is ready to be sanded. I am leaning toward stout porridge stirring spoons lately.


You can see that the spoon has a crack right through. A couple of treatments with CA glue and once sanded it will look fine. 

 I have had a request for salad spoon and forks. I take requests.

cheers ianw  
spring is just around the corner. sigh.


Monday, October 18, 2021

Table Top, and Kid Projects.

  This was a grand kid dominated weekend, a great return to our normal life.  My Grand Daughter worked with Oma and created this lovely stained glass panel as a gift for her teacher. Once the panel was cooled it needed a stand. Clara and I worked in the shop to make the wooden stand.  She cut the wood using a back saw and mitre box.  I did use the table saw to cut the slots into which the glass fit to help out.

Stained Glass Apple 

  My next project is a coffee table using a large live edge slab of soft maple.  This slab was cut using a chain saw and so needed plenty of sanding. For a task like this I have a heavy duty diesel powered disk sander.  I inherited a 7 inch sander from my father's shop. My father had a "go big or go home" attitude towards tools.  Generally I use my 4 1/2 inch angle grinder with a sanding disk, but this job needed a 7 inch 40 grit disk to flatten the chain saw ridges. I think the table top will be very striking when finished.  It has some spots that will need epoxy to fill and I am going to consult with a friend who is expert in using epoxy before I take this on.  I would hate to mess it up and then have to grind out the mistakes.  


Live Edge Table Top


  This weekend also saw my Grandson make his first lathe project.  There are few tools as much fun as a wood lathe. Kieran designed this light house, complete with a little house for the keeper and made it on my mini lathe.


Light House lathe project

  The next time they are here I'll have wood mounted on face plates so the kids can make bowls.

  Our lives have returned almost to normal after so very long.  We have been blessed, no one in our extended family fell ill and very few people had their work disrupted. I hope that is the situation for you'all too.

cheers ianw 


Monday, August 10, 2020

There Be Dragons


Our Grandson arrived for a week long visit and he brought his Crested Gecko with him.  It is an interesting sort of pet, not a kitten but...less trouble.   Last visit Clara and I built a small house for her Gerbils so this time the project was a castle, fit for a dragon. 


This was Kieran's largest project to date.  Also the one in which I was the least  hands on. He used the band saw to cut the top of the wall and the drill press to make the holes. Importantly, he made the plan and set up the tools. That meant that he figured out how to put the drill bit in the chuck and align the holes etc.  This also was the project that got the most careful sanding so that the Gecko would not risk injury crawling around. A small drum sander was used to smooth all the windows, with files and rasps used on the top of the wall. 

 In the back are three levels, connected by ramps all cut and assembled by the young apprentice.  As part of the design there is a catapult on the top rampart. It is a castle after all.


  The whole project is made from 3/4 plywood.  We both agreed that it was heavier than necessary but it was what was on hand.  He and I are not quite at the point where we need to shop for the exact material for the project, but that day is coming.  

  We are having another heat wave.  The shop is a cool spot to hang out, I've got a couple of small things to fill my time as I hide from the heat.


Monday, June 15, 2020

The Current Little Things


  The last two weeks have been heavily absorbed by family responsibilities. Everyone with an aging parent can guess what is going on, if you can't, lucky you, your time is coming.


   Small project- when cleaning things up I found a cranked neck chisel blade that I made at a black smiting workshop I did a couple of years ago.  Everyone should spend a couple of days in a forge on a course, it was fun and educational. While my Grandson was carving a cat I roughed out a handle for my chisel.


  I have spend a few minutes sharpening the chisel and now it is a ready to use tool.


   Oma wanted a bird house.  My Grandson and I made one, he did 7/8 of the work and loved drilling the big hole with the drill press.  Next week our Granddaughter will finish the house, she is going to do the sanding and painting.


  While working away in the shop and helping Kieran with his wood carving, I found my half finished bow sander.  While K was sanding his project I took the time to finish mine.


   Another project to finish.  I found a box of half finished carvings while carving with last week.

cat back


 Cat front
Kieran  worked away for a couple of hours on his cat.  The cat will be on a dowel connected to a hockey stick used to brace a patio door.
  Yet another carving requiring finish.  I filled the owl, sanded it down


  Nice contrast , now...what to do with the owl.

  I have at least two more weeks away from my shop and home while I help out family.  

cheers, ianw


Friday, March 20, 2020

Social Distance Shop

  Needless to say life is not 'business as usual'.  We did have the Grandchildren here for a few days and have had a few family members around but by Wednesday we have settled into a quiet life.  Nearly everything that takes us out of the house save for basic shopping is closed down.  This maybe a sort of blessing after all, only time will tell.

  I have been spending time in my shop naturally.  I find myself puttering around doing some long delayed maintenance and organizing as well as projects.


  The table and chairs are painted and into action at my sister-in-laws. This furniture set is at least 20 years old. Isn't wood great, with a little effort and a splash of paint another generation will have hours of playtime.


http://blogthetoolstore.blogspot.com/2016/09/claras-clock.html

Clara's Clock

  I while ago the clock's bright tape face began to peal off, I fixed it today. It was time.  


  Generally I don't write reviews of tools.   I was at the Leamington Home Hardware Tool Expo at the end of January 2020 and was talking with Jeff and he was promoting these new saw blades.  I thought it was a good idea and bought a blade with my own money.  This is not a promotion. I have been using the blade on my sliding mitre saw for a few weeks and am satisfied with its performance.  It might be a bit more aggressive than my previous blade, but that could be because it is brand new sharp.  The cut is smooth enough that I am using it to cut a picture frame currently.  I will add a further comment when I turn it around and try the other side, next year sometime.


  Last weekend's shop project was fitting a cover on the upper bunk.  I don't know what inspired my Grandson but he decided he wanted a covered bed.

  I had three thin pieces of wood, off cuts from something, squaring a 2 x 4 I think.


  Since I was balancing two kids in the shop. My Grand Daughter and I were binding our own wooden covered note books like the ones done October 2017.
 

   Kieran and I designed the extension brackets for the hoops and he cut them out on the band saw and sanded them.  Next he used the drill press to predrill the screw holes and we attached the brackets to the bed frame.  While this was going on Clara was sanding the book boards and using the drill press to drill the holes in the boards and the pages for her book.


  I used this project to introduce another and historic wood joinery method. With careful drilling and screwing the thin wood strips could have been attached to the brackets but I wanted the Boy to do his own project.  We put glue on the hoop and clamped it in place while we wrapped the joint with strong string. The back two against the wall where out of my reach so he and his sister did the work, which was great. I know that lashing is always decorative in modern life but....knowing things like this is good for you. (I believe)


  To finish this off we made a draw bridge door, why? why not? I used foam core for the door.  I have found foam core really useful as a building material for kid inspired projects. They can cut it themselves and it is lighter and cheaper than plywood.  The hinges at the top of the door are multi layers of Duct Tape, again cheap and easy for short lived kid projects.


Thursday, June 6, 2019

Latest News and Small Project

   Last Thursday I resolved to clear  my 'to do'list.  My list had many little tasks that I had been put off or ignored for a long time.  As I was crossing off these listed items many others things rose up.  After the 'to do' was complete I then spent two more days on shop related tasks arising from 'to do'.

   What were the tasks?  A couple of hours were spent sorting through my wood rack and collected off cuts.  Over time lumber had been stacked, piled and thrown into the back corner of my shop creating chaos.  A bonus for getting organised in the back corner was the rediscovery of floor space.


  While clearing and re-stacking  I also  vacuumed the entire shop.  Of course serious vacuuming meant that all the dust collectors had to be emptied and all the filters cleaned part way through the process.  When all was said and done there was nearly a bushel of stray saw dust collected in my vacuum cleaners.

  For a break while cleaning and sorting I gave Captain  his spring re-fit.  Captain will float in our water feature and provide sunning space for frogs again this season.  Kieran and I made Captain during K's Thomas Tank Engine fan boy days. 


    Another undertaking over the two days was sharpening.  I touched up shop knives, chisels and block planes, now all of those tools are ready for action again.  I used a combination of my " Work Sharp", ceramic stones and  the "Scary Sharp" system.

   The biggest job was sorting my collection of loose screws, bolts and other bits and pieces.  Many shops have one or several large jars with mixed screws etc. in them.   I do not...I used to have such jars, but now I collect the bits and pieces for a few months and then sort them back into their appropriate place.  To do that job I pour all the weird  and lonely fasteners onto my work table, this time it filled the entire table top. First I gather all similar screws together, before returning them to their respective boxes and tins.  This way I save dozens of screws for future projects.  Next bolts with nuts, nuts alone, then plugs, marrettes and things related to electricity etc. Lastly all the weird craft items, wheels, bells, bits of wire and general miscellanies are sorted, sifted and put into jars, boxes and drawers for future use.  Since I began doing this when I moved into this new shop (new house) ten years ago I have been amazed at how many things have been saved for further use and how much money has been saved.

   Another project that I did to take a break from the domestic chores of spring cleaning my shop, properly was an eight sided box to be a plant pot.


   This rough looking piece is a 'proof of concept'.  Four of the section have 90 % edges and four have 45% edges.  The 45% pieces fit proud and are then sanded flush.  If the material is thicker and the project large enough the pieces can be connected using pocket hole screws. There is a special jig you make to aid in clamping your work.

  This piece is only 3/8 inch thick, so too thin for pocket holes. Also the material is too thin to cut the 45% edges with my mitre saw, I discovered. Since I had to cut across the grain I wasn't able to plane the angle on a shooting board either.  For my next attempt I have a table saw fixture in mind that will make accurate and controlled cross grain cutting possible.  Once this project is fully sanded and finished I think the grain will make it acceptable as a flower pot.

  Pots like this as well as small boxes are going to use up various bits of lumber that I discovered while sorting the lumber rack.  I have a number of nice but orphaned pieces of lumber that will make a  small project.  

  Anyway, now my shop is much a nicer and easier place to work.

cheers ianw