Sunday, January 31, 2021

Two Projects

  I have been working in my shop but not posting this week.  I changed my camera with the hope of not only taking better pictures but of making it easier for me to get the photos into the blog. Everything has a learning curve.  The curve is steeper when there are actually technical problems.  The port on my camera in which I plugged the connecting cable does not work. That was the last thing that I imaged was the problem. After consultation with my friend Clive, the camera guy, problem resolved.  Think it will take better pictures, I will get so moving the pictures around will become easier.

   Small Bench

  This is the top of a small bench 10 x 16 inches.  The bulk of the top is a drawer front reclaimed from the side of the road.  I trimmed the piece with elm. I did the glue up in two stages, sides and ends. (mostly because I am not in any hurry. Less so now that there are further restrictions on causal travel.)


  Using poplar again with a 1 inch tenon on each leg.  I rounded but did not fully round the legs on the lathe, it gives a semi hand shaped look.  Sort of tapered, sort of eight sided.


  The 12 Degree Jig again came into use.  I love it when a tool naturally fits into the work shop.


  This time I cut four blocks and glued them onto the bottom of the bench, after drilling the 12 Degree holes.  Once the blocks were firmly glued I stuck the legs into place and....LET GLUE DRY.  Four diver's weights held everything in place. (I think the diver's weights are 6 and 8 pounds.)


  Box

    The next project developed because I looked under my bathroom sink. Unless you want to find yourself a job that needs to be done on you knees, don't look under the sink.  Anyway having made that error I dragged all the stuff out that had accumulated under the sink in the last 12 years.  There were many, many bottles and jars that had a little bit of something in them.  You know, hand soap, shaving soap, mouth wash, shampoo bottles that weren't totally  empty and were awaiting the time when they were poured into one bottle. That time came, possibly this is a natural 12 year cycle. Anyway, once I amalgamated all the potions together I went from having many bottles, to just a few.

    This pine box was also under the sink, filled with....you know.  I decided that though this was a personal project, from years ago it was time to rebuild it.  This box was too large, the wood too thick and therefore too heavy.   


   I took it apart and then used my Dado Stack to reduce the thickness of the long sides.


   Setting up a dado stack is something of a pain....but nothing works as well for ploughing wide grooves and removing material.  I seldom use my Dado blades but every shop should have a set, even if you only use them once a year. 

I have had four Irwin Quick clamps forever, 
that type of one hand clamp makes shop life better. 

  Ultimately I cut about three inches off the length of the box, used the dado blades to reduce the thickness of the sides by 2/3 and am gluing the ends inside rather than out board as the last time.  This means that I have  storage box for under the sink that is not too awkward to retrieve with one hand, even when filled with bottles and jars.

  All that remains is sanding and finishing.  

  Cheers ianw

a post card sized painting.
the other thing I'm doing with my 
indoor time this winter.


Friday, January 22, 2021

Finishing the Three Legged Stool


  The stool is 10 inches across and 12 inches tall.  The seat is ash, the legs are poplar and the wedges are cedar, This turned out to be a good little project and with careful set up not a difficult one after all.
   

  The internet told me that the typical angle for the leg holes was 12 degrees.  I decided to make a proper jig to hold the work while drilling.  The last time I did this I just wedged the work piece and ended up with one leg hole misaligned, this time perfect.  The jig will now hang on the wall with all the others, after it gets a coat of bright paint.


  In action the only trick was to solidly clamp the work piece to the jig, to the drill press table. I think it is past time to address the challenges of clamping to the drill press table.  I've got the time, I want to make more stools and tables, so...get on with it.


  After the holes were drilled and the legs attached I needed to glue a couple of pieces of bark back on. As well as make repairs to my mitre saw jig. And assemble the paper towel holder for our laundry room.  All those things are being held together with glue.  Glue works great when I give it time to set.  When I put up the sign, I remember. Visual aids are important teaching tools for some people. (me)

   A three legged stool was on my "make it"  list, as well as bellows, wooden nut cracker, spinning wheel among other things.  It feels good to check off something on the list.

  cheers, ianw

 
the other thing I have been doing with my time, thinking spring


Tuesday, January 19, 2021

Flattening, Planing, Scrapping and Sanding

  The current project is a three legged stool using an ash round as the seat.

the half round marble table top is used as my 'flat' reference surface in the shop.
I found it put out as garbage by a neighbour one day, a real find.


  My Brother in Law cut down an ash tree a couple of seasons ago and generously gave me a dozen rounds of various sizes. The wood is  gradually getting turned in to cheese boards, clocks etc. This round will have three legs set in as a small side table/stool, plant stand.  The rounds were cut from the tree trunk with a chain saw and so are pretty rough. Even with skill and care a chain saw leaves plenty of marks on the wood.

   The  challenge is making the flat face smooth using a reasonable amount of time and effort.  Having now flattened several rounds I think I have arrived at the most efficient method.  

electric power planer.

 I bought this planer on clearance from a booth at a wood show a few years ago. It is fairly short and somewhat awkward to use but...it cost $10.00.  As a rule I don't use a power planer but for hacking away at end grain like this it works very well.  Once the face of the round is flattened somewhat,  hand scrappers are the next step.  Again the scrapper can be used aggressively but still controlled.  The final stage is random orbital sander time, 80 grit and up.


  The end grain planing leaves a pile of rough saw dust, not nice shavings.

   The legs are poplar 2 x 2's 14 inches long.  Initially, since the power planer was on the bench I used it to knock the corners off the legs before turning them on the lathe. Funnily enough the power planer was not the best tool for the job.


  Quickly I turned to using my jack plane to ease the  corners, and the result is much better for the shop's air, and as quick, in my opinion.  My Grand kids used to call the shavings feathers. They liked cedar feathers best, don't we all!


  It is quick, easy and quiet using a hand plane.


  It took about 20 minutes a leg to turn on the mini lathe, and sand ready to be set into the seat/top of the stool/table.

   Next, decide the leg angle, make a jig and drill the holes using my drill press. 

   Planning and set up will take longer than the job. 

cheers, ianw


Monday, January 11, 2021

January Project - storage cart

   Before I get to the storage cart I want to share a new cutting board.  Before I get to the cutting board,  I want to share the top  of our kitchen island.  I wanted to take the photo of my latest cutting board on the island, first I have to move a bunch of  things. The top of the island is Brazilian marble, the base of the island is one of my shop projects. I built the wheeled bottom of this island so long ago I can't find the related blog posts. 


  Everything that lives on top of the island is from our creative minds.  Eva made a set of three stained glass candle holders and the various wood things are from my shop, over the years. 


  There is nothing special about this cutting/serving board other than it is walnut and maple.  I'd never worked with walnut, now I understand why it is so popular.  I also cut out four spreading knives from poplar wood. Things like spreading knives can be churned out easily using the band saw and a drum sander. 


  I was asked by my brother to make a storage rack for the basement.  I like it when there is a need for my wood work. He has an area in the basement that is filled with beverage cases and recycle bins that needed a more efficient system. I made the rack and put casters on one end so that it can be manoeuvred around easily.


It is difficult to see but I notched the legs into the shelve frame making it more sturdy and taking up less space.


  The interesting aspect of this project for me is that it was made almost entirely from left over materials. The shelf frame is made from the laminated elm boards that I first made for the wheel barrow repair.  I had planed and glued the board together before I decided to go a different direction with the repair and then didn't need them.  I did keep these boards on  my lumber rack, You can never tell when you will need 5 foot 3 x 3's.  It was simple to rip the boards to size on my table saw.  I have only ever had a job site saw in my shop and it has served me well for the last 20 years. hint: good, sharp blades make all the difference.


The uprights are from a long ago failed set of production items.  My Grandson was little in the video and now he is big, so that tells you how long the up rights have sat in my shop.    Again cutting them to size was a breeze on the table saw.  I know that plunge cut circular saws have their  fans, but I like what I know, I guess. 


  Other than gobbling up a bunch of 1 1/2 inch wood screws and some glue the project used two casters from a parts bin. For a couple of seasons I brought home wheeled office chairs that were being discarded and salvaged the casters. I am at the point that I no longer gather up materials without a plan, mostly because now have lots of materials, not so many plans.

  As we are evermore encouraged to stay home I am looking for things to do. I bet you are too.

cheers, ianw


dance, even if your feel are cold!


Monday, January 4, 2021

New Year 2021

 We are all looking forward to 2021 turning out much differently from 2020.  My year in the shop has begun in a small scramble.  I am just finishing a bowl on the lathe, waiting for the varnish to dry.  Part of the bottom of this bowl is not round, it has two flat planes. Since it wasn't round I couldn't really finish it on the lathe. 


I am fitting a scale to the handle of a tiny knife.  I found the knife on the road and replaced the scales previously but one seems to have abandoned the knife and now needs to be replaced.  Roasted maple looks great and is easy to shape with files and sand paper.


let the glue dry

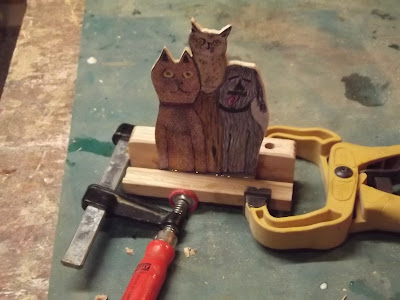
My Grand son sent me a drawing with three cats a while ago.  I've created a "trio" drawing of my own for my Grand daughter that will be a pencil holder for her desk.  

let the glue dry

  Latest cutting board, walnut and maple.


   Once the glue is dry this board will sand down to a glowing finish. 

  Its a new year and a good time to get on to new things.

cheers ianw