Tuesday, April 26, 2016

What to do before a two week break

 We are going to be involved in family things and travel things and general busy things for the next two weeks. I will not be in my shop at all and may not even be able to post any blogs. So what did I do with the remaining few hours I had before my break? 

  Well, first off I cleaned up the shop a bit. Nothing major, just put tools away and swept the place up a bit.

  Then to kill some time on a rainy afternoon I did a couple of small potter around things. These are the jobs that most people don't bother doing, but since I have a shop and tools I improvise and repair.


   A none event, but now the clothes hanger doesn't grab my pyjamas. I had to drill two holes and use some super duper glue. Most people won't bother.

  I also took time to sharpen some knives and change the  blades in a couple of utility knives.   Maintenance stuff like that takes more time than you realize.  I like to use times like this to sharpen blades so that when I reach for them during a building project I don't have to stop and sharpen.

  While I had my super crazy glue out I glued a rare earth magnet to my pencil sharpener so that it would stick to my over bench work light.  As with having sharp tools it is nice to work with a sharp pencil.


   The last thing I did was make a pattern for and cut out a silly little craft. These roosters will go into the box for the church bazaar. 


  Projects like these give me practise in making patterns from a photograph and uses up small scraps of wood that I have been to cheap to throw away. 

holding post-it notes on my desk.
   This rooster is made out of 1/8 inch plywood and a bit of pine. I like the shape and size and will make a few from stained wood like the one from the internet. (when I have some time to kill)

 Have a good couple of weeks and I'll for sure be back in mid May, and maybe will post an update or two before if I get a chance.

cheers, ianw


Sunday, April 24, 2016

Repairs and a Project

I have been doing repairs for 10,000 Villages for a couple of years and usually the repair/ is a box. However this week I got to repair a didgeridoo. The repair was not difficult but how many of you have repaired a didgeridoo?

bamboo didgeridoo about 3.5 feet long.

The didgeridoo was cracked, which I filled and stained to match
the original finish. The repair is not invisible, but pretty close.

 The next repair  was necessary because my original design wasn't very good.


  I turned this small bowl last winter and have been using it with my shaving soap. Since the bowl is half cedar, half pine it has done will with the wet/dry cycle of its life. The design flaw is I put a foam bottom on it. 


  The bowl sits on the bathroom counter and its bottom stays spongy and wet for too long.


  Having a wood working shop means that I have the tool for every eventuality. A Dremel tool and a dura-grit rotary burr were used to clean out the base of the bowl making it convex. I finished with a some small diamond grit points  to smooth things out.


  Finally I drilled nine 1/8 inch holes and drove pieces of dowel into the holes. The bottom of this shaving bowl now stands on nine 1/8 feet so that it will dry out when sitting on the counter.

  Repairs are always a funny thing. Many people would just throw this out, after all there are no shortage of small bowls in a house with a wood lathe in the basement.  I also have it on my 'to do' list to make a lid for this bowl. I like to keep things working rather than just toss them out. 

  Last week I made a pattern, today I made a trivet. In the fall our church has a bazaar to raise money for projects and there is a table of wood working stuff. I can but this trivet on the table and the church can charge what ever it wants. It is a good idea to have an outlet for your projects. It is nice to make things and see them put to use.


  A teapot will fit nicely on this leaf engraved into a spruce board. Once again I used my Dremel with various fine point tools. A variable speed Dremel is nearly indispensable for wood craft projects. 
  
 Cheers, ianw


Wednesday, April 20, 2016

Making a Pattern

  The first thing to include is my two finger hold down in use as promised. 


You can see this  jig allows me to hold the wood very close to the saw. This situation doesn't happen very often but often enough that it needed attention.

 The other thing I thought I'd show today was the process I generally use for making patterns and templates. 

 Often I am inspired by something I've seen on the net, there are a nearly infinite number of gifted people with an infinity of good ideas to be inspired by, or just copy. When I can I give credit for the idea, in this case I don't know whence the original design came.

   Initially I make some sketches on scrap paper and then a finished drawing in a serious art note book.


  I use these books because the paper is almost as heavy as Bristol board, but with a matte finish. It is 190 grams per square metre vs. 200 - 250 for Bristol board.* In this case my drawing is for a scroll saw pattern.


You could cut this pattern out with a coping saw and a band saw without too much trouble, the scroll saw is just easier.

  Next I make a copy of the pattern using my computer printer on ordinary printer paper. This way I keep the heavy paper pattern in a folder for later use. The light paper pattern is glued to the wood and cut out on the scroll saw.

 In this case I glued the pattern onto a piece of 1/4 inch Baltic birch and cut it out.  Since I like this pattern and expect to use it often I'll trace it onto the wood the next time rather than glue a print out onto the material. Tracing the pattern means I don't have to wait for the glue to dry, or clean it off the project after cutting it out.


Since it is a jig, it has to be red.

  I see this as a small trivet or a large coaster. A larger version could be used to protect a table top from hot dishes. We have a couple of palm trees in our house and this goes with the décor.

 Just by the by, here is a sketch that I did last evening in my note book.


cheers, ianw

p.s. bicycle season has begun here, finally.


Is that cool wood, or what!

* - If you keep your eyes pealed quality artist note books come on sale frequently. I bought my last books on a 3 for 1 sale. 


Monday, April 18, 2016

Mitre Saw Jigs

  At least ten years ago I bought a Bosch 10 inch sliding mitre saw and have been happy with it ever since. I don't know if Bosch even makes a 10 inch saw any longer, I suspect the linked Makita saw is every bit as good.  Over time I found that I could really improve the performance of the saw with a quality blade, that was kept sharp. 

 And another thing I did was develop or copy jigs for use with my saw.

 All my home made jigs are painted bright colours, generally red so that I can find them easily. The first jig I'll show you is a recent modification on an earlier effort.


  I've had this red stop block for a while. Today I made two small and useful changes to it. First I got very serious about squaring up one side and one end. Now when I seat a piece of wood against this block it is immediately obvious if I am cutting against the squared end. And I used my router table to cut two pencil slots into the top side. Now there will be a pencil readily available at the mitre saw work station.


  The slots are deep enough for the pencils to be out of the way of the clamp holding the block in place.

  The second jig's paint is still drying. It is an idea I copied from an Izzy Swan video.


  He had a cool commercially produced unit similar to this. This is a two fingered hand that will hold small pieces of wood near the blade of the mitre saw and not flinch, the way I do. Like a push stick for a table saw, this is a hold stick for my mitre saw.

  I made the stick by cutting a 33 degree angle on the faces and drilling two holes for the 3/4 inch dowel.


 I clamped the piece of wood to a larger piece of wood which gave  a wider stable base and then clamped the larger piece to the drill press table. To get holes bored straight I had put the same angle on the other end of the section and so was able to place it firmly against the table of the drill press.

 Before I glued the 3/4 dowels in place I shaped the handle, first on the band saw and then with files and rasps. Then I painted it red and added two 3/4 cane tips to increase it grip. This way I can hold smaller or awkward bits of wood near the blade and not worry about my fingers.

 Once the paint is dry I show it in action.

cheers, ianw


Friday, April 15, 2016

Rubber Band Pistol

 Today I whipped up a quick project for my grand kids.  They are coming for part of the weekend and I wanted to get my gun done so that the paint will be dry by the weekend.

 I looked on the net for plans and ideas and I found dozens. There was toy guns that were made to look like a real gun (not a good plan) and rubber band guns with sophisticated multi fire mechanism and some easy models with which kids can play. The weakest link in making my gun is the poor quality of the modern clothes pin.

  My gun is a three shot clothes pin action gun.


  I set out to make the gun look more like something from outer space than from real life.

loaded and ready to go.
 The barrel is short enough that that rubber band can't gather much potential energy and so will not sting if it hits skim by mistake.  I made the gun because the cheap plastic toys like it are crap. I hate crap toys, or tools for anything else.


  If you want to make a more complex toy like this :


 Check out this video; Slimmest Step Up Action.

cheers, ianw

Tuesday, April 12, 2016

Table Saw - Shim Jig

 Every now and then you need a shim. There is something that fits a little less than perfectly and the problem can be fixed with a little wooden wedge. You can buy shim stock at a big box store, really the shim stock is just low grade cedar shakes and they cost money. Or you can cut the wooden wedges your self. I have cut many wedges with my band saw, but I like John's idea for using the table saw better. The result is more consistent and the cuts straighter. 

 John Heisz at I Build It.ca has a jig that makes making shims quick and safe.

A Shim Jig, not a Shindig. 

 This is a jig that you should have in collection of table saw jigs, you know, with you thin strip jig, your spline jig, your table saw sled etc.

 I especially like this shim jig because it has a system to hold the small shim after it has been cut lose.  A jig like this is something that I would make while I was supposed to be cleaning up the shop or when I was puttering around waiting for glue to dry. Jigs like this are always painted red or orange so that they doesn't blend into the back ground and get lost amongst the other bits of wood and incomplete projects in my shop.

cheers, ianw

Friday, April 8, 2016

Lap Joints, a Puzzle and a Relief Carving.

  Over the last couple of days I have been nursing a sore back but still trying to do some things in my shop.

 I am taking another painting class, this time oil painting and need a way to move damp canvases from studio to home.

  My plan was to make a frame that would go in between the face of two canvases. That way the wet paint would be protected and hidden.
 The frames are made from 1/2 poplar with lap joints for strength without nails.


I cut the joints on my table saw by making multiple passes while holding the wood on my table saw sled. After cutting the joints I used a rasp to clean up the little bits left over. I keep a fairly course rasp close at hand and use it often to tune up little details when working in my shop. I opted not to use dado blades for the few small cuts that needed to be made. If the project had been any bigger I would have taken the time to put in dado blades, they are the correct tool for the job. 


The stop block limited the width of the cut.


  The frames were glued together and left to dry over night.


  Canvases of two sizes ready to go to art class next week. I had the straps in a box in my shop. They are old straps from camera and tool bags long gone. 

  The other two projects are a puzzle for a grand child and a small relief carving I was working on yesterday between laying on my back trying to find a comfortable position.


  When I am finished there will be six different pictures on these blocks, therefore six puzzles.  If the puzzles are too much challenge just now, then the blocks can be played with just as blocks.

  The relief carving is just a time killer.  


 I think it is a Dogwood. (sort of). I need to add some refinements and then paint it. As I am painting the rest of the puzzle I will get around and finish this.


Tuesday, April 5, 2016

The Apartment Wood Worker

  I think I have a new woodworking hero, Curtis Hampton a.k.a. the Apartment Woodworker.

  Check out this video of him making a tool box and visit his site to see his other projects.


making a tool box


  In a blog on February 24 2012 I talked about an apartment tool kit and another time talked about the usefulness of a jig saw 
(April 2, 2012). I could and should have talked about the Black and Decker Workmate and the Kreg Pocket hole Jig and worth while additions to the apartment tool kit. Curtis certainly showed both tools to their best advantage.

 If, in the future I whine about my workshop space people are allowed to give me a cold stare and refer me to "The Apartment Woodworker".

nice bit of work there


cheers, IanW

Sunday, April 3, 2016

Japanese Style Tool Box Video

  John Zhu has done a number of woodworking project videos and his video on making a Japanese Tool Box is very well done and helpful.  He shows in detail how to fit the lid and the wedge to hold it in place. He goes through the various steps like an experienced teacher, well done John.

Japanese Tool Box for Beginners.


   Check out his video, it is worth your time.

cheers,ianw

Saturday, April 2, 2016

Desk Lamp


I saw this desk lamp design on Pinterest and used it as an inspiration. 

The Catapult Modern Wood Arm Lamp in Walnut - Contemporary Light Fixture Articulating Wooden Table Lamp - Reading Desk Task Gift:

  I chose to use an battery powered LED light. This way the lamp is ultra-portable. 
Sylvania, DOT-it LED Light (silver)
Light 
  And instead of a carriage I used threaded  dowel and tapped two knobs to hold the joint together.


   The right end is glued  and the left side is for tightening and loosening the joint.


  The last time I threaded dowel I cut about 24 inches knowing that I would use it in the future. The tap cuts threads to match exactly, just as when working in metal.

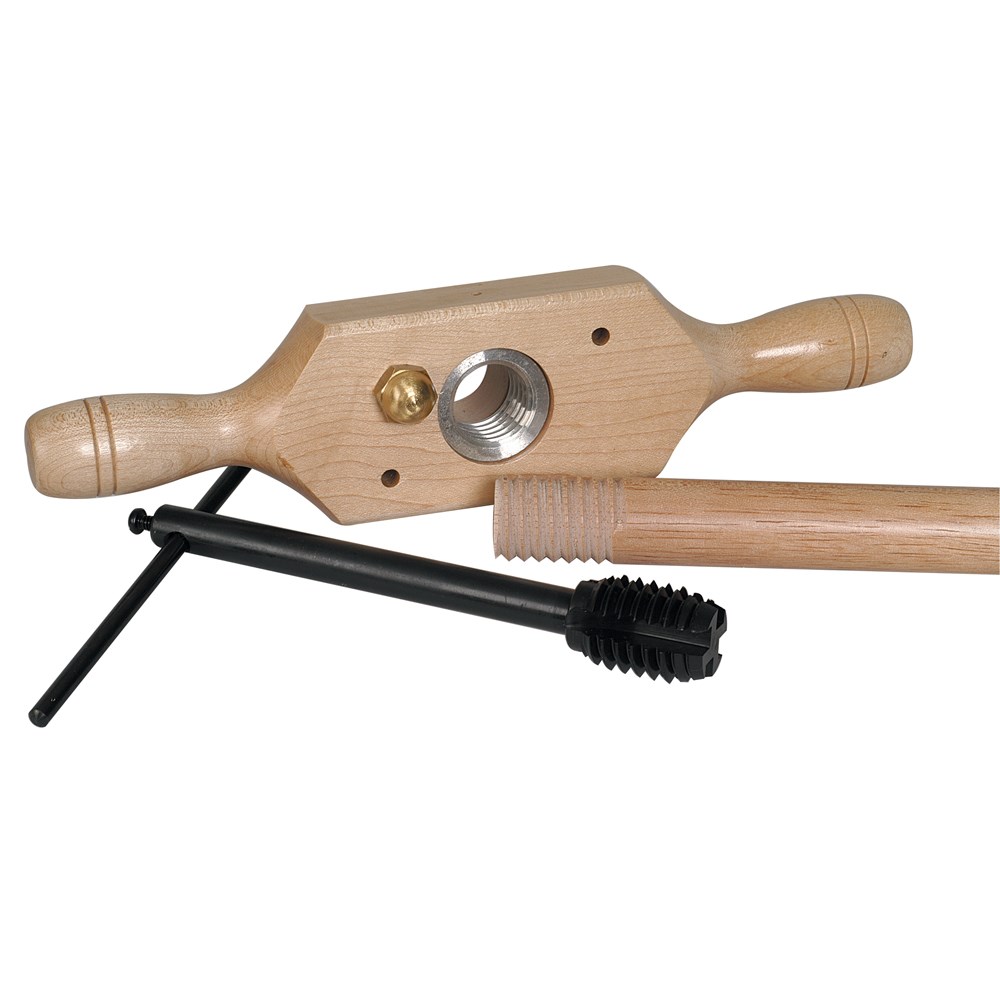
  I cut the thread with a thread box:

  Generally I have had success with threading wood, there are a couple of things to keep in mind.  The dowel and nut cut best when wood is straight grained. I soak the dowel in tung oil before threading to help lubricate the cutter.  When tapping the threads I drill the appropriate sized hole and then lubricate the tap with paste wax to help while cutting the grooves. I have also found that when tapping the wood is is best after cutting the threads to clean the die and run it through a second time to get clean clear threading.


  At this point the glue is drying on the knob and the base. I will take the arms off to finish the lamp and to fit a small section upon which to attach the light. I think I will round the corners and stain the lamp a dark brown.

 I think this will make a nice little desk lamp for someone.


Friday, April 1, 2016

A day late, but not forgotten

  This blog entry belonged to March, but with it being tax time my desk time has been diverted from this more useful and pleasant work. Anyway, better late....

  Every now and then I see a 'shop tip' that is so good.  I love this, I don't have a dead blow hammer, and since I don't make much furniture have carried on with one for years. Sometimes I do need to persuade some nice bits of wood to fit together and now I can do it without concern for the wood finish.  We all have more hammers that we need, so fitting a rubber tip to one is not a trouble. Interestingly this hammer was the one that lived in my Grandmother's kitchen junk drawer for ever and ever. I think of her when eating pie and tarts and when hammering in my shop.


 Wood workers can find useful tools in craft and hobby stores too. A while ago I bought this self healing cutting board. I cut all my leather and many of my templates on it now. Using it means I don't have to find a smooth, unblemished section on my work bench when cutting things out. This is something that I wish I'd bought years ago.


  These are a few of the small things I finished off yesterday in a break from annual paper work. 

   The figure eights are to wrap head phone cords around to control chaos on my desk.

  The napkin ring was turned on my lathe a week or two ago and I finally wood burned a design and varnished it.

  The bamboo chop sticks and skewers are to remind you to recycle them in your shop for paint stirring and glue spreading. I have also used the skewers as tiny dowels on project.  

  
 Last but not least is a prototype money clip using leather as a hinge with rare earth magnets to hold it closed. I'll see how it works out, then either refine or reject it.


 These are the products of a bit of time in my shop relaxing and forgetting about tax related paper work. I don't know what I would do if I didn't have a shop in which to play.

cheers, Ian W

both death and taxes are inevitable, delay the first and manage the second as best you can.