Friday, April 30, 2021

Go Anywhere Garden

 Recently KREG Tools sent a post with a plan.  We have had a wash tub sitting around in the yard for a couple of years. A contractor had used it to mix mortar for a small job and then left it when he packed up. The KREG plan was designed to make that old tub useful.  My wife plans to fill ours with salad greens.


 This is one of my favourite kind of project. There is a use/need for the project and it uses up stuff that is laying around.  I used 2 x 4 lumber to make my planter.  All of the wood was left overs and shorts from previous things.  The only cost was the pocket hole screws and the finish.


 The frame complete.  I made separate  feet so that when rot set in I could change the feet and save the frame for another season.


 A word about the finish.  It is from a $.99 can a picked up at The Re-Store.  With some vigorous stirring the stain/poly mix worked fine.  I am a big supporter of The Re-Store, it is a great place to get orphan cans of paint and varnish, also a good place for miscellaneous hardware.  Buying there supports a good cause and keeps usable  stuff out of  land fill sites.

  If you are looking for a quick  container garden project this is it.

cheers, ianw


Tuesday, April 27, 2021

Making A Box Or Two

   I don't really have any projects ahead of me so I think I will make some boxes.  You can always use another box.  To begin I made some lumber. In my lumber rack are many 18 - 30 inch long bits of left over wood.  Much of it is rough, reclaimed from skids or construction lumber. I decided to make some 3/8 and some 1/2 slabs ahead of need.  The joiner and the planner have to be rolled into the centre of the shop and they are both noisy. I  wanted to get the unpleasant part of the work out of the way first. 


various bits of wood.  some of it is domestic but some 
is recovered  exotic hardwood from skids.  A couple of the 
pieces have amazing grain patterns. 
 

Edge gluing clamps. I don't need them 
often but when I do ...they are great.


 For a change I thought I would use my Incra IBox jig fo make a bunch of finger joint boxes.  The previous time I used this jig I had it set up for use on the router table.  This time I thought I would use it on my table saw.  I had to return to the instructional videos as I couldn't remember the set up.  Frankly it doesn't seem intuitive to me.  As you see below, following the instructions enables you to cut finger joints, and quickly once it is set up.  I will make all the boxes with this width of fingers. 


This box is made from a spruce 2 x 4 cut down to 3/8 inch.  Once it is sanded and stained it will look fine.  I think it will be used as a flower box on a window ledge.

  Box making is a nice diversion and generally the result is useful.  The weather is improving, the motorcycle is on the road as is my electric computer bicycle, shortly the car will be only used for cargo trips.


I like  Blue Bikes.

cheers Ianw


Tuesday, April 20, 2021

Small Projects and Lessons Learned


This is what Easter looked like two years ago.  My sister in law and niece 
are cake bakers supreme.
Alas, no family get together last year or this, next year ....


nice plant.

This is the plant stand finally finished.  I messed up the varnish coat and it had to be sanded stained again and varnished.  I should know better than to experiment on a commissioned project.  I have learned to let my glue dry so I will learn not to mess with finishes, someday.

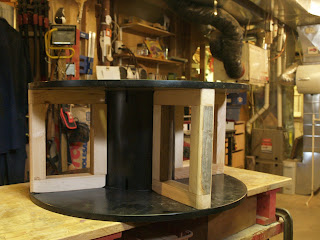
  This is the first thing I am working on, using up left over and stray 2x4. We have four plastic spools that are about 3 1/2 feet in diameter that came from my brother's workplaces trash. The spools looked too get to throw away so he brought them home for me.  Eva and I decided that they would make really nice little patio tables for little people. (of whom the family is well equipped again) I am ripping old 2x4 into size and putting four in each spool to increase rigidity.  There is consideration being given to covering the tops with tile mosaics.
 

  This is one of those projects at use time to save money.  The fast and easy way would be to buy a bundle of 2x2 strapping and bang these things out.  Since I am using old, stained, weather, cracked wood there is ripping and sawing and fiddling that needs to be done.  Not the least of which is making sure there are no nails/screws in the wood already.  Anyway, this type of job is a relaxing, low stress thing, doing when I want and how I feel.

  The other job is a learning project for me. In October 2019 I made a box for my bathroom stuff.


  Having lived in a wet environment next to my sink this thing has begun to rot away.  I decided to make a new one, that used the space better.  This purple box was an orange crate that I re-purposed. The next unit is designed to fit a specific space.


  I have never made anything with curves before and wanted to try it before taking on a real project.


  It was an interesting little project for me, probably what I learned I should have known years ago but as a self taught wood worker there can't help but be gaps. To get the shape/curve I needed I traced the space on a newspaper, cut it out and refined the curve. I used Baltic birch plywood for all the straight edges and the bottom. The bottom stands on cork feet to try and keep things dry.  The bent wood is elm ripped to less than 1/8 inch.  Needless to say the grain runs the length, surprisingly  the elm bent easily without heat or being dampened. 

   A few years ago I saw a bread box in Sweden that was round for storing their typical round hard bread sort of like this one.


The round bread is about 12-14 in diameter and a couple of inches deep per package.  There are usually 5 - 6 slices in each package. 

  I thought the round container was cool, it was covered with painted and wood burned folk art that made it unique and personal.

  I have some more elm and I think with steam I should be able to bend the sides around without too much trouble. We shall see.

cheers ianw

p.s. It is April 20th and I am looking out the window at light snow.  Jeez.


Tuesday, April 13, 2021

Book Up Date - It Is Finished

   The last few photographs of the process show the cloth covering being glued to the boards. Just like all workshop projects, you can never have too many clamps.  I stretched white cloth around the edges of the boards and clamped it 'til dry.


  You can see the binding ribbons that were glued to the spine and will be glued to the boards and held in place by the front and back pages.  When the book is being made, the ribbons are sewn right into the spine of the book.  I wasn't prepared to take the book fully to pieces and re-sew the binding so I glued the new ribbons on.  Modern glues are so good, I have no concern that the ribbon will come loose.


  The book is together.  There are 18 feet of repair tape inside fixing rips.  I was forced to cut down a dozen pages that had deteriorated along the edges to the point there was nothing to save. Those pages were all in the index so almost nothing was actually lost.  All the colour illustrations and recipes  were saved.  As well all the loose pages (25) were re-attached so it is now a complete and usable copy of the original book.


  Cleverly my wife went on line and down loaded a copy of the books cover and printed it out.  After getting a print out the correct size she coloured the lettering to replicate the gold leaf printing and re-created the cover's original back ground colour too.  After all that she made a clear plastic cover to protect all that hard work.  Actually a cook book should come with a plastic cover automatically. 


  Anyone that looks at this effort will realize that it is not a 'restoration', it was a repair, that saved a family favourite cook for another generation or two.  If they can read the old style script!!.

  Actually book binding is a low tech, high satisfaction  craft.  If you search 'book binding DIY' on Youtube the are many  good and informative videos available, Sea Lemon  is one of my favourites for ALL the different sewing methods used to bind books. 

  Cheers Ianw

Monday, April 5, 2021

Book Repair

   I have always loved books and reading, maybe more than wood working.  In the early 1980's I took a multi-week community college course to learn book binding and restoration. Book binding requires few special tools but endless patience. Over the last forty years I have bound a few books, I use the tricks and skills to make my own watercolour sketch books and I have repaired (saved) a few books. I am not a trained conservator and I don't do leather binding.

  This last week we have enjoyed some good spring weather and so we've been outside and my time in the workshop has been spent on maintenance sorts of things which are not very interesting, not even to me.

  Mainly my energy has been focused on restoring and re-binding my late Mother-in-Law's old, old cook book.  The cook book  has many loose pages and the cover is falling right off. Clearly it was a well loved and heavily used cook book. I'm told it is the German equivalent of our "Joy of Cooking", a go to book for home cooks.


since the cover is so loose many pages at the front and back are loose too.


I won't re-sew the signatures. I will use latex glue to hold the loose pages in and 
attache the binding tape.


  When dealing with book repairs there are a few special tools:

 Transparent Mend Tissue, a type of tape, that isn't plastic and doesn't yellow.

Linen binding tape - used to attached the cover boards to the body of the book.


sharp scissors, tweezers, very sharp knife, bone folder, straight edge, rubber cement, paste, spray bottle of water, magnifying glass. dental pick and cutting mat.

The first thing I did was go through every attached page and tape any tears in the pages.  The linen tape is 1/2 inch by 12 feet. To repair all the tears I used 15 feet of tape.  There were many torn pages.

All the pages are here, it is just a case of smoothing them out, repairing or trimming the frayed edges and carefully gluing the pages in where they belong.  A full restoration would cut the signatures free and re-sew them while putting the loose pages back.  I have found that sewing signatures requires more practice to do it well than I have acquired.

 Really crumpled papers unfold better when slightly dampened, other wise the paper can be too brittle. I have only five pages left to re-attach, that is about an hour of fussy work, for me.  A skilled experienced book binder would be quicker.  So today I will finish putting the pages back into the book and tomorrow begin the work on the outside. (the covers etc.)

  Happy Spring time everyone.

cheers, ianw