Saturday, February 27, 2021

Inspired by instructables.com

   Instructables.com is a web site to which I subscribe and have for a few years.  I like the site because it features everything from art to zoology projects. Cooking and wood working are my two special interests. Lately there have been 3D printing projects too. I can see great things in 3D printing, but not for me at this stage.  Similar to CNC controlled routing I have retired from production situations and so don't need the latest technology to complete in the market.

Last week there was a 3D printing project that caught my eye. I liked it enough to really check it out and so decided that I could make the project using old school techniques. I am old enough to remember "pattern makers". Google doesn't even know what I am talking about, I checked.  A pattern maker worked from drawings to make a perfect wooden model of an object that was then to be cast in metal, the pattern. Now the object exists only as a computer drawing and pattern makers are very nearly extinct. I decided to make the 'pattern' the old fashioned way.

  Shawn the Sheep is famous among my grandchildren so I decided to copy the idea of Shawn but skip the 3D printer part of the project.


  If you feel like a little sheep in your bathroom these are all the tools that I needed to make Shawn. Since I used wood, I needed the saw. If you made Shawn from foam core or card board you wouldn't need the saw.


  To get the curved body I cut a vitamin bottle with the utility knife,  stout scissors  would work as well.  The legs are chop sticks and an awl would have made the holes, the drill made it easier.


  That is the finished sheep parts.  Four legs, cut and painted, the face and plug cut with the coping saw. I sanded the face and legs a bit, but not much and glued the eyes on.


  I know this is not a "work shop" project in the tradition of furniture and canoe making but I included it as a reminder that making stuff, that is fun and poplar doesn't have to involve tonnes of money or equipment. The body was re-purposed plastic, the legs were re-purposed chop sticks. (I always save my chopsticks from restaurants) The only cost was the googly eyes, a low cost craft item. My sheep's face is roasted maple, because I had some laying around, but painted card board would work just as well. Using painted card board would make this a kitchen table project for kids.

  While the glue was drying and because I am trying to finish up, fix up, put to use or throw away things lately, I decided to finish my hour glass.  I bought the blown glass part of this project while in Sweden a couple of years ago it has sat waiting for be captured in wood since then. The hour glass is actually half size and so runs about  30 minutes.


  My initial thoughts were for something thing fancy. I haven't abandoned those thoughts completely but at this point it is two squares of mahogany and four 3/8 dowels.  But, what it is, is finished and usable. Until now it was stored away "safe" awaiting purpose. 

  I have come to believe that the person with the least junk wins, not the person with the most stuff.

cheers, ianw  


Sunday, February 21, 2021

Next Two Planes


This photograph shows my wooded plane. This blog is about the two biggest. The longer of the planes is 26 inches and the shorter is 21 inches long.


The shorter of the planes had two issues with which I'd not bothered. The handle was a little loose and the top of the tote had been broken off, long before I bought the plane.  This plane and its big brother came from a local antique store where they were seen as decor items, dirty and therefore cheap. 


  Part of the fix was easy.  I flooded the space where the handle was set into the body with CA glue and let it set.  The handle is no longer loose. The broken part was just as easily solved using modern chemical technology.  First I drilled a couple of holes and glued in fine dowels.


Next, I created an over sized knob from two part putty.  Once the putty dries and sets (about 24 hours) it is very hard and workable.  It also adheres really well to wood, the pins were probably not necessary. 


  I spent a few minutes sanding/shaping the knob and the handle and all that remains is to re-stain it.  Occasionally I have used this plane in the past so it has been sharpened though I seldom need a plane this size. It is very large and awkward to handle, I am thinking of putting a knob on the front for my left hand to hold while planing.

  The second plane is the monster plane of my collection. It is 26 inches long, 3 1/2 inches square, sharp and usable, I just never do anything that needs that much plane.  It would be something used to flatten a table or bench top I guess.  


 It was a stained and greasy mess when I bought it years ago so I scraped and sanded it long before I ever tried to use it.  It  has been sharpened and it will work, it is just TOO big for my shop, it is nearly too big for me to manage it.  I have thought of making it into an edge jointing/squaring plane by adding a fence.  Any thoughts from you folks out there?

  I am now working on some small projects that seem to need more sanding than anything else. I will share them next time.

cheers,ianw


Tuesday, February 16, 2021

First Two Planes-A Hit and A Miss


  My wooden planes all have a story.  This plane was a gift from college friends 35 years ago.  Their idea was for the plane to sit on my desk as a paper weight. I knew nothing about wooden planes and my friends picked this one because it looked old, nice and was reasonably priced.  So, for years the plane sat on my desk, and then on a shelf in my shop and other than having the dust blown off it occasionally  it was not a tool, it was an ornament. As my skills increased and the shop became filled with tools this coffin shaped smoother was re-examined.  

  Around that time I made the decision that all my tools had to be working tools, so this had to be made to work or find a new home.  About fifteen years ago I imported some speciality wood working planes and started to study planes in general. I bought some books, watched videos and began to experiment.


This plane had seem lots of use before it came to me.  The throat had been worn away and the sole had had an insert installed to close the gap.


  Yesterday I added a tiny amount of filler to one corner of the patch.  Once the filler was dry I flattened the sole with sand paper on a marble slab.  The blade and chip breaker had been attended to previously and I've used this plane on and off for at least ten years.   


  Enlarged to this size you can see that this is a quality blade from serious maker. It still does good work for me. 

  Since  have two  really good steel body smoothing planes it is to one of them I turn for very fine shavings at the final stage of planing. This plane fits into the preparation process between my Scrub plane and my bevel up low angle smoother.  Rex is right, a wooden plane feels different in your hands and some times different is therapeutic. 

  The story of this next plane,  Well,  not all stories are happy ever after.  This plane is junk. It looked so lovely sitting on the shelf, The body has lovely flowing curves, As a devise for holding a sharp blade?? maybe its real purpose is for shredding cabbage. Shortly it will be repurposed as a long body sanding block. I was supposed to be an Asian style plane that was pulled instead of pushed. It was cheap, I should have known better, but..it had such lovely flowing curves. 


  Next time another hit and another miss.

cheers ianw

be optimistic, spring is coming.


A Tip and Projects

   The 'tip', I thought I would share is my carving gloves. I bought leather finger protectors a  few years ago and while they made carving safer I couldn't get them to stay in place very well. Having wood slip around in my hands while carving was just as unsafe as a firm grip in a bare hand in my mind. My solution is ugly but effective. I glued the leather finger tips onto rubber palmed work gloves.  I have worn the gloves long enough that I have worn a few holes which I have taped up with Duct Tape.  One of these days I will move the finger tips to new gloves, I guess.  I have two pairs like this so that a guest carver can work safely too.


   This is a 'why wood' kind of thing.  This cheerfully painted box was my Mother's when she was a little girl. Over eighty years ago she got this box to hold a doll and its clothes.  Originally this was a tiny steamer chest, blue with black strapping, looking just like the real thing only about 10 by 10 by 18 inches.


  When I was little this box was the grand kid's toy box at my Grama's house. So 55 years ago, and it was still blue. The key, well, that was long gone even when I was a kid. My Mother went through a 'folk art' phase and lots of things got painted with hearts and flowers, that was 25 or 30  years ago.  Recently Mom gave this to me to pass on to a Grand Daughter and all that the box needed was to have the tired old hinges fixed.


  The hinges had been sprung from years of the lid being opened fully.  I was going to cut the old hinges away and install me ones. Then I reconsidered, there was no need to remove the old hinges.  Taking the hinges off would have exposed holes that would have to be filled, and I am sure the box was painted around the hinges.  To keep from having to fill holes, and match paint I just added two more little hinges to solid wood and the box is as good as it was 50 years ago.

  That is why I love wood.  There are no cool plastic boxes from 80 years ago.  If it had been metal it would have gotten rusty from thoughtless storage and been discarded. When my Grand daughter gets old enough to more on to college this toy box will be nearly 100 years old, and there is no reason not to imagine it living onto her children.  Wood will last, in use, like few other materials.  The flowers and hearts my be replaced with something new but..this box and its history will endure.


  Here is another box from my Mom. When Mom was going through her ceramic  phase I made her this box in my first workshop. (30 ish years ago) She hauled this about the country first with tools and glazes and later with paint and brushes. I presented her with a white box, you can see what happened. I think she was quite good at 'folk art' painting.  This box, I think will stay in my shop, for brushes, tools and sentimental reasons.

  This project is just being put into storage to await another Christmas season. Eva cut scores of slices from fire wood, drilled holes and wired the rounds to a wire frame that came originally covered with BRIGHT coloured garland. Eva made three trees, we kept one.  This is her variation on things seen in real life and on-line.  A work shop is not necessary, but a table saw sure made cutting the slices quicker and easier than by hand. 


  These various things out of the way, I am starting on a series of blogs related to wooden planes. 


  Next time, evaluation and decisions.  Check out Rex Figures It Out, my inspiration for the next couple of blogs.

cheers, ianw 


Monday, February 8, 2021

Whittled -Two Knife -Knife

I don't do 'how to' blogs, mostly because there are many ways to do things and my way is not any better than your way. Last time I wrote about the Flex cut whittling knife and I thought this time I would do a blog about basic whittling tools. 

 The Project - Easy spreading knife   

 I have made many of this style knife, they are sturdy and easy to make.  Poplar is straight grained, harder and so more robust than basswood. Wooden knives, like wooded cutting boards should not be put in the dish washer, ever. I picked a piece of poplar from the 'off cut' bin and laid out the basic shape. 


  You can see the blade runs the length on one side.  Doing this makes it easier to cut out the its shape with basic hand tools. You don't need a band saw, just a decent hand saw. This designs also means you don't have to worry about getting the blade in the centre of the handle.  Rounding the end and where the blade joins the handle can be done with your knives, or a rasp.


The knife was deeper than needed and again a quick rip with any available saw brings it to size.  If you were a hard core hand tool user an axe or draw knife would work just as well.


  Basic clunking shape before bringing carving tools into the game.  I generally make my spreader knives sturdy because I use them for more than pretty pate and soft cheese.


  The blade carved until thin and the handle is tapered and thinned quite a bit.  For me the carving process is about shaping and on the fly design.  As a rule my handles are larger than average, it makes them more comfortable for old, stiff hands to hold.

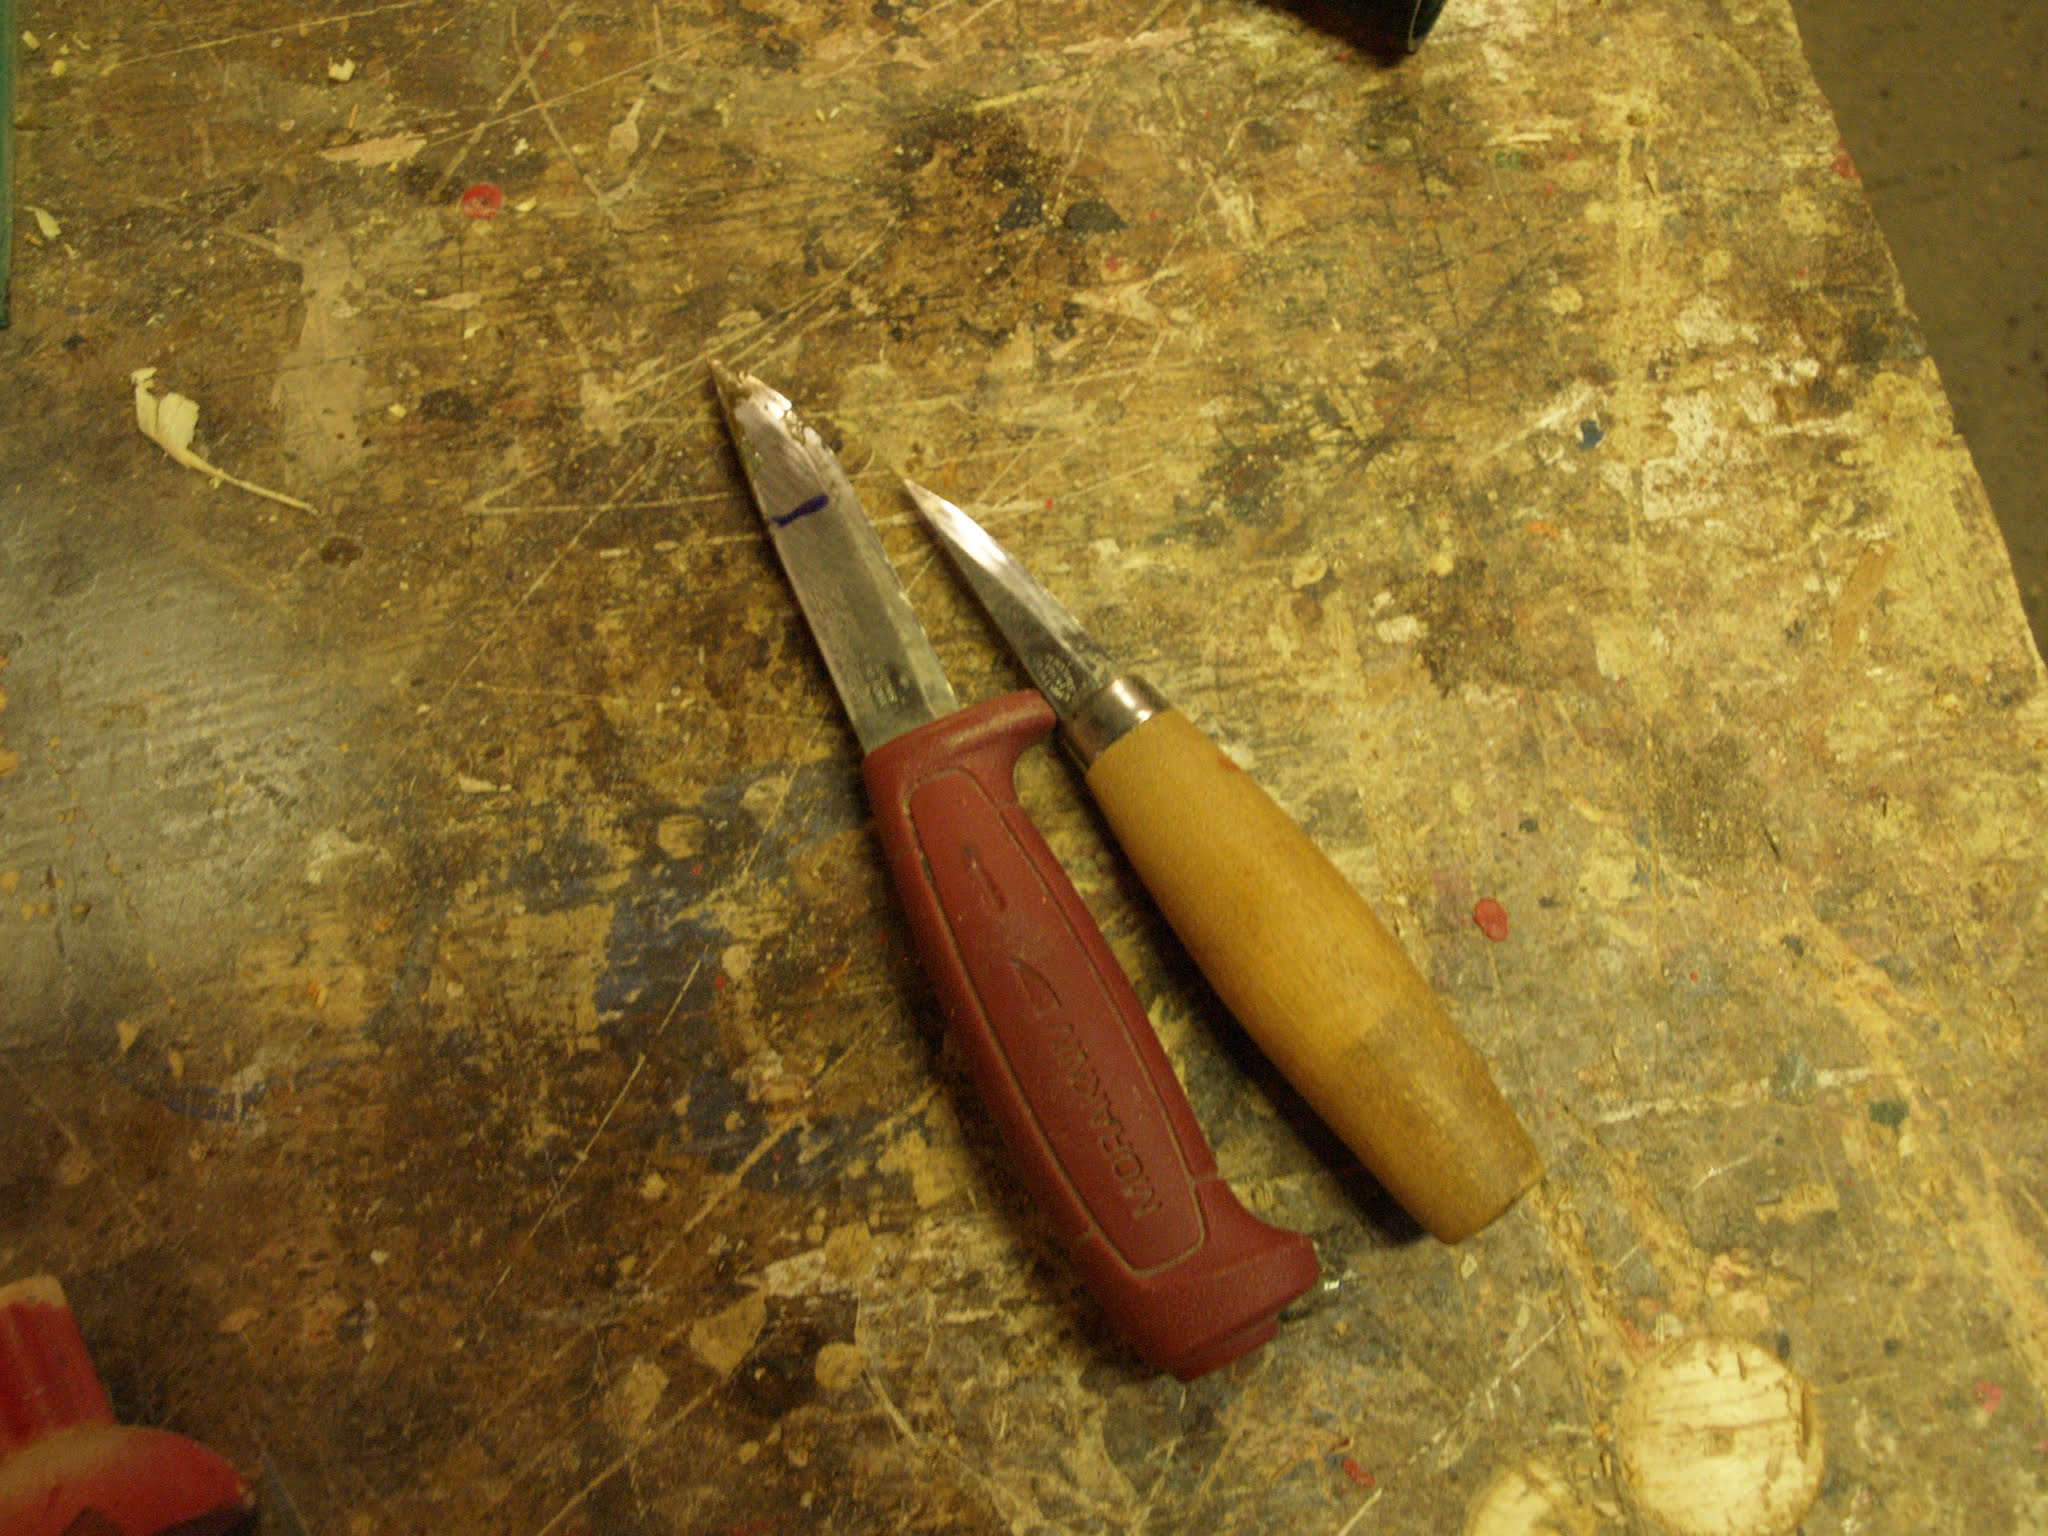
  The knife filled a spare hour yesterday morning, including posing and photography.  After the blank was roughed out I used only two tools.

511 and 120 

  This knife was roughed with the red handled shop/hunting knife and finished with the wooden handled carving knife. The wooden handled knife wasn't necessary but its finer blade and slightly smaller handle makes it easier for me to do really fine work.  I didn't even need sand paper to finish this project. 

  All wood carving requires very sharp tools, regardless of what brand or whence they come. In this case both knives are Mora kniv from Sweden. Both very reasonably priced, the red handled knife was $7.50 CDN when I bought it a few years ago. I don't remember the price of the small knife, I've had it for years. The only thing special about these knives is they are easy to sharpen, and stay sharp with basic stropping.  

  It is easy and fun to get caught up in "stuff" for a while. Getting older I am wearying of stuff, storing,sorting and caring for my stuff is wearing me down.  The honour(?) of having so much stuff is growing pale, doing things is more fun that having stuff I think.

  So...get into your shop, or studio and do things.

cheers, ianw

spring is coming......


Thursday, February 4, 2021

Three Carved Projects - Whittln' Jack


  I don't claim to be a serious wood carver, but I like working with and making things from wood.  I have a drawer filled with pocket knives and a tool box filled with carving chisels and knives that I have gathered up over the years.  Carving to me is like wood turning, another of the things that I do with wood, for fun and relaxation.

  I have a full supply of really good wood working and 'everyday carry' knives but recently an opportunity arose for me to borrow and try out a Flex Cut Whittlin' Jack.  I have seen them for sale and wondered.


  This is a two bladed folding knife designed for whittling or rough carving.  I am not sponsored by Flex Cut so this is my opinion  based on my experience only.

  First off, the knife came out of its package sharp. I stropped the blade a couple of times while working as much from habit as necessity. The blades are more sturdy than a typical two blade pocket knife and so do not flex or threaten to break if you wedge and twist while working.

  I used a piece of walnut and made a loose tea scoop, a small mixing spoon and a spreading knife to try out the tool. The Whittlin' Jack was a perfectly good tool to smooth out and shape the projects after I cut out the rough shape on the band saw.  These projects were quick, easy and didn't require much sanding.

loose tea scoop, mixing spoon and spreading knife.

  
    The Whittln' Jack enabled me to do relativity fine work, I didn't need any other knife or chisel to shape these projects.*  More patience and practice would enable me to refine my work.

  Conclusion:

  If I wanted/needed a easily portable, easy to maintain, One Knife to Rule Them All I would consider a Whittln' Jack. I did find the handle a bit large for my hand and that would take some getting used to I think but my hands are smaller than average and getting arthritic. 

  It is a tool with which to start or travel, I think.

cheers Ianw 

* I did use a dremel to shape the bowl of the spoon.