Showing posts with label gravity clamps.. Show all posts

Wednesday, August 17, 2022

More Gecko Stuff

  On July 30th I posted a blog featuring the travel box for Nacho the Gecko that Kieran and I made while he was here.

  He then went home for a week and while he was gone. I decided to make a solid home for Nacho that could be left here. We had a card board gecko house that K had made a while ago. A gecko likes a cool damp environment, he is misted several time per day, good for a lizard, not good for his card board cage.

 I followed the basic size and shape of the card board effort and used softwood lumber and screening to make a home away from home for Nacho.


 I made the frame from 7/8 inch spruce construction lumber and used screws and glue to assemble the frame.  My gravity clamps are holding the screening down while the glue sets.

the finished unit

  The finished unit fully decorated and ready for habitation.  I have it on good authority that he likes his home away from home. 

  Another D.I.Y task I completed this week was the deck sealing of the out door benches at the Ancaster Senior Achievement Centre.  Couple of years ago the centre was renovated and a very nice court yard was added.  In the court yard are three U shaped benches made from 2 x 4 lumber.  The contractor varnished the benches, which looked nice for about a season and a half. Now the varnish is gone and the wood is exposed. I spent nearly three hours thoroughly cleaning and soaking the boards with deck sealer.  It is one of those volunteer things that guys with shops, drop cloths, brushes and gear can do for their community.


  I think that we should support our community and if I can be supportive while doing something satisfying it is a win/win.

cheers ianw   


Saturday, March 20, 2021

Furniture Making Tip

 Now I only make furniture for friends and family.  While custom wood working can be profitable, getting a final product that suits the customer can be a challenge sometimes. I found that the finished colour was the issue most often.  Clear varnish was okay and painted pieces were generally okay too, but, stained pieces were nearly always a problem.  Often the piece would not be the colour that the customer thought they wanted.  

  This plant stand I am currently fiddling around on is the perfect example of the what would have been a perfect customer.  I am making the plant stand for my friends David and Elise for whom I have made several things in the past. When they want something they provide an excellent plan, carefully drawn with all necessary measurements. There are no 'about or sort ofs', so the final product will be the correct size and shape. Usually, they do the finishing, so the stain colour never enters into the discussion.  In this case David brought me tin of the stain they want the stand to be.  Perfect. No 'oh!!, that's not what I thought it would look like' at delivery time.

  Not always fool proof, I had a customer a couple of years ago tell me exactly what colour stain he wanted his shelf units. I bought the exact colour from the exact company, I finished the shelves with the stain, it was hideous ( I knew that immediately)  and he was cross with the result.  I got paid but...he wasn't happy, not my fault.


  Dark Walnut stain of a plywood top.


 Dark walnut on legs. It remains for everything to dry.  Once fully dry I'll put it together, after I finish the top.


  You can't possibly guess what this is going to be.  It is glass and weights holding something down while it dries.  Once this is dry I am thinking of adding it to the top for a bit of ornamentation, I know that there will be a plant hiding most of it but...an advantage with working for friends is a flexible timeline and room to experiment.  After all if my idea doesn't work, it will be hidden by a large flower pot.  

cheers ianw

Spring is here? a cold spring, but sunny


Friday, November 6, 2020

Let Glue Dry - homage to Laura Kampf


   I hate waiting. I especially hate waiting for glue to dry. Ms. Kampf has a visual she places in her videos to show her audience that the action has been interrupted for the glue to dry.  As I was rummaging around my shop yesterday I reminded myself I need a visual reminder too.  My block is 13 x 4 x 2.5 with two cutouts for my lead gravity clamps. Each  of those lead plates is over ten pounds and come in very handy many times.  I recommend every shop to have some weights like this.  Weights that are proper cubes would be better.


 In January 2015 I helped my friend make this entertainment centre for their basement.  Recently I made the small TV stand that fits on top of the entertainment centre.  It is great working with/for these friends, they provide an exact plan, with exact measurements every time. This way  building things for their house is successful and so is very satisfying.  Insist on an exact plan when building custom  pieces for people.  If you do not have precise measurements there is a really good chance that you wouldn't make what the other person thought they wanted. In the same vain, I do the initial sanding but leave fine sanding and finishing to the other folks, that way it they don't like the colour, it's their fault, not mine.

  I have begun working on Christmas/seasonal things.  I made repairs to our large snow man a while ago and have recently dragged my lathe out of the corner.


  I think this is a Cossack snow man. The grain of the wood is actually pretty striking.    (he clearly needs arms)


  I had a little piece of fire wood and made a little thing.  Small projects like this are great to practice finishes upon and are quick enough they can be completed in a quiet evening. A tea light candle will fit in this wee bowl or I guess it could catch some loose change.  It had no preordained use.  It was a shellac/bees wax finish experiment more than anything else.I like how quick and easy the finish turned out to be too.

  I have seen many snowmen , elves, Christmas trees etc, on the net.  I think I will spend some quality time with my lathe this season.

cheers, ianw


Saturday, October 24, 2020

Small Box B

   The second small box I made from pallet wood also turned out to have lovely grain. This time I pushed my luck a little too far and made the sides 1/8th inch thick.  That did not give enough contact surface to get a solid glue joint so I had add  bracing.


The sides are braced internally and taped 
while the gravity clamp does its job.


  When I do a project like this that relies on glue alone I always give the glue lots of time, usually over night to set. I used Gorilla Glue to hold this together.  Also I tapered the corner braces so there was a smooth flow from the top into the box.


  The box is finished with two coats of "3 Part Finish" * and one coat of wax.  The only small handicap 3 Part Finish has it is is slow to dry.  I find that it needs 24 hours to dry enough that a second coat can be applied. It takes a couple of days for the final coat of finish to really harden. In this case time was available so it is not a problem, old style finishes are not for last minute folks. Once dry I gave the box a quick coat of wax and now it looks great.  

  Start thinking about gift season, it isn't far away.


* 3 Part Finish - one part boiled linseed oil
                          -one part varnish
                         - one part mineral spirits or turpentine.


Friday, November 15, 2019

Carving a Wooden Bowl.

 This is a project that I had in the back of my mind for a while.  Two years ago I picked up some spruce logs from the side of the road.  The logs were recently cut and oozing sap.  Now after two years under the steps in the garage the wood is nicely dried and ready to be worked.


   Once I scraped the dried bark off I needed a flat surface  for the bowl to sit upon once finished.  I used  the joiner to flatten a small portion by setting the log on the joiner table and making a couple of passes working with the natural shape of the log.

   The next thing  to do was flatten the top side which was pretty uneven after having been split apart.
  

  I set the flat bottom  on the table of my drill press and set the depth stop for the forstner bit to match the thinnest section of the log. Then I the drilled down through the  extra wood until the top was fairly evenly flat.  

   After chipping away any remaining bits around the drilled holes I planed the top of the board enough to make it easy to draw outlines.


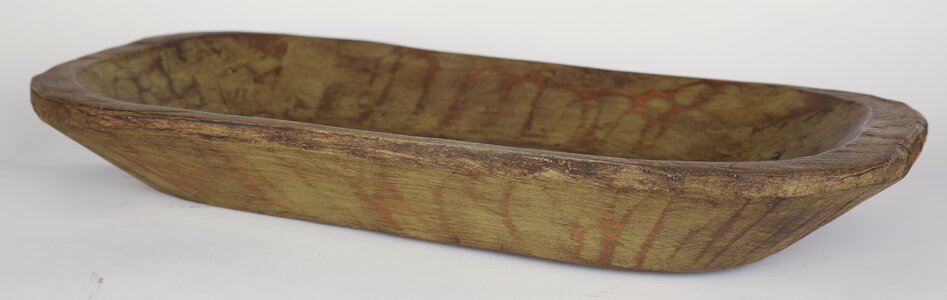
  There is plenty of waste wood to be cleared, to  get an even inside shape I set the depth I wanted to go and drilled a bunch of pilot holes.  The centre holes are deepest, the holes on the sides are less so, and the holes on the ends are a little more shallow because I plan to taper the sides of the bowl.  The basic shape is going to be like a pioneer style dough mixing bowl .

Painted Rustic Wooden Dough Decorative Bowl
what I am working toward.

  I have a variety of power tools to clear on the waste wood but so far I have stuck to chisels.  I can rough out what I want without making tones of dust and noise.  A chisel cuts out chips and chunks without making any saw dust. 


  My new  bench set up allows me to clamp this project solidly to one section of the bench while pushing it against the raised work bench which is held on with large C-clamps.  This way the work can withstand heavy chisel work and is at a better height for my back.

  The last glue up with the box.


  Most of this box was glued using lead weights to hold things in place while the glue dried. All that remains is final sanding and a couple coats for spray varnish.

6 x 10 x 3.5 inches

  This is actually a frame in which a drawer sides though from either side.   That way you don't have to reach into the back of the drawer, or pull it all the way out to get to the stuff in the back. The top is maple, the sides and bottom oak and the drawer, exotic mahogany type wood with walnut veneer detail. It wasn't a difficult project, just one that seemed to drift around in the shop while other things took away my attention, you know, things like noses.

  cheers ianw


Friday, May 5, 2017

Friday's Business

 I am making a pair of door handles for a shed and when it came time to glue the handles to panels I opted for a gravity clamp.


  This piece of train track has been in our family workshops for generations, it is a poor man's anvil.  I keep threatening to grind the horn smooth, but haven't gotten around to it.  I could have used other types of clamps to hold this together but gravity was quickest and easiest.  To attache these handles to the door I attached the handle to a plate and the plate to the door rather that driving long screws through the door into the handle.  Since modern glues are so good I decided first to glue the two pieces together.  Once the glue set I turned the unit over and drove a long screw into the handle through the plate.  With the glue set nothing wiggled while drilling and and  screwing. 

  Here is a progress photo of the funny little man.


   This little man is going to Sweden for my youngest grand daughter.  He is sort of a viking, but she is too small to have a toy with horns on its helmet.  The big ears and nose stick out enough.


  Over a year ago I was at a yard sale hosted by our church and six of these panels were for sale.  At the end of the day the panels hadn't sold and the owner shrugged their shoulders and supposed they would burn the panels in their fire place come winter. I voiced my opinion that that was a real shame, as a wood worker I hated to seen decent wood burned for lack of imagination. My point was taken and I got all the panels for a very good price, on the understanding that they didn't end up in my fire place.  I have been thinking about the panels for a while and recently found a project that will feature four of them.

Stay tuned.

cheers, ianw