Showing posts with label Forestner bits. Show all posts

Friday, November 15, 2019

Carving a Wooden Bowl.

 This is a project that I had in the back of my mind for a while.  Two years ago I picked up some spruce logs from the side of the road.  The logs were recently cut and oozing sap.  Now after two years under the steps in the garage the wood is nicely dried and ready to be worked.


   Once I scraped the dried bark off I needed a flat surface  for the bowl to sit upon once finished.  I used  the joiner to flatten a small portion by setting the log on the joiner table and making a couple of passes working with the natural shape of the log.

   The next thing  to do was flatten the top side which was pretty uneven after having been split apart.
  

  I set the flat bottom  on the table of my drill press and set the depth stop for the forstner bit to match the thinnest section of the log. Then I the drilled down through the  extra wood until the top was fairly evenly flat.  

   After chipping away any remaining bits around the drilled holes I planed the top of the board enough to make it easy to draw outlines.


  There is plenty of waste wood to be cleared, to  get an even inside shape I set the depth I wanted to go and drilled a bunch of pilot holes.  The centre holes are deepest, the holes on the sides are less so, and the holes on the ends are a little more shallow because I plan to taper the sides of the bowl.  The basic shape is going to be like a pioneer style dough mixing bowl .
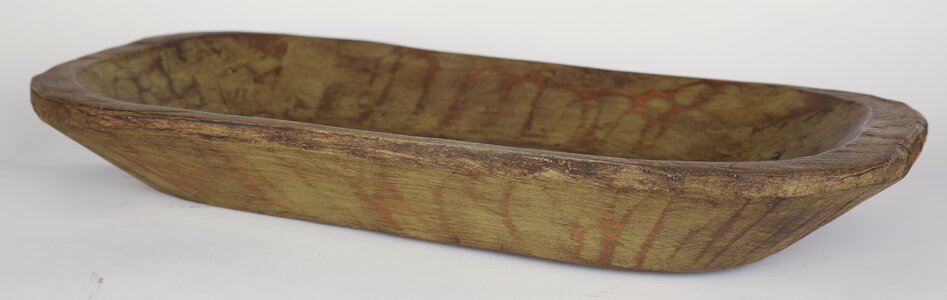
Painted Rustic Wooden Dough Decorative Bowl
what I am working toward.

  I have a variety of power tools to clear on the waste wood but so far I have stuck to chisels.  I can rough out what I want without making tones of dust and noise.  A chisel cuts out chips and chunks without making any saw dust. 


  My new  bench set up allows me to clamp this project solidly to one section of the bench while pushing it against the raised work bench which is held on with large C-clamps.  This way the work can withstand heavy chisel work and is at a better height for my back.

  The last glue up with the box.


  Most of this box was glued using lead weights to hold things in place while the glue dried. All that remains is final sanding and a couple coats for spray varnish.

6 x 10 x 3.5 inches

  This is actually a frame in which a drawer sides though from either side.   That way you don't have to reach into the back of the drawer, or pull it all the way out to get to the stuff in the back. The top is maple, the sides and bottom oak and the drawer, exotic mahogany type wood with walnut veneer detail. It wasn't a difficult project, just one that seemed to drift around in the shop while other things took away my attention, you know, things like noses.

  cheers ianw


Wednesday, December 12, 2018

Nut Crackers---sweet


  I saw a plan for a nut cracker on Instructables last week and decided that I would make one, or two, or three....


  Once I got going, I decided to adapt the idea to make a more rustic style nut cracker.

  To make a wood screw nut cracker you do need one piece of specialized equipment, and some drill bits and a drill press. You need either a thread box or...some other method of cutting threading on a dowel and tapping a hole.  I have a thread box and matching tap.

 I began these nut crackers by threading a length of one inch hardwood dowel after reading variety of blogs taking about cutting good crisp threads with a thread box.
Image result for threading box
  I took the dowel and soaked it in vegetable oil for a week as suggested by a blog. The threads cut very crisp but...the dowel did swell a bit and fit very tightly in the thread box.  Next time I will soak the dowel for 3 or 4 days in hopes that the outside is soaked but not too swollen. 

  Cutting the thread was the most difficult part of these projects.  It is very difficult to get a good grip on round oily wood.  I had to clamp one end of the dowel with vice grip pliers, which tore it badly.  I threaded about twice as much dowel as I needed so I could pick and choose this time and so that I'd have some in hand for a later project.  

 With threaded dowel in hand I picked a piece of six inch black locust for my nut cracker. I cut one end square and left the top on a bit of an angle, just for the 'look'.


  Next I used a Forestner bit to drill a hole down the end grain.


  Drill slowly and clamp the wood firmly when drilling.


 You can see the branch clamped to drill the side hole, that will be threaded.  I use a wooden hand screw since it will hold irregular shapes better.


  I used the matching tap to thread the hole.  Again the branch needs to be held firmly, and the tap started straight and carefully.


    I glued a piece of barn board onto one end of the threaded dowel and await the final setting of the glue.  Once the glue sets I'll shape the knob a bit. On this nut cracker I drilled an opening on the opposite side for the dowel to fit into.  This way when not in use the dowel is totally buried and takes up less space on the table as well is protected from being broken if dropped. 

  I learned something important while experimenting, I could not cut threads into end grain, I had to cut thread across the grain.  End gain just tore and was useless.  I found that problem in maple, maybe other woods would work better, I'm not going to bother trying. 

 I thought I would add a photo of my bench in process.


When I am working on something 'new' my work space becomes chaos.  I am forging ahead full steam and don't put things away as I work. Also when I am working on something new I usually end up with about twice as many tools at hand than I end up needing.  For example I only needed three Forestner drill bits but I didn't know which ones for sure so I brought the whole box off the shelf.  I had things to clamp but started with the wrong type or clamps that were too small. They are there on the bench.  There are knives, chisels, saws, glue bottles, and various pliers.  Most of which will stay on the shelf the next time I do this sort of project, everything will look much more professional, next time.

  At the end of today's work it took 20 minutes to clean up and put all the tools where they live. This style of working is not a habit a new woodworker should cultivate and one an old wood worker should try and break. (maybe a new year's resolution)

  I think these will be popular Christmas gifts .

cheers, ianw