Showing posts with label straight edge. Show all posts

Tuesday, April 13, 2021

Book Up Date - It Is Finished

   The last few photographs of the process show the cloth covering being glued to the boards. Just like all workshop projects, you can never have too many clamps.  I stretched white cloth around the edges of the boards and clamped it 'til dry.


  You can see the binding ribbons that were glued to the spine and will be glued to the boards and held in place by the front and back pages.  When the book is being made, the ribbons are sewn right into the spine of the book.  I wasn't prepared to take the book fully to pieces and re-sew the binding so I glued the new ribbons on.  Modern glues are so good, I have no concern that the ribbon will come loose.


  The book is together.  There are 18 feet of repair tape inside fixing rips.  I was forced to cut down a dozen pages that had deteriorated along the edges to the point there was nothing to save. Those pages were all in the index so almost nothing was actually lost.  All the colour illustrations and recipes  were saved.  As well all the loose pages (25) were re-attached so it is now a complete and usable copy of the original book.


  Cleverly my wife went on line and down loaded a copy of the books cover and printed it out.  After getting a print out the correct size she coloured the lettering to replicate the gold leaf printing and re-created the cover's original back ground colour too.  After all that she made a clear plastic cover to protect all that hard work.  Actually a cook book should come with a plastic cover automatically. 


  Anyone that looks at this effort will realize that it is not a 'restoration', it was a repair, that saved a family favourite cook for another generation or two.  If they can read the old style script!!.

  Actually book binding is a low tech, high satisfaction  craft.  If you search 'book binding DIY' on Youtube the are many  good and informative videos available, Sea Lemon  is one of my favourites for ALL the different sewing methods used to bind books. 

  Cheers Ianw

Monday, March 18, 2019

Changes in the Family, make for small shop projects.

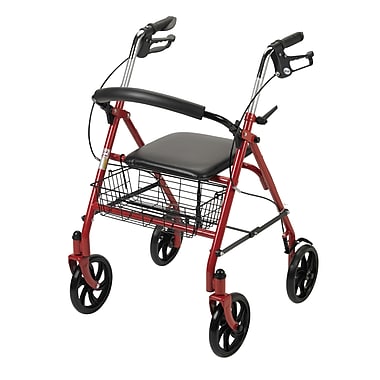
Drive Medical Four Wheel Rollator Walker with Fold Up Removable Back Support

  A few weeks ago my Mother took a nasty fall and has been recovering well but will need some help with her balance and walking for a while, so she has a wheelie walker/scooter thing as a travelling companion now.

  Of course it needed to be accessorized. We are tea drinkers and so I made a tea tray that sits on the seat allowing Mom to move about with a tea cup and small plate without worry about spilling things.

10 x 16 inch tea tray

   My plan was to have the tray as light as possible so it is made from a piece of door skin that I had laying around.  ( I'm going to have to buy another door skin soon.  It gets used for lots of light weight projects.) A tip with door skin, I don't cut it with a saw anymore, I score it with a straight edge and a utility knife, a few passes with the knife cuts through and leaves a usable edge.


  The handles are a pair that I bought at a yard sale a few years ago for cheap, cheap.  I think I got an entire kitchen's worth of handles/drawer pulls for a couple of dollars.

  To drill to fit the handles I made a jig this time. 


   Since I still have eight pairs of handles this jig will make lay out in the future quicker and accurate.  Why didn't I do that before?...I don't know.

 The white on the tray is three coats of spray acrylic and the handles are cedar with paste wax. 

 Two days from now my Mom moves to respite care for two weeks; that's a lot of tea drinking  and then.....home again, good as new. (or as close as possible).

 cheers, ianw 


Wednesday, August 6, 2014

Puppet Theatre for Clara

  My grand daughter's 3rd birthday is two weeks away and Eva and I are making puppets and a puppet theatre as her gift. This project had to be designed from scratch to suit special criteria.  We wanted the theatre to be portable, hence the handle across the top and it needed built in storage space. 

The front of the theatre,
made from 1/2 inch birch plywood.


The back of the theatre featuring 10
cubby holes to store the puppets.

  When making a project like this using plywood I need two very common but special tools.  First  I use my carpenter's square to determine whether I am working with a 90 degree corner. I've found that when I cut up a sheet of plywood sometimes a corner will get out of square by a couple of degrees.  That error can get multiplied as more pieces are cut. If your square is suspect, here is a video showing what to do. 

  The second tool is a straight edge.  I use my straight edge to check whether I drifted off line when cutting my plywood sheets with my circular saw.  I find that breaking down a large piece of plywood can be tricky without a panel saw.  Even though I use a straight edge as a cutting guide small errors can creep into a long cut none the less. 

  Checking the corners and the edges are true makes for better results down the road. I think that were I a heavy user of sheet stock I would buy a plunge cut saw .

cheers, ianw