Wednesday, January 22, 2020

Two Turnings and Two Legs

  Having sorted out the work station and nearly sorted out dust collection I have been working on my lathe.

  I have two of the legs made, it takes about 30 minutes from start to sanding with four hundred grit.  I am not finishing the legs, they will be painted in the end.


  The maple makes a straight grained and sturdy leg. Once all eight legs are turned I will drill them for the braces then glue the whole thing together. 

  The wood turning diversions were: one functional, one artistic.


  The plastic end on my shop vac broke so I made a replacement.


  Super glue glues anything to anything, vacuum hose to wood, no problem. I need the vacuum to suck up all the fine, fine dust from the sanding stage on the lathe projects.


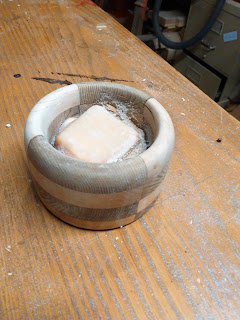
  Last April I turned this bowl for shaving soap.   Today I got around to turning a top for it. Now the brush will sit on top of the bowl and the soap will not dry out as fast.


  I picked the board with the knot on purpose, it adds character though it made the turning a bit tricky.  Now the bowl looks pretty shabby, I think I will have to wax and polish it before I put in back in the bathroom.  Nice diversion, next thing is to settle down and turn some more legs. 

  Sharpening a roughing gouge, good video. I need to sharpen my gouges. 

 Another days work.

cheers, ianw


Monday, January 20, 2020

Lathe Work Station

 For years I have been rolling my lathe around the shop on top a cabinet where I stored lathe related tools.  I have done that because my shop is small,  so nearly everything is on wheels.  There is not enough space for the lathe to have a dedicated area of its own.  Since I now have to produce eight chair legs it seemed time to focus on improving my lathe work area. (something that has been on my mind for a long time)


  Regardless of how good a wood worker I maybe I can't create wall space where there is none.  So  did the next best thing.  I created a wall on the cabinet.  The lathe will still be rolled out of the way when not needed but  now it has its own work space.


  As you can see the plywood was used for something else, in this case not by me. However I was going cut a whole in the back board for dust collection hose to fit through anyway.  Now the back board has all the tools that are regularly needed while working on a project.
My chisels are racked in the upper right.  They are high so that when I reach for them I am well clear of the spinning work piece. In the middle are two face plates, on the left the key for my chuck etc.


   As soon as I was finished with the design I made an addition.  This bucket has pencils, Hex keys and other small stuff and a top to keep chips out.

  When I began work on the eight chair legs I decided to make nine.  The first leg is to be used as the template from which the others will be copied and as a just in case.
  The legs are turned from maple, made from hoarded wood, three pieces of maple stair tread that I had picked up in my travels.


  The leg will not be fancy, but I think it will match the style on the table and chair back, well enough. The legs need to be sturdy as much as they need to be fancy.

  cheers,

ianw


Friday, January 17, 2020

Table and Chairs - Restoration

  My sister in law told me that she had a table and chairs that came from her husband's family and she had always intended to fix them up for their use.   For twenty years or so she had intended this, I volunteered to make this long held dream a reality.

  This what I have with which to work:


 a fruit box of parts.  By the way the table and chairs are for kids.  I like kids and that is why I volunteered for the project.  In this box are nearly all the parts for the table and two chairs  no legs.

  I gathered the pieces together.  One wing of the top was badly split, I took it apart and re-glued it first then I took the hardware and wire brushed the rust off and painted it.


  This table and chairs are so old that they are constructed  just like adult furniture.  The legs are held on by corner brackets into which the legs bolt.


  One of the legs did not have the bolt in place, it had rusted away with time.


  I drilled the leg, threaded the hole (1/4-20) and drove the piece of threaded stock into the hole with glue.  It is as good as new as far as anyone can tell.  Doing this stage of the repairs called to service a set of tools that came from my Grandfather's  workshop, which I have never used before, these tools have traveled around in the bottom of my metal tool box for at least twenty five years. I kept the tools because they were my Dad's, Dad's and for no other real reason.


    As a kid I remember my Grandfather using this tap set a couple of times and in high school shop class I drilled and taped something as an assignment but had not used these tools before.  I have drilled and taped wood for nut crackers in the past, same principle. So I drilled the leg and then taped the hole so the threaded rod would have good grip. As a diversion while glue dried I took the time to remove the many years of rust and neglect from the handles. That tap and die set was made my Ace ? and is at least 60 years old. Good tools last, buy good tools.

  
table complete,
  as far as I am taking it anyway.  My sister-in-law can paint it to her personal taste.  There are really too many filled spots to make this a nice piece to be stained I feel. I think it is made from poplar or some other semi-hard, white wood.  There is an underlying green tint that makes me think poplar.  And with new replacement hinges the wings go down just like kitchen tables did when we were kids. 

  The next step is to turn eight legs for the chairs.  Turning matching items has not been successful in the past.  I need to study on the design and make a plan and a template.  Luckily the legs are only about ten inches long so failure won't waste much wood.

  Legs.....next week.


Tuesday, January 14, 2020

Work Bench Ideas, small light stand.


  The underside of my latest raised work bench shows two pipe clamps.

  The pipe clamps enable me to face clamp long boards to the bench for planing. The only problem was the end of the clamp would twist and so not engage the bench, so I sometimes needed three hands, one for each end of the clamp and one for the board.
  
 Problem solved.


  I cut two 3 1/2 inch  oak rounds from 3/4 wood, drilled a 7/8 inch whole in the center and now the end of the clamp holds the oak washer and the washer always engages the edge of the bench. I did not have a 7/8th forstner bit so I drilled the holes with an auger bit and hand brace.  To keep the oak from splitting as the tip of the auger bit forces its way in, before the cutting parts of the bit engage I drilled a pilot hole through the board. 


  Another jig, this is a planing stop that is held in place by the pipe clamp, newly efficient with the oak washers.  All the jigs in my shop are red, orange or purple, I need to be able to see them easily.
  
 Last week I made the frame for the light fixture.  Yesterday the electrician came and put the light up in our front hallway.


  Fifteen bulbs hang down from eight to twelve feet from the ceiling.  My wife is planning small stained glass shades for every light bulb.  It is going to be very cool when it is done.  We've waited for a long time to light that space properly.

  Yesterday's project was a small thing, made from re-cycled wood.  A while ago I took and the old dresser in the corner apart and salvaged as much of the wood from the drawers as possible. 

  I got enough for several small projects,


  and the recent small project was cut out and clamped up yesterday.


  If you don't make small craft type projects you probably don't realize how much pleasure resides in a small 'nothing' like this. It was a damp over cast day so spending the afternoon in the shop designing, cutting and sanding while listening to  pod casts was quite enjoyable.


  My Mom was given this Christmas ornament this year and it sat on her dinner table. It didn't have stand so it was sort of balanced on another jar and the power cord was visible and it was a good idea that wasn't quite finished.  

  To make that little stand I used the last piece of dresser drawer, which is solid wood because that was the way things were done in the 'ol days". I cut the half circle on my scroll saw, only to discover I had only one blade left. Everything was squared, glued and clamped and left to dry while I did some shop maintenance.  Once the glue dried I sanded it to 400 grit by hand then shellacked in and gave it a hand buffed coat of bee's wax.  It is smooth to the touch with a gentle warm glow. Since the wood was cut over 75 years ago I thought a traditional finish was appropriate.  

  Little jobs like this are great as a quiet diversion on a stay at home day.  Next I have a couple of decorative boxes to make and a fairly big restoration project awaiting my immediate attention.  

  As long as the weather stays seasonal I am all set.


Saturday, January 11, 2020

Sanding and Drilling and Tapping, Oh My.

  The sanding story is nearly always a cutting board story in my shop.  Everyone I know needs a cutting board and I like making them. 


 These boards are oak, sanded to 400 grit and finished with Hemp Oil.  I like Hemp Oil as it is natural, food safe and grown locally.  As with any cutting board these will need to be re-oiled over time.  In a busy kitchen a wooden board can be re-oiled with just about any cooking oil since it will not have time to go rancid before it needs to be renewed.   Maple makes a very nice cutting board too, I just don't have a ready supply of maple handy.

  The other project was another nut cracker. 


  This version got sort of antiqued finish.  No, I don't really like it and no I won't do it again.

  This is one of the few things I make in my shop that  requires special tools and doesn't have a variety of ways to be made.

  I use a big forstner bit to drill the vertical hole.  I mean big.  In this case 1 3/8 inch big.  To drill the hole I hold the wood in a large wooden hand screw, which I clamp to the drill press table.  If everything goes well, you could hold the wood with your hand.  If things don't go well...well.  Just clamp things down when drilling a really big hole.

  The horizontal hole is another story altogether.  I drill that hole with my brace and bit. I threaded a one inch dowel and so needed a 7/8 inch hole in the side of the piece.  I prefer to use the hand drill because it is really slow and there is less chance of break out or splitting.

   Once the hole is drilled I use the tap which matches the threaded dowel and slowly tap the hole in the side.

  I have used this tap and die set several times over the last couple of years and here are a couple of tips for threading and tapping wood.

  -soft wood is easier, so if you can get away with poplar or pine, this latest nut cracker is cedar, use it.
- soak the dowel for a couple of days in food safe oil, the threads will cut better, not perfect, but better.  If you have the time and have planned ahead turn your own dowels from quality wood with straight grain but still oil it.
- when tapping the hole, oil it and the tap too. Dry wood is more likely to splinter. A dry tap more likely to stick.
-go slow, threading and tapping wood takes time.
- clean up and oil the tap and die box when done so it will be perfect when you come to use it again in ten months.

Image result for tap and die set for creating wood threads 

  This is one tool  for which there is not a work around.  There are multiple ways to cut, drill, shape, plane, fasten and finish,  only one way to cut threads and tap wood.

  It is January 11th and we have no snow.  That is a good thing.

cheers ianw


Monday, January 6, 2020

A New Year

  Happy New Year everyone.  I hope that 2020 will be a good year for you, your family and your workshop.

  I was into my shop on Saturday for the first time in 2020.  Naturally, the thing that needed to be done first was to clear away and clean up the tools and wood chips from our recent wood carving experience.  This last time I  let my grandson down tools and walk away, usually we are more professional and  clean up when we are done. He has very good workshop safety habits, not quite as good clean up habits.  Well...safety first.

  Once I got going on the clean up I used the new year momentum to carry me into the back of the shop,(the part never shown in photos) where I spent some time with the shop vac and the garbage bin.  I have all my large tools on wheels and there is room for everything, just not enough room for everything to be out at once and so it can get chaotic and dusty in no time.

  My latest project was a simple task.  

  When a project is taken on I make a budget decision,  what am I willing to spend on that project? How much Money, Time and Energy.  

  Money, Time and Energy are in finite supply.  Not in limited supply but definitely in finite supply.  While at university I wrote an essay exploring the reality of M,T,&E.  As a younger person I often chose to spent time and energy to save money. Now that I am retired I can spend time to save money, and as a retired person my time is pretty flexible.  Alas, as a retired person with ongoing back pain issues energy is the limiting factor in all my  shop now.

  The project, I needed to make a frame to fit inside a large light fixture. The wooden frame will be fastened to the ceiling, the metal light fixture will be screwed to the wooden frame.

16 by 62 inches, and weighs a tonne.
   This light will have LED lights hanging down and the lights will be covered by stained glass shades made by my wife.  An electrician, with a helper are coming next Monday to put it up. 

  Had I chosen to spend a few dollars and buy two 2 x 4 x 8 this would have been a twenty minute job, even with the half lap joints in the corners.

  What did I do?  I went to the garage,  dragged out a reclaimed rough 4 x 4 that I picked up off the side of the road last spring.  


  The beam was twelve feet long so I still have a fair bit left because I decided to rip it into 2 x 4 size anyway.

  This was a case of spending time and energy to save money.  In reality I wasn't worried about saving money, I just wanted to make some saw dust and play with my toys and use a piece of wood that was hanging around the garage.

  I ripped the beam on my band saw after using the jointer to get a square corner by jointing adjacent sides.  The piece was a bit long for the size of my band saw table so I needed to dig out my roll stand. (seem in above photo).  The stand was not tall enough so I had to find a box large enough for the stand to stand on, all for one cut.

  After I ripped the 4 x 4 I cut it to length on my sliding mitre saw and opted to use half lap joints, mostly for the heck of it, partly for the inherent  strength.

  Have you ever looked for half lap videos on You Tube. "How to Make a Half-lap Joint".."Half Lap joints three way". etc.  If you have a quiet evening there are videos that are a half hour long or more.  I picked a couple of short ones to share.  

  I cut my joints on the band saw and by hand.  The short pieces were cut on the band saw the 62 inch ends where cut by hand.  I used a combination of hand saws, planes and chisels to get the joints aligned and fit together.  

  All together I spent the entire morning fiddling around in my shop.  What a great start to the new year.  

Cheers Ianw