Sunday, August 28, 2016

Easy Easels

 One of my fellow art students asked me to copy our studio's table top easels for her

new easel on the right
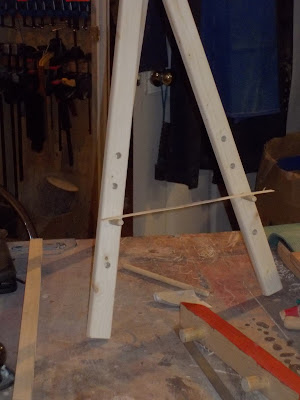
 So I did, I copied the studio's easel in poplar, using an off cut from the table top.  The poplar is strong and easy to work either by hand or machine.  After cutting the three legs to length with my mitre saw I did the rest of the work with hand tools. (just for fun). I used a back saw, a block plane and a bit of sand paper. I did use a cordless drill to make the holes for the threaded rod that holds it all together.  I do have a brace and bit if I need be.  I actually use it when the forstner bits aren't long enough.

  After I got the commissioned easel make I decided to make one from my self. Mine is made from:
from this:

  One of the car load of 2 x 4's that I brought home a few weeks ago from our kids house. The board was weathered and a bit twisted but after I cut it to length on my mitre saw, joined one face and one edge, then ran it through the planer and ripped it on the table saw:
to these:
 I even went to the trouble of putting a round over bit in my router table and smoothed all the edges. It took longer to rout the edges and sand everything nice than it did to cut and drill the thing. My easel doesn't have a cross piece like the others, it has two dowels upon which the canvas or book or what ever will sit.


 The only trick in making this....


The angle where the three pieces come together.  To move the easel around, just undo the bolt at the top.

cheers, ianw


Friday, August 26, 2016

Hump Removal

 I have a sofa table to make and my plan is for the top to be one piece.  I had an poplar slab long enough and thick enough for the job. The problem is that I have no way to re-saw a twelve inch board.
 How to get a poplar slab that is 48x12x7/8 to a piece 48x10x5/4?  If I can get a flat side, my planer with just manage the job.  Needless to day my jointer is not large enough to flatten a 10 inch board.  
 What do you do?  The slab was somewhat bowed so either the hump needed to be flattened or the high edges on the valley side need to be flattened.  I opted to remove the hump. My thinking was that putting the board on the bench hump up would make it more stable upon which to work.  If I'd put the hump side down I would have to wedge/clamp the board so that it didn't rock while I worked on it.
  What are the best hump removal tools?
  My father did a great deal of work on rough lumber with a massive grinder and 7 inch grinding disks.  If I were working outside I might consider that method, it is fast but oh my goodness does it create a fog of dust.
  I decided to break out one of my favourite hand planes. Years ago I bought a scrub plane from Lee Valley and have used it to remove more humps and lumps than a  Hollywood dermatologist . I set the blade for a medium deep cut and worked across the grain systematically. If you have never used a scrub plane you have no idea what a wonderful tool it can be.  In a very short time I had scrubbed off the hump and was ready to move onto stage two.
 A few years ago I imported some low cost hand planes from India, Anant Tools was the company that made the planes.  For the price the tools are good value and I kept a few of the planes for my own use and sold off the balance.  I have two small  A 33 Craftsmens planes (Stanley #3 sized) that I use regularly.  One of the planes is set for a  coarser cut and the other for a finer cut with a finer bevel on the blade.  

hump removal tools:
scrub plane, smoothing plane,
 straight edge, bee's wax block.

poplar plank ready for final smoothing.

  I spent nearly an hour turning that rough plank into a board with character.  Once the hand planing was done there were many passes through my bench planer.  It is pleasantly surprising how much wood can be removed by a 12 inch bench planer if you don't demand too much of it.

  The top is prepared and ready. The next round of serious machine work will be making the taper legs. That is next weeks job.

cheers, ianw

Tuesday, August 23, 2016

Shop Sharpening Short Cut

  I honestly don't remember whether this quick tip is something that I picked up off the internet or from a fellow woodworker or if it is something that I figured out for my self.  It is so obvious that I am sure someone else has done it before.

  This blog begins with it being peach season and I love fresh raw peaches, I even eat them unpeeled.

  Yesterday I was cutting a peach into sections with my thin bladed fruit knife.
]

  This knife has a very thin carbon steel blade that takes a very fine edge is excellent for slicing fruit. Care is needed because the blades will turn over easily if it hits anything harder than fruit flesh.  Cutting a peach or plume means you draw the blade along a pit sometimes. 

   Since I was sitting and enjoying my peach I didn't want to have to go to the kitchen (or shop) and get some thing to hone the blade I was using.  Ordinarily I would use a sharpening steel, ceramic stone or strop to re-hone the blade. I improvised and used the unglazed section on the bottom of my coffee cup.


  After a couple of firm but careful passes across the raw section of ceramic the knife blade was much improved and I was able to slice my peach into perfect thin sections.  This is not a substitution for formal sharpening tools, but a quick way to touch up a knife on a work site, and another reason to avoid paper coffee cups.

cheers, ianw

Saturday, August 20, 2016

Balance Bike Plan and Finished Project

  Last week I posted a couple of videos showing how to make a balance/glide bike.   Since then a link showed up on my Pinterest account here is an actual plan for a bike.


    Today I began the process of applying coats of shellac, sanding and varnish to the small three drawer storage cabinet.


  The drawers are about 8 inches square with aromatic cedar ends, plywood sides and bottom. The body of the box is white cedar and the top is maple and mahogany.  This entire project was made from materials available in my shop.  The top was cut down from boards I edge glued for another project years ago.  I never throw anything away and on this project it paid off.

cheers, ianw

Wednesday, August 17, 2016

Work Bench Solutions

  There is a saying, 'if you can't raise the bridge, lower the water'. That little maxim is meant to inspire thinking that is 'outside the box'. You are to think of a valid but unlikely solution to a problem.

  A while ago I solved the problem of misaligned table tops not by shortening the tall table but by fitting thicker than usual floor pads to the short table.  I gave the lower table lifts.

  As you know I have serious and ongoing back pain issues, issues that are really aggravated by working bent over. Until you get into a situation like mine you have no idea how much of the work in a shop is hunched over and twisting.  I have my semi-movable work table upon which I do nearly all my woodworking. This work table is very heavy and stable but now too low. I have made a couple of smaller bench accessories that raise the work surface which helps but they are too small.  My original thinking was to make a larger accessory and affix it to the bench,.  Ah Ha! don't raise the bridge......

work table up on blocks
  Using four 10 inch cinder blocks I was able to raise the work surface and extra five inches. The bench no longer rolls  but....I seldom moved it anyway.  I am going to take the casters off and use them somewhere else and get a couple of more blocks to add to more stability. This raises the bench too high for most people's comfort and well above the recommended height but it allows me to work longer with less pain.  I continue to cope with my back pain without drugs, and want to keep that way. 

  Another solution that I have worked the details out on in the one dealing with large sheet stock.  In an ideal work your shop is large enough that you can cut large pieces of plywood on your table saw, or you have a panel saw set up. My shop is in the basement and doesn't have space for either of those solutions.  If I worked with sheet stock regularly I would beg, borrow or build a panel saw, no question.


 To cut the 1/4 plywood for the drawers for the small cabinet in the photograph I turned my raised work table into a giant clamping table.  I clamped a couple of long boards across the work table and clamped the piece of plywood to the boards.  I then clamped another board close to the cut line to give the thin plywood as much support as possible.  I cut the plywood using a hand saw.  For very thin plywood a circular saw to aggressive, and cutting with a good hand saw means that there is virtually no tear out, therefore less wasted material. 

  My current project is a three drawer storage box for art supplies. Although the inner drawers will be mostly plywood, the box  will be mostly cedar, keeping it light and aromatic.

  Cheers ianw
 

Sunday, August 14, 2016

Garden Structure

  I  recently picked up a station wagon's worth of 2 x 4's that had been used for temporary fencing.  The wood had been outside for a year (temporary?) but is still useful for rough projects.

  Today's rough project is a quick but sturdy trellis for our back garden.

Coreopsis
  Against our back fence grows a clump of coreopsis about three feet wide and one foot deep. The clump grows bigger every year.  By now the plants have grown six or seven
feet tall and one good storm with rain and heavy wind blows the stalks into a twisted mess. This happens every year, this year the clump of flowers is big enough and I have the right materials at hand so I did something about it.

trellis, 5 ft. by 3 ft.
  I started out with weather 2 x 4's which I ripped into approximately 1.5 by 1.5 inch boards. Before I let the wood near my table saw I brushed in heavily with a wire brush and double checked the wood for nails and screws.  When I picked up the boards I took time to remove all the nails and screws that I could see, but checked again to be certain.  I like re-using materials, I hate to see wood wasted.


  I used 3/4 inch dowelling as tenons. The up rights were drilled on my drill press and the ends of the cross pieces drilled free hand.  I opted for tenons and all wood construction so there would be no rusting screw or nail heads next season.

  There are many ways to cut dowelling and a variety of jigs that can be built but I have found that a mitre box and hand saw do the job as well as any method.

Stanley Clamping Mitre Box w/Saw 20-600
Stanley mitre box

  Nearly always I am cutting a piece of dowel less than 2 inches long so the 10 inch sliding mitre saw is too aggressive. = (scary).  Dowels can also be easily cut with a band saw, probably my second choice. 

  When I came time to glue the trellis together I only had two pipe clamps that were long enough so I improvised for the third.

c- clamps attached to the rails, Bessey clamp
pulling the c-clamps together.
 A quick and adequate extension.
  When this year's flowers die down I will move the trellis closer to the fence so that next year the wooden trellis will be somewhat hidden by the growing flower stocks.  The flowers between the trellis and the fence can be ignored and the flowers outside the trellis I will tie up.  

  We have a couple of other spots in garden that need extra support and so I will probably make a couple more versions of this trellis over the next while.

  cheers, ianw


Thursday, August 11, 2016

Make a Wooden Balance Bike

build a balance bike
  
  In Europe balance/glide bikes are fairly popular.  These bikes allow a child to develop their balance  early on.  I've seen this sort of bike being used by two year old  children.  My Grand daughter in Sweden started out on a balance bike and graduated to a proper two wheeler without training wheels by her third birthday.  Her balance was well enough developed that she didn't need training wheels.  My Grand children in Canada didn't begin on a balance bike and so spent a season with training wheels before moving to two wheel pedal bikes.

wooden balance bike

    These two videos show some ideas for making your own bike.  This would be a wood working project that somebody would love. If you have a large enough play room a balance bike can make a good Christmas present for a little person.

   Bikes are on my mind lately.  I was able to get away for a couple of days bike riding and today my wife rode her bike 100 km. That is pretty good for a member of the Ancaster Senior Achievement Centre or anybody else for that matter.  She took up riding about 15 years ago and has written thousands of miles.  
 
  cheers, ianw


Friday, August 5, 2016

Jewel Box Built


  There is the jewellery box build part complete.  I have to scrap the old finish off the top two drawer pulls, sand some edges and begin to finish the case.
  I think I will wait to shellac and varnish this project for a while.  Currently it is very hot and humid in our area and I know that humid air can case clouding as shellac dries and really slow the drying time on varnish. Since I don't have a dedicated finishing room long drying times mean varnish with dust and cat hair embedded, so I am going to wait until this hot humid spell breaks before I undertake the last stage of this project.

  What have I learned from this project?


a; Don't just wing it. make a plan and a cut list, even for a one time project.

b:  I still really like elm, it has a cool grain and colour.

c:  consider drawers more carefully for the next project.

d: fasteners really speed up the process, a glue only project can be slow.

e: you can never have too many clamps

f: if you are doing a project like this don't cut corners on materials, prepare extra pieces in case you change your mind, or.....cut something too short.

g: you need a really good, small square when making things this size.

h: take your time.

cheers ianw


Wednesday, August 3, 2016

Leg Vise for Your Bench

  Traditionally a woodworking bench had a leg vise.  There are several companies that will provide kits for make a vise or you can do like Jay Bates  and make your own.

making a leg vise 

  If you don't want to make your own bench you can buy one from thetoolstore.ca , or order a General workbench, it comes with vises included.

  I am continueing work on the jewel box, to day I made the drawer pulls, they are contrasting colour wood like the trim on the top and the third drawer.  Making this project is taking forever because I am not working to a plan.  If I am in a hurry then I draw and plan and a cutting list.  With this project everything is a one off.  Each of the drawers is a different depth and so far all three have different types of reinforment in them, I can do this because there is no time dead line.  Once this is finished I have another project very similiar to make and it will be done more efficiently and quickly because it isn't good to keep a customer waiting.

cheers, ianw


Tuesday, August 2, 2016

Taking Shape Finally

  July was a holiday and family filled month.  I am hopeful that August will be a workshop filled month.

  I resolved to build this project using glue only.  You can see from the photo below that gluing the top and sides to the bottom involved clamps and ballast, and waiting.
clamps and ballast 

trim for the top
  I decided to put raised trim around the top so that things like pens and coins won't roll off. The trim is from a piece of exotic wood flooring I got at a yard sale.  The wood is very hard, starts out reddish orange and turns to a dark brown over time.

re-enforced bottom drawer
   The drawers are made from 1/8 ply and so I decided to add reinforcement rails in the bottom/largest drawer.  I used a couple of pieces of aromatic cedar, it smells nice, keeps moths at bay and looks good, a triple win.

facing the second shelf
   You can see all the clamps that I used to hold the face of the second drawer on while the glue set.  Working on this type of project reminds me that rushing doesn't do any good. Everything has to be fitted carefully, glued and left to dry.

  It is interesting to note that while this has been going on I have made a plane with my Granddaughter, re-glued my wife's sandals and spent several hours trying to clean and organize my shop.  'Organize the shop' seems to be an ongoing and fairly unsuccessful enterprise.

  We are in for another hot week, that means watering gardens and struggling to keep cool. Ah well, I will remember this fondly in January.

cheers, ianw


*** there has already been lots of hand sanding, and there will be much more.