Saturday, October 24, 2020

Small Box B

   The second small box I made from pallet wood also turned out to have lovely grain. This time I pushed my luck a little too far and made the sides 1/8th inch thick.  That did not give enough contact surface to get a solid glue joint so I had add  bracing.


The sides are braced internally and taped 
while the gravity clamp does its job.


  When I do a project like this that relies on glue alone I always give the glue lots of time, usually over night to set. I used Gorilla Glue to hold this together.  Also I tapered the corner braces so there was a smooth flow from the top into the box.


  The box is finished with two coats of "3 Part Finish" * and one coat of wax.  The only small handicap 3 Part Finish has it is is slow to dry.  I find that it needs 24 hours to dry enough that a second coat can be applied. It takes a couple of days for the final coat of finish to really harden. In this case time was available so it is not a problem, old style finishes are not for last minute folks. Once dry I gave the box a quick coat of wax and now it looks great.  

  Start thinking about gift season, it isn't far away.


* 3 Part Finish - one part boiled linseed oil
                          -one part varnish
                         - one part mineral spirits or turpentine.


Thursday, October 22, 2020

Small Box Project - What you can get from a Skid

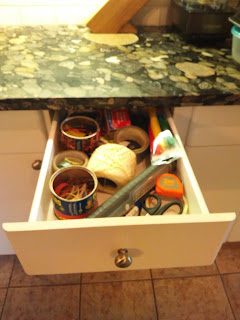
   In our kitchens there has always been a 'Junk Drawer'.  In this drawer lives the many miscellaneous house hold things that need to be at hand, but....don't really belong.  This drawer holds, zip ties, twist ties, rubber bands, string, a flash light, and emergency radio and other stuff.  This drawer served as the inspiration for a proof of concept project. The tins holding the twist ties and rubber bands have gotten nasty and rusted, time to be replace with something nice and without sharp edges.


 It is fashionable to collect and up cycle wood, happily there seems to be no end of skids at the end of driveways asking to be taken away any used.  Over time I have collected skid wood, some ended up is camp fires but the heavier hard wood bits have been kept back for future consideration.  Often , given the nature of the wood, I have chosen to make most of the projects pretty rough or aimed at life outside in the elements.

  This time a sorted through my collection of hard wood from skids. 


  All the wood is rough, often a little twisted and I have no idea what species of wood the pieces are. But it is all 'hard wood' and should have some personality once cleaned up.


  A hand tool wood worker faces the same first steps in using reclaimed wood as I.  Being a hybrid shop I used my jointer and planner to get my wood to consistent  workable dimensions.  For this box I machined the board to 1/4 inch thick.  Next I ripped the board to 4 inches wide and cut off four 4 inch pieces.

  With a bottom of soft wood cut to size the four sides were glued in place and left over night to dry.  The quality of modern glues means that as long as the seams are tight and the glue allowed to cure no fasteners are needed.


  Since this box is made from hard wood. Actually really heavy, hard wood it sanded very smooth. I went to 400 grit when sanding and then used clear varnish to finish this box.  The grain is quite interesting and the glued butt joints perfectly solid. 

  The next box will push the envelop. The wood is only 1/8 thick.  Next blog you will see the result. I have high hopes for the glue joints.

cheers, ianw


  p.s get out and enjoy the fall colours while they last.


Saturday, October 17, 2020

Last Week - Safety On the Brain - Boiled Linseed Oil.

 Since we live in the Great White North, almost, we are doing some yard things to get ready for the coming cold weather.  Eva is spreading wood chips around the garden and pruning shrubs.  I have disconnected the hoses and turned the water supply off, pumps needs to be pulled from the water features too.  It's not that cold yet, but any job involving water is best not put off too late.

 The other thing I have worked on is Tromso. He needed some paint and I sealed his back side with boiled linseed oil/oil based poly/turpentine mixture.


  As long ago as 2013 I adopted a three part  mixture when using oil based finishes.  Most wood finishes in Ontario are water based now and for the most part work fine.  Tromso is going to sit outside all winter and so I opted for an older style treatment, using some materials that have been around for years.  I mixed equal parts, oil based varnish, boiled linseed oil and turpentine to get a perpetrating style oil finish.  I liberally  soaked the bark and the back side of the snowman. As well I made him new buttons;


 which literally sat for a couple of hours in a jar of boiled linseed oil.  The oil will help seal the small rounds and I hope keep them looking good through the winter.

  Boiled Linseed Oil is a very old, well respected, time consuming finish that has a special issue, its own special safety concern.  If you watch "Wood By Wright"   you will see that linseed oil can spontaneously ignite   and what to do to avoid that.  In my shop right now are two used shop cloths laying on the floor drying, to be burned later today. 

  While things were drying I filled some time in the shop with carving yet another spoon.


  This spoon will be used to scoop loose tea from a tin, therefore a teaspoon. I made this spoon from a scrap of walnut in the burn bin. I hate to discard any wood, nice hardwood especially, even if it likely has no purpose. This bit was saved. Once fully dried linseed oil is food safe, they say, I've always opted for pure Tung Oil , or for the last few years pure Hemp Oil as my spoon and cutting board finish. 

  As a foot note:
Last blog I showed splined mitre joints.  I turned the example joint into a square for our craft table.                                                                                                     


  This square is not accurate enough for my workshop, but plenty accurate for measuring and cutting card stock, drawing papers or laying out a design for a poster or card.

   Al together a fun, relaxed and positive week in the shop.


Monday, October 12, 2020

Picture Frame - Mitre Corner with splines


This is what I wanted, a picture frame for my drawing. The drawing is an odd size, so there are no standard (cheap) frames available, hence a custom frame needed to be made.


  I thought a rustic  look suited pussy willows, so finger jointed 1 x 2 was okay for this job.  Although current glues are very good I wanted to give the corners a little extra support.  The wood is less than 3/4 thick (after sanding)  and only 1 1/4 wide (after trimming)  so I felt dowels would be more trouble than they would be worth.  Instead I opted for veneer splines to add glue surface to the mitred corner.

  To cut the slots I used my Moxon vise to hold my work.


  The 'real' Moxon style vise is generally used for holding boards while cutting dove tail joints. You can buy, and spend a bunch of money for the 'real' thing.


  My vise clamps to my work table and uses clamps instead  of screws to move the jaws holding the material being sawn. As far as I can tell it works fine. 


   The mitred corner is clamped in the vise where it is very well supported and I used a rip saw to cut the slot.  After the slot was cut I used 80 grit sand paper to widen the slot slightly to  fit the veneer I had available.


  I cut the veneer with a sharp knife and glued it in place.


  I give the glue several hours to dry before I slice off the excess with a flush cut saw and knife.


 I could easily hide the spline with some stain if I wanted.  This project doesn't require the extra step.  After making many picture  frames over the years I think I have found the one I like the best.  A larger frame from thicker wood could easily have two splines per corner  and be quite solid.


Wednesday, October 7, 2020

Finished - Street Find

 After some gluing and sanding I drew patterns on the ends of the tote. Since is  a garden tote, one end is spring and the other fall.  I used my wood burning pens to outline the patterns, then painted them with water colour.  The  whole thing will get several coats of varnish to make it mud repellent for  work in a garden. 


  This is one of those projects that happened without purpose. it will go onto a shelf and wait to find a use someday.