Monday, February 28, 2011

Band Saw Tricks and other good ideas

   There is a site out there, a Canadian site judging by the web address, woodgears.ca that is very interesting. 
   The title says it is an engineer's approach to woodworking.  My daughter is a mechanical engineering graduate from Queen's University in Kingston so I have developed respect for engineers over the last few years.  When I was at McMaster all I saw of engineering was over turned benches and toilet paper flapping in the breeze.
   I look in on this site regularly to see what he is up to and to get inspiration for my own workshop.  I use his Zero Clearance Insert for the band saw all the time.


Zero Clearance Table

  Has anyone tried using 7 1/2 inch circular saw blades on their table saw that he talks about in his wood shop trick section. His logic is good but I haven't tried it yet.

Sunday, February 27, 2011

Elm Knitting Needle Box, in progress

This a an entry borrowed from my blog, walwoodwork.blogspot.com.
Elm Knitting Needle Box

The plan is to finish it Monday, or Tuesday.  Definitely but Wednesday suppertime.

cheers

Wednesday, February 23, 2011

www.thedesignconfidential.com

  This morning while sitting at my computer and wishing the weather was fit for motorcycling I was tipped to this site by a Facebook friend.
  
   Initially http://www.thedesignconfidential.com/ looks a little arty and not too useful, but....I found that it has woodworking plans available for free.  While the plans are not for complex projects the plans are very complete (Sketch Up) and the instructions are well written.

   Usually I don't follow the plan I buy or get from the net slavishly, but I do like to have a basic plan to start with a  cutting list.     

     I have learned that I am not a designer and so I happily defer to someone that is.  My feeling is the designer is like a play write and I am like an actor.  Not everyone can create and write a play but a play needs actors for it to realized fully.  In my shop at least, finding out what I can do and working to improve those skills has been more productive then struggling with the things I don't do well and neglecting my strengths.

cheers

Sunday, February 20, 2011

Battling the DUST MONSTERS

Beware the DUST MONSTER 


     Having done battle with the dust monsters  in my shop for several years I now  have a workable though not perfect system in place. I don't pretend to be an expert, this just my experiences shared for what you think they are worth. The air quality as has improved so that I don't track dust all over our house and, more importantly, don't  sneeze tissues full of saw dust at the end of a working day. 


   I began my system five years ago with several shop vacuum cleaners attached to separate bench tools.  I had a large shop vac dedicated to my contractor's table saw and three other small vacuums that moved between my pocket hole jig, sanders, etc.

 The system began to fail as soon as I acquired more and larger shop tools.  I got a planer first.  Most of the time I just ran it with the door open and the dust blew into the back yard.  The weakness of that system is coldly obvious.


   Once I got a joiner and  so really serious about milling my own lumber the mess just rapidly got out of hand.  No longer was it a few rip cuts on the table saw and then some sanding. Now it begins with rough lumber to be dimensioned , milled and machined.
  
         Let me lay out the full system as it is currently.

  First stop Joiner, sadly I count on gravity to draw the chips down a chute and into a box.  Not really a dust collection system,  I console myself by saying it is mostly chips and not much fine dust. (we will tell ourselves, anything).

   Sometimes, but not often, it is the circular saw that comes first.  Dust is not controlled, but I try to avoid the power saw, I even use hand saws sometimes. 
                                                          

     Second stop;  either planer or table saw.  These two tools are set up close together and share my Delta 15amp dust collector. (the reviews is of a recent model but mine is pretty much the same) The amount of chips that this unit collects is impressive, but it is a real pain to empty the bag.  Something I learned was to take the top bag off too and then I can reach down from the inside while putting the bottom bag on.  Since the bag was filling too quickly I bought a cyclone top to go on a garbage can.  The cyclone I bought was fairly cheap and so only moderately effective.  I think it captures about half of the saw dust so it takes twice as long to fill the bottom bag. Anything that allows me to wrestle with the bag half as often is a good thing.


Third, the mitre saw.  I have it attached to a shop vac, but as you know mitre saws are very dirty.  


Band saws and sanders all  are attached to a Oneida Dust Deputy driven by that big old shop vac.  As far as I can tell the Dust Deputy does everything it claims.  I haven't changed a bag in the vac in over a year and have emptied the Dust Deputy bin dozens of times. 


    One thing I did some years ago was buy extra vac hose and solidly tape it to my sander's dust ports.  Now all my sanders plug into my Dust Deputy or Fein Vac easily and quickly, so they get plugged in, even for  short little jobs. 


   The only real stumbling blocks are the mitre saw and the joiner, and I have the pieces for the joiner I just need to re-arrange my floor plan to get the joiner close to the Delta dust collection.  So it is not stumbling, really it is just procrastination. In the near future there will be a dedicated mitre saw station with an umbrella like system to catch free flying chips.  Beyond that or buying a Festool saw I don't know what to do.


Errors in judgement. 


     I bought a small down draft table with a small single bag dust collection vac.  I do not use it.  I haven't got the space to leave it out to work on and the small single bag vac just screams.  The sound makes working beside the down draft table vac wildly unpleasant even with ear plugs.   


   One of my sanders has a square dust port, it was such a pain to make an adapter for so that it would fit easily on the vac hose.  From now on all dust making tools have to have round, standard dust ports. 


Tragedies:
     My old belt sanders don't even have dust ports.  They are indestructible, I'll have them forever and they can really only be used in emergencies  or outside. But man oh man will they remove material in a hurry.   I have a great old Makita finish sander, again it predates dust collection ports on tools.  Sometimes I drag out the down draft table and use the Makita, it is good, but I hate the down draft table so much the Makita doesn't get used much.


    A cool thing I've learned, hand planes and cabinet scrappers are great  and can really reduce noise and dust.  Cabinet scrappers are easy to sharpen and impossible to wreck.  Using planes is not just a back to nature coolness, also they work great, those old dudes did know a few things.


DEATH TO THE DUST MONSTERS !!!!!


Wednesday, February 16, 2011

Red Elm Mirror Frame and box

     Recently I got 120 board feet of Red Elm (slippery elm) that was to be flooring but ended up as misc. shorts at a lumber yard.  I confess I didn't know anything about elm until I got it to my shop. I took it 'cause it was a real good price.
    I now know that is gives more than its fair share of splitters, the cuts will be fuzzy if your tools aren't sharp and that the projects turn out pretty nice, if you like grain.  The mirror frame on the left is destined for sale.

     I made the frame with 12 inch mirror panels and you can see from this photo that the grain is quite pronounced. What isn't as obvious is the colour range from nearly white to reddish.  Someone will love it, or not.  Once I got the wood machined initially,  it was fine to work, and took the Rub On Poly finish quite well.
 This is the left overs.  I used a clear finish on the mirror frame and so thought I would see what happened with a Watco Danish Oil finish on the off cut box.  I like the Danish Oil better.  The brown tone in the Danish Oil  muted the red just a little and made it sort of "walnutish" in colour instead of the old style red mahogany colouring. 

You can see the variation in the grain patterns if you look closely. (one day I'll get to be a better photographer and get a better camera). Shop tools and techniques are more important right now.

Altogether I have been pleased with the results and look of the Red Elm. 

Saturday, February 12, 2011

The Computer and the Wood Worker!

  Aside from being a Blogging sort of guy I find myself turning to the internet/computer more and more in pursuit of my woodworking hobby.

  For example, "What does a 6 inch jointer cost?"  I jump on the net and zoom, I have prices from three or four local dealers, I can find out what is in stock and then I type in the model number I can read reviews from all over the world.  I can answer all the important questions and make a decision without having to get out of my PJs.

  Another example, "Sweetie, Can you make a tea chest for the church auction?"  Type in tea chest in any search engine and see links to dozens of plans.  Type in Etsy and see what the world thinks a home made tea chest is worth.

  How many of you use your computer for those tasks?

  What other uses do you have for your computer?

  How many of you have turned to the computer grudgingly?  Aren't they great when they work.  It is tiresome that the world has become so dependent on computers that they can't even make change at the local store when the computers are Down.

   I am writing this blog entry while sitting in a local McDonald's restaurant waiting to go to a meeting.  To a guy with grey hair the whole thing is like a scene from Star Trek. (including the girl with the green hair).

cheers, Ian W

Friday, February 11, 2011

Wisdom from Leamington

     One of the great things about going to wood shows or large in store events like last weekend's two day Sales Expo at Leamington Home Hardware is the chance to meet and talk with other woodworkers.  Since most of us spend our shop time working alone it is easy to forget we are part of a large fraternity of sawdust eaters.

      Howard (lathe) and Clarence ( scroll saw)  have been coming to Leamington Home Hardware for years and it is always a treat to see what they are doing and how they are doing it.

     That challenge that had been spoiling our fun can be often cleared up with one question answered by an experienced fellow woodworker.  Another  thing that mixing with fellow wood workers can supply is inspiration, seeing other woodworkers makes for more "I can do that" or "why didn't I think of that" moments.  Wood working is a craft and a craft can be learned.


The next opportunity to see wood turners in action is the Kitchener-Waterloo Wood Show on March 11th to 13th  at Bingemans.

Wednesday, February 9, 2011

Small Jobs and New Tools

   Last weekend I was at the Hamilton Wood Show and wondered past the Dura-Grit booth.  In the past I had purchases a couple of their sanding blocks and this time I saw that they were selling rasps.  I am very happy with my sanding blocks and so added the rasps to my collection of tools.

   One rasp is square with two sides 60 grit and the other two 120 grit while the round rasp is 120 grit. The section with the bonded grit is about 6 inches long and the handles are small in diameter but that is easy to fix.  I expect that I will wrap the round rasp's handle in tape.

   I make an assortment of smaller projects and I also do some scroll saw work.  Both types of project usually need small touch ups before finishing, until now I have used needle rasps, files, hand held rotary type tools and an all sorts of tricks and jigs.  These new rasps do a good job on small edges and I found working with them easy. Things I especially value in these rasps are the blunt ends and the length of cutting surface vs. the sharp ends on the short little needle files.  Cleaning out inside cuts on scroll saw projects will remain a needle file task but the outside edges will be touched up by these rasps in the future. ( and I will not poke myself if my mind wonders)


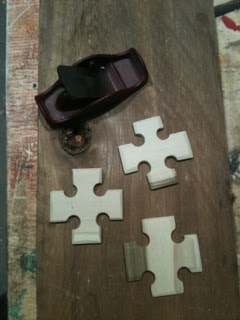
This is an example of the current small job.  These are Thread Winders.  A local store, Spencer's Mercantile   specializes in historic re-enactment products and I have been making some small things for them. The latest products are these thread winders in poplar, the new rasps worked great for easing edges after I cut them out on the band saw.

Friday, February 4, 2011

The Work Bench Quandary, my solution


 The two photos above show my take on the ever present work bench challenge. 
  
   Five or six years ago I was working  in a much smaller workshop than I do now. Then as now I was trying to maximize work space.  Everything needed to be on wheels, but a sturdy bench/work table was also required, I didn't really believe that the "bench" could move.  My solution was to build my rolling heavy duty work table/bench/storage cabinet.

  Three years ago when I got more shop space it was my plan to get rid of this Rolling Work Bench. However there was work to do and not enough time to explore the possibilities of a replacement work bench. So what  I ended up doing was modifying the Rolling Work Bench as a stop gap measure.  I made it  easier to clamp to the top and sides, also I moved my vice onto this work table from my small and awkward bench.  I have to admit it works for me.

  The basic design is 35 inches tall to the work surface which is 40 by 40 inches and 1 1/2 inch thick. The base compartments are made from 3/4 plywood and divided into four sections, that way the base layer is very very stable and the second layer is just as stable.  I bought two very good locking casters and then put two stout legs under the other side. 

  The work table is not so heavy that I can't move it when I choose, but it is heavy enough that I seldom have to lock the casters.  The height is good for most projects to sit on top and still be at a good level for work.  I have repaired and re-glued many chairs on this work table.  Since the table is so stout it also acts as my workbench.  Since it has access on four sides when needed, I have able to plane, re-saw and manage sheet stock (with a little help) on this work surface.

   With the 1 1/2 top standing on spacers I can clamp on all four sides and use the space under the top for tool storage while working. The power bar is used occasionally, when I need to plug in a battery of drills and sanders it means that I have only one extension chord running across the floor.  Finally the best part is for production type jobs it matches up with the out feed on my planner.(the planner is also on wheels)

   In the left hand photo you can barely see my "work bench' behind the movable table.  The work bench is where I do small projects, carving or finishing while sitting on a tall stool, to save my back.  The build quality of the movable bench is not very high, it was built in haste, of construction grade materials with a brief future in mind.  My  Rolling Workbench  has turned out to be  very usable and quite flexible thus a lucky inspiration.

Thursday, February 3, 2011

Prototypes: Yes, No, where to they go?

   Over the course of my wood shop life I have made products for resale or as gifts.  Regardless of the intended future, generally speaking I need to make a prototype to work out the details and proportions, something I learned from Norm Abram on the New Yankee Workshop.
  
  Sometimes the prototype ends up as fire wood if it didn't really work out and other times the project finds new life in a secondary use. All shops need storage and will take whatever they can get. So the various shelves, book cases and credenzas are full of tools not knick knacks or linens. 

    The prototypes that turn out pretty well then get gifted to my long suffering friends and family. After all, I put in some serious time to create the project and if things go well the only difference is it is cheaper wood or painted instead of the stain finish of the "good copy".
  
   So my question:  Do you build prototypes and where to they end up?