Saturday, June 27, 2015

folding table


  Our deck needs a small table and I decided to look for a plan for a folding version.

folding chair and matching table, from an old wood project magazine

table plan


  To make the table I gathered several pieces of oak from my stash of rough flooring boards. 


  I rip sawed the oak on my band saw to make the table top 3/8 inch thick and then joined and planed all the sections.  Oak can have a wonderful grain and will look nice on the deck.  In the pattern most of the wood is 3/4 inch but pine instead of oak.  I opted for thinner hard wood, it should stand well if left on the deck in the weather.


    I made all the pieces for this project, scraped and sanded everything to 120 grit before assembly.

   When working with oak there a few of things to remember:

 1. Oak is very hard and quite sharp so you have to be mindful of edges. Oak will splinter if you are not careful and it is no treat to get an oak sliver under a finger nail.

 2. Oak has a great grain that you have to mix and match when you are setting boards beside one another to get the best effect.

 3. Every fastener has to be pre-drilled or you'll split your wood or bend your nails.

 4. Oak finishes very nicely with cabinet scrappers in place of sand paper, but watch out for the grain in the same way you do when hand planing

  Next blog, the finished table.
cheers, ianw  


Wednesday, June 24, 2015

Hose Guides

 As you can see from the photo we have a hose that runs beside a garden in our back yard. When working in the yard you have to be very careful when watering or the hose gets dragged into the herb garden and knocks things down. I decided that I needed a more efficient way to roll out and roll up the hose. 


 Since I don't work with metal, and still wanted the guides to be strong I turned to one of the good all weather hardwoods, oak.


   These guides are 5/8 oak with 1 1/2 inch holes. I drilled the holes with a Forstner bit in my drill press and cut the balance of the guide on my band saw.  I rounded the corners of the guides in case someone bumped into them while working in the garden. I rounded the inside of the holes with my Dremel tool so that the hard oak edges wouldn't abrade the hose.


 Now the hose runs along the top of the 2 x 8 board edging, when I pull it off the wheel or wind it in the hose stays out of the garden.

 Since oak is hard and stands up pretty well to weather I don't expect to have to replace these things for many seasons.

 cheers, ianw

Tuesday, June 23, 2015

Travelling Tool Kit


  In spite of the date stamp in the corner, this is a travelling tool kit I put together on Friday and used last the weekend at my kid's place.  My shop is focused on woodworking, in fact I hate nuts,bolts,screws and all types of auto mechanic sort of stuff. Surprisingly then, there are many auto mechanic type tools close at hand in my shop. This weekend passed my son-in-law and grandchildren needed an assortment of little adjustments to their bicycles, mostly aligning and tightening sorts of tasks. Somewhere in their basement are all the tools to do the job, somewhere.  It is just easier to do a job if take the tools with me I think I will need.

 Some of the tools in the bag are clearly wood shop tools, you can see on the left a pencil, folding ruler and Warrington hammer. The 3 in 1 oil fights rust on woodworking tools as well as machines. I have a spray can of a silicon cleaner lubricant and it gets used to clean woodworking machines as well as bicycles.

 Various Pliers and vise grip style pliers are used in my shop for nail pulling and basic metal forming. Linesmen's pliers are usually the first pliers I reach for, sometimes they are overkill but usually the are just what the doctor ordered.  

  In most cases I do not like multi-tools, like most compromises they don't really satisfy anyone, but...I took a Picquic screw driver. The multi bit screw driver is like the multi bit hex keys, adequate for a quick little job but would drive me crazy if I had to work with them for any length of time.

  Adjustable wrenches are like multi-tools but carrying a set of wrenches, (in Canada metric and imperial) can be literally back breaking so I opt for a "one size fits all, mostly" pair of adjustable wrenches. Since it was bicycle repair I took small wrenches.

  Rags, a tooth brush and black tape round out the kit. On something like this I know that the kids have paper towels and old tooth brushes, it is just easier to have it at hand.  I took the black tape because sometimes bicycle cables have frayed, scratchy ends and I wanted the tape available to wrap up the nasty bits so that the little guys wouldn't get poked.

  I took a shop apron with me just in case the job was going to be really greasy. Over the years I have ruined many, many shirts do "a little" job. And will probably ruin one or two more over time.

 The little, cheap canvas tool bag, that I acquired years ago and has travelled thousands of miles was money well and wisely spent. When not in use it folds flat and is stuffed into a corner in my shop.  I have a large wooden tool tote and have made a couple of smaller totes to serve particular purposes but they do take up space.

Kieran's tool box.
The copper pipe makes for a strong but small hands.
  The other thing I like about this canvas bag is that it zips firmly shut so it can be  strapped it to the back of my motorcycle seat and I needn't worry that I am losing more than my mind as I travel.

  I know that I am preaching to the choir but...how can you live a full and fulfilled life without a workshop?

 cheers, ianw


Saturday, June 20, 2015

Fast 2 x 4 - Garden Project


   To protect our tree from careless city lawn mowers and to add a bit of style to the boulevard I turned a stud grade 2 x 4 into a retaining collar around the our tulip tree.

  If you are gardener or know a gardener this project is dead easy needing only a saw and fasteners.

  I began by cutting 8 nine inch sections of 2 x 4 with my mitre saw. Next I cut a 45 degree angles on the ends of four of the pieces. All of the cutting could be done with a hand saw and a mitre box making this a basic D.I.Y project.


  You can see how the pieces fit together, note the overhang.  I clamped two pieces of the project to the bench top and drilled two holes in the pieces with the 45 degree ends.  Then I counter sunk the heads and used self taping Kreg screws to hold the pieces together. I used a cordless drill and driver but again this could be done by hand, or you could nail the sections together. 

  If you were making a larger octagon you could hide all the screws inside using pocket holes. I will do a blog later showing the inside technique for those of you that don't already know it. 

 Once I got the whole project together I cut the over hang off with a Japanese tooth pattern saw


   Even though this project will soon be hidden by grass and wood chips I sanded it to 100 grit just to ease the edges and smooth out some of the machine marks. But I did decide not to bother using wood plugs to fill the screw holes.  If this were going in our yard amongst my wife's beautiful flowers I would have filled the screw holes, sanded it smoother and maybe even stained it. 

  There is a good chance that the city maintenance crew  will bash into the collar before the season is out which is why I made it. If you used a 2 x 8 you could easily make an eight sided raised garden to feature annuals or herbs based on the same idea as this project.

 I enjoyed a long motorcycle ride, a visit with my Mother and shop/garden time today.  It doesn't get much better than that.

cheers, Ian W


Thursday, June 18, 2015

Bunk Bed for the Grand Kids


  My wife and I recently finished assembling a bunk bed kit in our basement.  Our grand children are big enough that they have out grown their kiddie beds and we wanted the space savings of the bunk bed design.

 Our grand children slept in a crib that I made from scratch. Clara sleeps in a bed that I made for her, but this time we bought a kit.  I was planning to make their bunks in my shop. The major reason for making beds from scratch vs. buying a kit is that often the kits aren't actually wood.  This kit is 3/4 inch pine with dowels and knock down hardware used in assembly. We decided on this bed because it is well engineered, nicely designed and pre-finished.

  It took us about 2 hours last evening to assemble the kit.  All these kits come with some tools but not all the tools you really need. For example to make assemble things more efficiently a large square is vital. A square aids in alignment as you are tightening the various sections together. A mallet is also useful for persuading some of the parts and fasteners in to place. A cordless drill can also be useful for driving bolts and lag screws. 

 Since this bed kit is solid wood I will be able to make a couple of modifications to if for our particular needs and should the need arise it will also be easier to repair.

 Truth be told the time and cost involved in designing and making a set of bunk beds from scratch is probably not cost effective unless you are planning something very unique and special.


the bed in the
Ikea catalogue

   Now it is time to go to the dentist and get yet another broken tooth repaired.  Thank goodness for modern adhesives. 

cheers, ianw


Monday, June 15, 2015

A Recycled Project by Matthias Wandel


rolling cart for a welder

  I have admired woodgears.ca for as long as I have been writing this blog and recently a video showed up on my You Tube link with Matthias using left overs to make a rolling cart for his welding machine.

   This video features several things that are near and dear to my heart.
  First Matthias reclaims materials that would have other wise ended up in land fill somewhere. Now that I have three grandchildren (soon four) I am aware of what I am leaving behind, I would like the future to have grass, trees and blue sky, not heaps of plastic and foul landfill sites. I try and use and re-use as much as I possibly can.  On Wednesday's blog you'll see what I picked up from the side of the road last week.

 Second I watch Matthias's videos and he seldom works in an unsafe way. I doesn't wear eye protection or a dust mask all the time but he always uses safe work methods around his machines. We all should use crosscut sleds and push sticks more often than we do.  I for one have been nipped at by my table saw. After years of splinters and scuffed knuckles I now wear gloves when milling rough lumber and machine sanding

 Lastly I like that Matthias concerns himself with the quality and look of the final product. Changing the handle on the drawer didn't improve the utilitarian aspect of the welder stand, it just made it look better. Often I get in a hurry and am willing to accept workable but ugly in my shop and that needs to change. Your work is a refection of you, it should show well, and that takes commitment. 

cheers, ianw


Saturday, June 13, 2015

helping Hands


 As regular readers know I am a proud Opa.(grand father). My grand children are especially cute, smart and loveable and I have made many things for them in my workshop.


    My oldest grand daughter, Clara Bear is soon to be four years old. She slept as a baby in the crib I made her older brother and when she out grew the crib I made her bed.  Her bed is solid enough that an adult can sit on the bed and not worry that it is going to fall apart like a 'big box store' particle board kit bed. 

  Initially Clara's bed needed a side rail to keep her from rolling out of it in the night. My solution was to take one side off of the crib and attach it to the bed frame with clamps. Clara is big enough now she does not need a big side rail to keep her in bed but she does need a lower rail to help keep the many stuffed animals and dolls in bed with her. She has bears and turtles and owls and otters and princesses in profusion to keep her company as she sleeps.

 Yesterday's shop project was getting the new side rail parts together. You can see on the table a large beautiful piece of aromatic cedar that will be the rail for the bed and two hands.


  The hands are maple and just about Clara sized.  I am going to screw the hands to the bed frame and the side rail to the hands. I have left the cedar unfinished because it smells quite wonderful and I hope that Clara will like rubbing it and making the aromatic scent come out.  The hands are left unfinished because Clara and I are going to paint the hands on Monday before I put all the pieces together.  She will be able to paint the finger nails and put bracelets on the wrists and give the arms colourful sleeves, if she wants, or do what ever she feels.

  I have spent a fair amount of time thinking about how I wanted to modify Clara's bed so that it will be comfortable and personal. Typically I thought of various fancy designs and layers of varnish and hidden wood plugs and all those craftsman things.  In the end however I have chosen simple, practical and to let her make it as personal as she wants.

  If on Monday orange is the colour that she loves then the whole thing may end up orange, not my first choice but then it is not my bed.

 I'll keep you posted on how it all turns out.

Wednesday, June 10, 2015

Wednesday in the Shop

 Sometimes I spend time in my wood shop and don't really do much, but all 'shop time' is 'good time'. Today was a good time.

  First thing I did today was clean up a cabinet that I picked up on the side of the road.


  This is a upper unit from someone's kitchen and all it needed was a shelf. To cut a shelf I used my framing square and a jig saw. I know this is not much of a woodworking project but....it was time well spent.

 Another thing I did was finish sand and varnish my bagel slicer.


    Kieran is my reason for making this bagel holder. Kieran likes to have a bagel with cheese for breakfast, he will be six this summer and I want him to be able to safely make his own breakfast. Again not a big job, but one that I felt needed to be done. Sanding blocks make getting maple glassy smooth easy.

two brooches and a tie tack

  I have been working away on small things.  These three pieces have three coats of varnish. These pieces are sort of silly, but style is often silly.

  The rest of my woodworking day was spent mowing the lawn and fixing a couple of small things from 10,000 Villages. Repairs always take more time than you imagine.  When I have repairs to do for 10,000 Villages I end up digging around in jars and drawers looking for hardware, and again I found just what I needed.  This sort of task is fun, when it doesn't need to be cost effective.

a bird condo?


    Finally the weather is good, the yard looks good and it is time to get outside.

  Do woodwork in the back yard in the fresh air.


Monday, June 8, 2015

Rebates, Bagel Slicer and Why Wood again.

Why wood?

 In April 2011 I made a door mat from oak and put it outside our front door.


  This door mat has sat outside the door through rain, shine, summer and winter. Last evening I brought the mat in and gave it a serious coat of tung oil and the mat looks like this:


  This oak mat shows almost no wear and tear, that's why I like wood.

  Cutting rebates by hand is an interesting video made by "The English Woodworker".

hand cut rebates 
  I watched the video this morning and this afternoon I actually set about doing exactly as shown by the video. 

  I cut the rebate on the bottom of my version the bagel slicer 

Bagel-Bread Slicer Completed


  I cut the rebate with a knife, chisel and shoulder plane. In the video "The English Woodworker" he is using pine for his box, I used maple. It worked was well with hardwood as with softwood. Cutting rebates by hand is effective but definitely slower, making one rebate by hand is probably quicker than setting up dado blades or a rabbet bit in your router table. With hand work you trade speed away to get a quieter work environment, sometimes quiet is nice. Sometimes fast is nicer. 

 My bagel slicer is made from a scrap of maple with a big ugly knot and a twisted grain that was a reject from a cabinet shop. I think it will look pretty good when the glue dries and I sand it to a fine finish. Interesting grain and knots does not suit everyone's taste but I like my wood to be interesting.

 cheers, Ian W.


Friday, June 5, 2015

Art Case

I have been taking drawing and painting lessons for a couple of years and last week I got tired enough with carrying my art supplies forth and back to my lessons in a shopping bag that I made a travel case for my watercolour paints and equipment. The case is 15.5 by 17.5 by 4.5 inches, top and bottom are oak and sides basswood. I made the front and back from door skin.

  The box is definitely a prototype, and so I decided not to spend a bunch of money on hardware.  The handle is rope, wrapped in twine and it works pretty well.  Instead of buying a piano hinge I used a couple of hinges from shop supplies, they are nearly the right size and type. What I did buy was the latch, and it was a disappointment, I never really trusted it to keep the case closed.

 So, today I made new closures out of wood.

 I laid out the plan in two pieces of oak from my off cuts bin.  I drilled all the holes needed at once and then cut two of the cuts on the band saw. Then to cut the vertical lines I used my coping saw. Every shop needs to have a coping saw available.  My coping saw is the tool I turn to for small jobs, including cutting dovetails. 


 Initially I fitted the catches in place with clamps and glue.
I then drilled and screwed the pieces on to the case work.


  Each catch has a through hole drilled, into which a wooden pin slides holding both halves together like a hinge pin.  In this version the latches are a bit over engineered so when I make another art box I will have learned my lesson. I also plan to take the medal latch off this case, since it doesn't inspire trust anyway.

  For the next version I think I will not bother with oak, though strong,it is heavy and really stronger than this project needs. I will use a piano hinge and make the handle from leather instead of rope and most importantly, I'll make a smaller case.


Wednesday, June 3, 2015

A New Invention - Box Making Blade

New Invention


  Check out the video.  I admire people that think of new and better ways to do things.  If I made lots of plywood boxes I don't think there is a better system than this new saw blade.

  cheers ianw 


Monday, June 1, 2015

Monday June 1 - a little shop time

 The last two days have been days off.  Occasionally I just don't do anything in my shop.  Wood working is my hobby and I have to keep my hobbies from becoming obsessions, or worse a job. My shop is special because it a a hobby that pays for itself (mostly), and so I have to be on my guard against trying to increase profit thereby turning my hobby into a job and the experience being spoiled by my natural greed.  

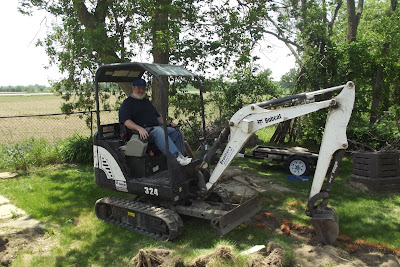
 So Saturday I rode my motorcycle out to see a buddy of mine that is living a dream.  He is building a big, big workshop in his back yard and was digging the footings on Saturday.


  Isn't that the coolest little digger you've ever seen? There are lots of directions that the bucket will go and to make it work efficiently requires study and practice. I played with it briefly and then rode off to play while my chum worked away for hours on his shop's foundation. 

 Sunday it rained,and rained and rained so I spent the day reading and painting.  I stayed out of the shop entirely just because I wanted a couple of days off.

  Today I cleaned up the pizza boxes and beer cans in the kitchen, washed the dishes and got back to work. My shop is not currently focused on anything very big but that isn't news. I do have some small things that I am playing with and I do plan to make a trellis similar to the one in the previous blog.

mini bench clamped in the
 work table vise. 


 large maple cutting board
ready for final sanding


  Last week I finished the mini bench and this morning was working on it.  The height is good and because it is bigger than the "toy makers" bench it can be used more often.

  
wooden tie bar

  I am making small carved jewellery and the latest project is a lightning flash tie bar. Since the pieces are carved from basswood though largish they are quite light.

  Basswood also takes colour well with no visible grain that needs to be covered by the paint, so painting is fast and easy


  If you want to make and paint small projects I recommend that you hold the pieces on fine screws or on gimlets. Most of the things you carve have a bottom or a back side into which you can screw a holder.

  I have other work to do but I don't want to run any noisy machines today,that is for tomorrow, today is carving and painting

  cheers, ianw