Wednesday, April 30, 2014

Workshop Cleaning, not my wood shop, my wife's.

  When we got married, years ago, we tired taking turns cooking dinner.  One person cooked the other cleaned up.  I was an okay cook, but, Eva is a kitchen Goddess.  Her cooking and baking are famous through out the land, (or at least locally).  Fairly quickly it was clear who should cook and who should clean up.   I don't ever imagine that I got the raw end of the deal.

  Since Eva regularly bakes 5 or 6 thousand cookies at Christmas each year and turns out a weekly supply of snacks for local organizations,  her kitchen is no idle play space, but a true work shop.  

    Today it is raining, overcast and chilly.  Eva is away for the day and so this is a good time for the serious spring cleaning of her work space. 


perfectly shiny and bright
loaded back up with tools.

   Eva's kitchen is a galley style kitchen, that sort of kitchen puts everything within easy reach and makes for a more efficient work space.  As every baker knows marble is great stuff upon which to roll dough and is easy to clean up.  A 'traditional' wood counter looks like a good idea but trust me it won't stand up to wear and tear like marble.  The cool thing about this marble  counter, it is made from an off cut, so, though it is very very cool, it was quite reasonably priced.

   How do I clean marble?  With stream. The kitchen floor and marble counter tops are easy to clean with steam.  One of the great things about steam cleaning is that it doesn't leave any residue on the surface.  I don't have to worry about whether I got the cleaning solution off the counter totally, so that it won't end up flavouring the next batch of cookies.  I also like steam because I don't have to concern myself with rubber gloves or other protection from chemicals.   

the other side of the kitchen, one piece custom stainless steel.
Note, the sink is large enough for commercial cookie sheets to soak flat.

  Stainless steel is also a great surface for a kitchen.  Eva designed this counter based on a commercial style work space.  While there are some very good stainless steel cleaner/polishers I again like steam.  I find that steam and a nylon scrubber will deal with any accumulated grease.  
photo/07-01-13-06-01-44Steam-Cleaner-BSD-205-.jpg


   Once I finished in the kitchen I moved out side, there was a short break in the rain and I needed some fresh are.  I  gathered  up wind blown 'crap' from our gardens that began life in our neighbourhood recycling boxes.  I know that recycling is a good thing, and I know that people don't want their paper and plastic to end up in our garden, but.....


Etore, 32'' Grip ‘n Grab Grabber
Grip 'n Grab


  Anyway this is one of those things that you keep telling yourself that you don't really need.  No, you don't really need a Grip 'n Grab, but then you really don't need a table saw, or a circular saw, but they just make doing the job so much easier that it pays for itself in stress reduction.

  Speaking of circular saws.


  In the garage we have a bench made from a steel packing crate frame.  As part of the spring round up this morning I cleaned out the garage and uncovered my motorcycle, (hoping that the rain will stop before it starts snowing again) I cut some scrap plywood to make a top for the frame, yes I could have cut the plywood up with a hand saw, yah sure!.  It is so much less trouble to go to the workshop and get my circular saw and  cordless drill and knock the job off in minutes.

  The romance of hand planes and razor sharp chisels are what drives many woodworkers, but...keeping the place organized and functioning smoothly is what keeps the dream alive.

cheers, 

ianw 


Monday, April 28, 2014

Things to Make with a Log

  On Saturday the Building and Grounds committee of our church had a spring clean up and the next morning the piles of tree branches reminded me of just tough our winter had been on our trees. Coming out of church I gathered up a few pieces of wood from the pile and brought it home. I got 10 good sized pieces of elm (I think) 5+ inches in diameter and 1 to 3 feet long. My plan is to turn some  small projects and to use some of the branches in bark-on  projects.

  I looked around the net to see what other ideas were out there and found two videos that I think you might like.

  Steve Ramsey's woodworkingformeremortals.com had a video of three projects.

Things to make with a Log

  A second video shows a Swedish Fire Torch:

Making a Swedish Torch Fire

  This is a neat idea too.  I can see this as a way to have a quick easy fire at a conservation area and you can do all the preparation for the fire at home and take it pre-packaged, just like taking pre-packaged food for the picnic.  If you are going some place where you can gather wood I suggest you take a saw like this.


Fiskars 10'' Sliding Pruning Saw 9258


  A saw like this will cut most anything you want to carry back to the camp site.  This type of saw is all most home owner need to look after their places.

  Right now my wood is green, so it is going to have to dry out a bit in the wood pile behind my house before I use it in any serious projects, but I will keep you posted.

cheers, Ian


Saturday, April 26, 2014

Why Wood, again.

  In this "modern" world I am always struck by how often the movies turn to Mozart, Bach, Wagner or Beethoven for their important mood setting music.  In the same way that those cultural icons are hard wired into our ascetic view of the world, wood is still a popular and attractive building material. 

  Twice in the last two weeks I was in buildings that made a feature of wood.  This building even has Cape Cod style wood shingles on its exterior. 


faux post and beam


  The most recent example of wood in form and function was on the New York State Through Way at the Ontario Stop, not far from Buffalo.  The coffee/bathroom stop was very inviting and comfortable.  I liked that, it said to me that the folks that got the contract for the highway lay-by actually had some taste and some interest in making their space inviting for people. Since they have no competition the building could have been an eye burning poured concrete monstrosity but it isn't is is wood and it is nice.


  These pictures are the ceiling in the lobby of the resort in the Caribbean where Eva, our Grandchildren and  I spent a week, two weeks ago. Each end of the lobby featured large stained glass windows and the wood was the darker stained colour. (the light coloured wood is just an over exposed shot, even a digital camera can be fooled).

   In the Caribbean much of the building construction seems to be painted poured concrete, which is efficient and effective. Wood can be efficient, effective and beautiful.

Thursday, April 24, 2014

Tip of My Hat to Alex Harris

  Alex is a young man from England that has maintained a wood working site for several years.  In fact he began as the teen woodworker, and now has a site thiswoodwork.com, because he is no longer a teen.  I admired Alex's site because he did fine work with a limited number of tools, in a fairly small space.  Clearly it loved to work with wood.

  I thought that I would share on of his early wood working projects.  The wine bottle holder.


  While it is clearly a basic project, he takes it seriously, does it well and creates an informative video.  I'd like to believe that Alex is the future of wood working.


Wednesday, April 23, 2014

Shoelace Stoppers

  Since I got home from the trip south I have been battling a sore throat and cough.  I am feeling sort of OK but....not 100%.  My suspicion is that it is my standard spring flu/cold, finally the weather has got good and I have been out for a couple of bike rides as well as worked a bit in the garden, so it must be spring.
Bike Sub 10
I love my bike.
    Having got out for a couple of bike rides helps clear my head, but having post nasal drip and a cough has put me on pills to control the ooze.  I treat those pills the same way that I treat booze, so I have not been doing big stuff in my shop. When my mind is a bit clouded I stick to small goofy projects that I can make with hand tools.  

  Today's project is one that I had been thinking about for a while.  Like most people I have an assortment of shoes for bumbling about hearth and home and a different assortment for bumbling about in the yard.  I try to be a good guy and not mix indoor and outdoor shoes. Mostly I  remember to change shoes as I come and go.  As I hurt my back last spring sometimes getting up and down to tie and untie shoes is  a "pain", it also doesn't help that I am not a svelte 200 pounder any more.  What happens is I find myself wondering around the house in untied shoes.   Flapping shoe laces are a tripping hazard, plain and simple.
  
   My solution, required a 5/32 drill bit, a whittling knife and some pieces of 3/4 square hard wood. (in this case elm).


  I made two sets of lace stoppers for my in door shoes so that I don't have to hunch over and tie my shoes.    These are not replacement for a property tied shoe by any means, I expect that the shoe will loosen up as I walk but it does eliminate flapping laces and the tripping hazard they present.


  I can hear some of the serious wood workers out there sighing deeply as they head to their shops to hand cut dovetails, with one hand tied behind their back.  When I started doing wood work in my home shop I referred to myself as a wood butcher, now I feel my skills have advanced to where I am a competent  DIY wood worker.  As a DIY guy I have done a few very nice projects but mostly I work in my shop for personal satisfaction and private amusement, thus lace stoppers are a totally acceptable little project. 

   Remember any time you spend in your shop is time better spent than watching television.

Sunday, April 20, 2014

The Solution,have a work shop


 So we just returned from a week in the south, it was a good holiday in a really nice resort.   As we unpacked our gear there were wet clothes, sand in everything, and a tangle of head phones.


The Problem

The Solution

    This is a quick solution to a ear phone mess.  I used some left over poplar and my band saw. Of course there was a wee bit of sanding but now the cords are organized.

cheers, ianw


Friday, April 11, 2014

Its Bird House Season

  There must be an unlimited number of designs for bird houses, and as we cut down the trees in the city, an almost unlimited need for more bird houses.

   Building a bird house is one of the earliest and easiest projects that you can do with a little person.  Kieran and I have made two bird houses already.  This summer it will be time for his little sister to get into the act as well, I think. ( blog on 4/13/12 and 09/10/13)


   When I typed bird house plans into the computer there came up 100's of pages.  I did like this one: 50 Free Bird House plans.

License Plate Bird House

  When you go to build your bird house it is a good idea to get advise on what size of hole is best for which species of bird.  You want to match the hole size to your local birds.  The trick is keeping the hole large enough for the bird but too small for the predator birds.

  I am sure that there is debate among the 'bird people' as to the very best size of hole, but, when isn't there debate.

  Something else I have been told.  It is not a good idea to put a perch or a stick by the hole on the bird house.  That perch supplies a place for predators to sit while reaching into the house for the eggs or the baby birds and a bird that is the right size for the hole flies in, it doesn't land on the perch and climb in.

   If every shop in the land made one bird house aimed at a local species of bird it could make a difference.


Thursday, April 10, 2014

Foot Operated Hold Down or a Carver's Hold Down

  In the last week or two I have been working on my  shop environment. Recently I made the saw bench from the Unplugged Workshop which was long over due.  The bench inspired me to think about some other workshop jigs or appliances that I could build that would improve my working situation and posture.  Since I am finally back to firing on all cylinders after months of back problems I want to stay that way, and have become much more aware of aches and pains that can come from working and playing. As the hair on my head grows thinner and my beard gets greyer aches and pains are ignored at personal peril.

 Though the saw bench is low, it is so efficient my bent over time is shorter and more productive.  Also I am doing more carving, both relief and carving in the round on projects from my shop. Things that require a very careful touch with the chisel need to be clamped/held in place while hold the cutting or anding tool with both hands.  It is best when the wood to very secure so I  can then  use two hands to accurately control the Dremel, knife or chisel.

  I happen upon an Instructable showing how to make a foot operated hold down.  I quite liked the design and will probably make one like in the video for working on larger items but first I modified the plan for use with on my carving projects.


hold down holding a carved spoon.
  Instead of the appliance being held in a bench vise as in the Instructable.com video I made a smaller version that I clamp to my work bench.

   I used a piece of oak, because I still have a bundle of oak shorts around and to held stabilize the hold-down I screwed a cross piece onto the bottom.  It is not a big project, I drilled and counter sunk two holes, rounded the end off the hold down and threaded the rope through.  The biggest trick was getting the rope the length that suited me the best.


  The cross piece is probably over engineering the project but that is my nature when I comes to this sort of thing.  The clamps keep the hold-down from moving one way and the cross piece keeps it from wiggling the other.  I have a spare KREG KKS-BK Bench Klamp that I will probably mount on the top of my carving bench next.


   I threaded the rope through the holes and tied a knot at the bottom.  If I want to work with this hold down while sitting I can tie a knot in the rope to shorten it or leave it long for standing.


  As you can see the rope will hold fast to non-square shapes and shouldn't cause damage to the wood, it I am sensible and careful.  To hold round stock I would only need to add a V block.

 cheers ianw


'stepping out!'

Monday, April 7, 2014

Bench Dog


  When you have a work bench you have occasions upon which you have to clamp.  To work is to clamp.  

   You can buy bench dogs, or you can do like I did.  


Cut some dowel and wrap a heavy duty elastic band around one end.  Some times the "KISS" principle works. 

Sunday, April 6, 2014

Working Levels, various benches

   In my shop there are basically four levels of work station.  The lowest of the levels is my new saw bench (21 inches) and my old "Box".  The Box was build a years ago as multi-use item.  The Box is 9 1/2 x 16 x 19, I made the box to stand upon while working in the basement.  I also made the box tight enough to use as a dust collector, there is a vacuum port in one side and many holes drilled in the top.  The Box very nearly matches the height of the saw bench to support longer boards when I am cutting.  

   I made the saw bench two weeks ago and have used it several times, when I have a small job and don't feel like all the noise and dust.  

dust collection port, fits my big shop vacuum
holes in the top of the Box

  The second level of work space is my heavy duty work table (34 inches).  I have talked about it before, it is on locking casters, very heavy and equipped with a vise and clamping points for KREG Clamps 


   The next work space is my KREG Clamping table, ( 36 inches)  I have raised the table to its full height and put storage underneath.  The Klamp table is used for assembly of small work and painting.  I covered the top of the clamp table with 3/8 plywood to protect the top from stains and glue.


    The tallest work space is my carving bench.  I added this second section to my small bench recently to raise it to 44 inches.   I find that I have less back pain when I stand up very straight as I work at a bench or my desk. 


    I keep my Dremel tool on the corner of the bench and reach for it often, there is also a small clamp-on vise that fits on this bench. Raising the bench to this height allows me to get close to my carving and work longer without back pain. 

  It has been almost one year since I was felled by a herniated disk in my lower back and I have been doing everything I can think of to make my work space 'back' friendly.  Having various levels upon which to work and being flexible about how long I work has enabled me to keep making sawdust, which makes me a happy guy.

cheers, ianw

Friday, April 4, 2014

Tray Molds


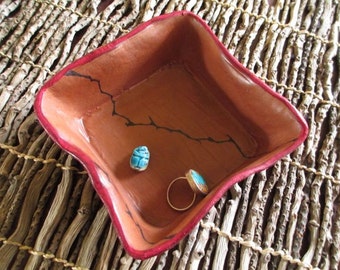
  I have a friend that is a potter. and the other day she asked me to make her a couple of moulds for making trays.  Generally pottery is thrown on a wheel, ( a mud lathe?!) but another way to shape the clay is moulding it and wood makes the best moulds, I was told.  

mould with the mud on it

8 x 16 mould
square mould 8 x 8

  Making these moulds is not high art and it was nice to find purpose for some of the bits of wood that are still laying around in piles.  This imagining oneself as the most primitive of pattern makers. One day I will have to buy more wood, but 'not today'. 

   Making the moulds was an exercise in 45 degree angles.  A sliding mitre saw makes short work of a project like this.  I bought my 'slider' quite a few years ago and have been working it hard. Bosch has continued to develop their saws, and I would certainly look to Bosch for my next saw too.

My only complaint with this saw is the dust.  It maybe the biggest mess maker in my shop, it is almost a messy as a lathe.

  After I made the two moulds I got a brain wave.  What about an eight sided mould?  And, why not just make inserts that fit inside the square mould?


   Why not?  Because you end up having to cut a whole bunch of 45 degree angles on very small pieces.  If anyone decides that they want to try something like this I suggest you make a larger mould so that you have bigger pieces with which to work. Since some of the pieces were too small for me to cut on the sliding mitre saw I used hand tools to cut the angles, even at that  the pieces were so small that they were very hard to hold on to while cutting.

  If you were to make a dedicated 8 sides mould it would be like cutting crown moulding for a tiny, tiny room.  If my friend is interested I would give it a try.

cheers,


Wednesday, April 2, 2014

Elm has Character

    Elm is also strong, heavy, prone to splitters and looks good with a clear finish.

   I have been trying to get some exercise to help with my waist (waste) line and to ease my back pain issues.  My doctor says walking is the best option and so I have been walking, not enough, but some.  Walking with a straight back and erect posture tends not to bother my back much at all so I have been walking with a hiking pole rather than a cane lately.

   My hiking pole is green and aluminium and when I looked around I found that wooden hiking poles are crazy over priced and pretty basic wood working. 
  
    As they used to say in "the six million dollar man" we have the technology, my technology is in my basement.


   This morning I started out with a 48 inch piece of elm that I jointed and planed before marking out the potential hiking pole, walking stick. 

  The first stop after the flattening was the band saw.  I have used a Viking Blade in my saw for more than 2 years and it is still cutting acceptably.  The next time I take on a big re-saw project I will replace the blade, but for now it is fine.  Once I finished on the saw, I just put my head down and sanded, and sanded and sanded.

  If I make another stick I will use my hand planes to get the basic, rounding shape and then sand things smooth if necessary. I skipped the hand planes this time because I was too lazy to figure out a good clamping arrangement, but as is so often the case the short cut turned out to be the long way 'round.

   Once the stick got a coat of Minwax Tung oil it looked pretty good.


    I even took the stick for a "test walk" today, it preformed up to expectations.  

Tuesday, April 1, 2014

Hand Saw Bench ll

  The other day I finished assembling my Hand Saw Bench in the style of Tom Fidgen.


  The Unplugged Woodshop

  
    I confess to not making it totally with hand tool. I prepared the poplar with my table saw and planer as well as did many of the cuts with my sliding mitre saw.  

  My design is a modification of Tom's plan too. The legs are a bit heavier than the original plan as are the stretchers, why?, 'cause I wood slabs I started with were a bit big, but not enough bigger to end up with usable wood if I had ripped them down to size.


   I also mixed my woods, the top is a spruce 2 x 6 stud while the legs and frame are poplar and the end stop is ash.  I wouldn't use spruce again, I had to fill some knot holes in the top when I came to sand the bench at the end.  Since the top is the part that is going to get cut up I'm not too concerned and one day I will replace it with a better quality wood.  The end stop is held in place by two 3/4 dowels so it can get moved out of the way easily.  Since it is a jig, shortly, it will get painted red.

  The bench is assembled with lap joinery, glue and dowels, there is nothing on the bench that can hurt my saw blades. Whenever I make a bench or work table I always avoid metal fasteners when ever I can. 

   In the original plan there is a stop that ran the length of the bench but I found I liked the stop across the end. My kneeling position seemed better on the long side rather than the short side.

  I built this bench so that I could comfortably  use my larger hand saws, I have an excellent rip saw that will cut as quickly as my band saw and an excellent cutting bow saw for cross cuts. With this saw bench in the future those saws will become a more automatic choice. I have  bench hooks  that enable work with smaller saws like my back saw that I use on my work bench, closer to eye level.  It is probably sacrilege but I plan to use this bench with my circular saw too.  To saw comfortably and and accurately I really like to to be able to get above the cut and see the line clearly, and this bench will enable that every time.  I also like to use my hand saws when the wood being cut is smaller, my plan is to retire with all my fingers.

   Something else I found today was that having a separate sawing bench meant that I could use the entire surface of my work bench for drilling, sanding, clamping and assembly with out having to leave room for sawing and trimming.  It is a very space effective way to increase working space in my shop.  The added bonus is the saw bench is the perfect height for me to sit upon and work on my lower assembly table too.

cheers,