Sunday, May 21, 2023

A Live Edge Bowl

  First a photograph showing the two tools from the last blog. The large sander is more than twice the weight of the 4 1/2 angle grinder.  However it spins slower and is not inclined to burn the wood.


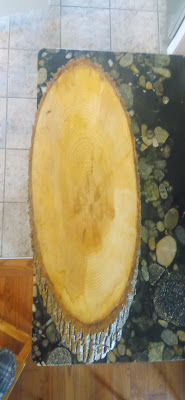
   The current project is designed to feature the worm tunnels that were under the bark.  Since this round of ash is nearly three inches think I decided to make it to a bowl.


   The first thing I did was trace the shape onto a scrap piece of  plywood and screw the round onto the plywood. 


  This way I can clamp the project to the work table in the garage and use my arbortech  turbo plane tool to wear away the inside of the bowl


    This is actually the quick part of the job.  Once the bowl's insides are roughed out it will take some time to sand everything smooth.

  To finish the inside I will use every sort of sander in my shop, next post : met the sanders.

cheers, ianw


Sunday, May 14, 2023

Grinder and Sander - compared

  This morning I set out to do a blog comparing the 4 1/2 grinder with sanding disk to a 7 inch sander with a sanding disk. 

  Both are great tools, sadly I can't show you any pictures of my tools because the computer doesn't feel like letting me load photos today.  I am assured that I am the problem.  However, it could be a software problem, or a hardware problem with my camera: or a software problem or a hardware problem with my computer or.....a software problem or hardware problem with my router or something in the system, but it seems I lack  understanding and unreasonableness  for expecting  digital technology to be reliable.  This is why I like working with wood, no bull shit.

I found the 4 1/2 inch grinder spins so quickly that it is a trick not to get burn marks on the wood,  The big old seven inch disk sander removes lots of material, in a hurry but does leave swirl marks to be sanded away later.

7 inch
4 1/2 inch

  If you look at the various models of these tools available you will see a wide difference in pricing. As a rule, the more expensive tools run smoother, quieter and and run cooler. I expect that you would also get more hours of service life for more money, though I don't know that for a fact. I do not have the cheapest nor the most expensive. My two grinder/sanders are not used every day and as a hobby woodworker I do not use them for long stretches at a time. Consequently these tools of mine are 20+ years old and still going strong.

  If one were to finally die, I would replace it immediately.  Unlike digital technology these are  two tools I can count on.


cheers ianw


Thursday, May 4, 2023

Kerfing plane/saw

    Followers know I have a shop full of tools and yet something I like to do is make more tools.  When I make a tool it connects me to the roots of the craft and because am retired I can spend time navel gazing without worrying about a production deadline.  Actually I just turned 65 years old and had the joy of my prescription drugs plummeting in price, so retired and lucky too.

  Anyway I digress.  I have seem a variety of kerfing plane/saw plans on the net for years. In the past I was able to cut rebates  and dadoes on my router table or table saw just fine  actually,  very accurately and efficiently. Now I like to fool around with hand tool projects and so decided I wanted an accurate way to cut consistent rebates by hand. The solution is the purpose made plane/saw.

  My tool uses a saw blade rather than a plane blade.


    This saw blade is one of a set I bought from a old fashioned hardware store ages ago that has been sitting on a shelf because I knew that one day I would need long random saw blades. This set of blades came with a terrible short lived handle that was supposed to give you a selection of saws that took up little space in your tool box.  The loose blades were really only suitable for baking into a cake and sneaking into a frontier gaol. A few years ago I put a short blade onto a knife style handle for my wife to use as a bone saw (in the kitchen).


  I cut this blade in half with my angle grinder and a cutting disk.  Then I got semi-artistic and shaped the blade to fit better on the wooden handle. 


  The blade is screwed to a piece of 7/8 inch elm with the drilled out area for my thumb. I had the blade cut 1/2 lower than the bottom of the elm back board.

  Stage two was to attach a fence to the other side to create a stop/runner that you allow the blade to cut 1/2 inch in to the work piece.  That way I can cut out a dado/rebate that is 1/2 inch square by sawing until the blade bottoms out. 
 

   The fence is white oak, straight, stable and hard wearing.  I sealed the wood with orange shellac and in use I have found that I need to round the end of the handle since there is more pressure horizontally necessary than I anticipated.  Getting the cut started is similar to getting any rip cut started, a bit tricky.

  I have the other half of this blade left and two more shorter blades with finer teeth. I will certainly keep them, wrapped in oily paper and no doubt they will get used, someday.

cheers ianw


Monday, May 1, 2023

Basic Woodworking?! with sanders

   Sometimes making nice things is quite easy.  If you have really good raw materials and don't get crazy you can get a fine result with almost no skill.


  I was given a piece of ash and all it needed was  sanding and hemp oil to finish.

  I started with  disk sanding using my 4 1/2 angle grinder initially to flatten the slab and then belt sander time with 80 then 120 grit belts.  By the time I was done  the garage was filled with dust even though the door was open.

  Once I got the slab flat and mostly smooth I moved into the shop and used my random orbital sander to get a glass smooth finish.

  I put two coats of water based varnish on the bark and three coats of hemp oil on the face.  We now have a charcuterie board that is nearly three feet long.  Isn't that want every family needs?


cheers ianw