Saturday, March 31, 2012

Miter Saws

Miter Saws

You will find Miter Saws in every professional and hobbyist's woodshop. There are a variety of makes and models to choose from such as Makita, King, Bosch, Dewalt and more.  Miter saws are especially great for cutting cabinet trim and crown moulding.  These days miter saws have many different features and variations so it's important to choose the right model for the work you'll be doing.

One big advantage to a miter saw is, the stock remains stationary while the cutting head moves, making it easier and safer to crosscut large pieces rather than using your table saw.

When purchasing a miter saw, you need to consider whether to buy fixed or sliding saw.  Which is best depends what you will be using it for?
If you intend to use the saw primarily for framing walls and cutting lumber the basic fixed or non-sliding compound miter saw is the purchase you will want to make.

 These Compound Miter Saws have a fixed head and can only tilt left or right.  They also are generally lighter ensuring easy transport from jobsite to jobsite.

For a larger cutting capacity sliding compound miter saws are best.  The sliding compound miter saw has a sliding head on mounted on guide rails making it able to guide forward and backward which increases the miter saw's cutting capacity.  The Sliding Compound Miter Saw is however much heavier and more expensive.

Both Compound Miter saws and sliding Compound Miter saws can be either single-bevel or double-bevel. On a single-bevel saw the head tilts in only one direction, while on a double-bevel saw the head tilts both to the left and the right. The advantage of a double-bevel saw is that it eliminates the need of flipping  large stock when beveling both ends. This is particularly helpful when you're cutting a lot of trim or molding.
Miter Saws are catergorized by blade size.  The blade size affects the maximum depth cut made at 90 degrees and 45 degrees.   A 10inch and 12 inch compound miter saw  are most popular.  There is however, a 3-1/8" saw for model makers as well.

Tuesday, March 27, 2012

FROG TAPE

Frog Tape keeps paint out and lines sharp.  Frog tape is designed to be used with latex paints for interior and exterior home painting projects.
Frogtape is the only tape treated with paint block technology, giving you straight crisp lines with no bleeding.
  Frogtape applies easily to cured painted walls, glass, wood trim and metal.  Frog Tape is pliable and easy to remove.  Frog Tape is available in 24mm and 36mm widths.
Easy to apply and remove 
 

Half Sheet Finishing Sander

  I am showing my age I guess, but I remember when this type of sander was very common and popular in all types of woodworking shops.  Then for a while belt sanders seemed to be everywhere, I have a couple of them too, but mostly you see 5inch/8hole random orbital sanders most often now days.


  In this blog I am showing my age and my new sander.  It is a very fine tool, the quality of finish it provides is excellent and the integrated dust collection is so good that I don't have to hook it up to my noisy old shop vac when I am using it.  Last weekend I was in London and go talking with the Bosch Sales Rep and he was telling me that almost no one buys these sanders any more, mostly I suspect because they are twice as costly as a 5 inch random orbital and also somewhat less versatile.  I didn't buy it just to be different, I bought it because I remember the quality of finish I got from the sander I had some years ago, that I worked to death and replaced with a my first belt sander.


   I make cutting, cheese and presentation boards as well as small boxes and the like  so I am nearly always sanding on a flat surface in a good position and can go with the grain all the time.  Since the work is downward the weight of the sander is also not an issue. (by the way this sander is light and well balanced, I use it one handed sometimes) All those things make a finishing sander a good tool for my shop.   I also confess to using belt sanders, scrub planes and a variety of random orbital sanders as well as a 1/4 sheet finishing sander with 500 grit paper on it to making my boards.
This is a cutting board I just finished made from elm and cherry, finished mirror smooth using my new sander in combination with the other planes and sanders.

Saturday, March 24, 2012

Today is Cold, but soon, it will be all Good

Cartoon Sun


  Today I dived into the archive at thetoolstore.ca website.  There is a section called the Do It Yourself Library part way down the left hand side of the home page.  That section has several patterns and the Freud router bit  catalogue.


The link I am including is how to make a curved deck.  Deck building is as much a summer tradition as swatting mosquitoes in Canada.


Build a Curved Deck


Wednesday, March 21, 2012

Working in the Driveway

 Now that the winter is behind us it is nice to get out of the basement and work in the sunshine, that means driveway or back deck wood working.  I know that a fair amount of work can be done on plastic milk crates, I done my share, but....working on a stable, clamping work surface is always nicer.


  One choice is The Rockwell Jaw Horse,it has a tonne of add-ons to make it a portable, powerful work station.


  Another option is The Work Mate which has also been around for years and too provides a portable adaptable work station.


  Glory in the fine days of this amazing springtime and get working outside.

Sunday, March 18, 2012

Re-Use, Re-cycle and save money


Some of friends laughingly note that I am cheap. I would rather think of myself as thrifty but either way you slice it, I hate to throw things away if they have any use or value left.


  Most wood shop folks send time sanding, maybe not as much as we should, but it still seems like sanding takes more time than building.  A common aid to hand sanding is a sanding block, blocks are available for sale or just as often are a scrap of wood more or less the correct shape.


  A while ago I made a sanding block that was a five inch disk and glued Velcro on it so that I could stick hook and loop sanding disks onto it.


  Recently I had to change the sanding pad on my random orbital sander, not because it lost its grip but because... well I'll show you.


  Something I was sanding, (an edge of something) caught and gouged the Velcro pad enough that it was tearing the sanding sheets to pieces.  I went and bought a replacement pad, installed it and was about to toss the damaged pad away when I got an idea.


  The scrap of wood is now screwed onto the back of the damaged pad and shazam, it makes a very flat, perfectly good sanding block. It is not cost effective to buy a new pad for this job, but as long as the old pads has grip, it is perfect.


Friday, March 16, 2012

KREG SHELF PIN JIG (KMA3200)

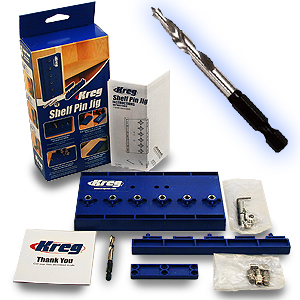
The Kreg Shelf Pin Jig enables you to drllill accurate aligned shelf pin holes quickly. The Kreg Shelf Pin Jig is made out of high impact ABS plastic.
 The best part of the Kreg Shelf Pin Jig are the drill guides made out of steel making them very durable.  The jig has storage on the back for the driil bit with its stop collar.
The fence can be mounted on either side of the jig, slides and locks into position easily.  This gives you a 1" or 2" drill from the egde.  If your holes need to be bigger than 2" from the edge than you don't need the fence.
Its easy to set drill depth.  Place the drill and stop collar in storage slot by sliding the bit forward til the shoulder of the brad point contacts with the Jig. Then just secure the depth with the allen key. 
If you are planning on a big project you may consider two jigs, can be joined together with the jig extender.  However you can just reposition the jig by sliding the jig down so the top hole is over the last hole you drilled and away you go.
The Kreg KMA3200 is an easy tool to use.  The Kreg Shelf Pin Jig can drill shelf pin holes with great accuracy saving you time and effort.

Thursday, March 15, 2012

Kitchener Waterloo Woodshow

Last wood show of the season:


Kitchener Waterloo Wood show

I am heading to the show tomorrow to see what is new and find a great deal.


2012 KW Flyer 

Tuesday, March 13, 2012

Plans - rough, but useful

  When I go to make something in my shop it usually has been mulled over in my head for sometime in this case I turned various ideas and plans over in my head for a couple of months.  Since I hate designing things I often spend serious time in books and on the net looking for plans to copy, but as in the case of the coffee machine shelf I couldn't find anything out there to suit my needs.  I ended up having to design the piece of furniture.  


   One thing that I really think about right from the start is what sort of joints I will be using, some projects use mitres, some pocket holes and this others tenons.  I considered all the options before deciding on Pocket Hole Joints, I still like their speed strength and accuracy. Also, I always suspected that this would be painted in the end and putty and paint makes pocket holes look as good as any other method.
   
   A couple of posts ago you saw the final result made from elm and finished with orange shellac.  This morning I just completed the last coat of high gloss white paint that covered the shellac, and made the little shelf unit fit with the other kitchen cabinets.
  
   The plan for the shelf was worked out in general form in my head but I did make a drawing so that I could make a cutting list.
   You can see on the bottom of the page, I don't figure out fractions in my head.  Putting those calculations down on paper and working them through like a Gr.5 kid has reduced my errors in the shop significantly .


   Since there was only one non-90 degree angle I did not make a full size set of plans.  This is also a one-of project so full sized plans would have been more work than they were worth.  A couple of years ago I made a sofa table and for that I made full size plans, it is a project that is worth repeating one day.


  While the drawing is pretty rough it contained the information that I needed and enabled me to prepare all the rough stock for this project.  It only took part of a morning to build the shelf once the planning had been done.  It always takes longer to plan and to varnish, or paint a project than to build.  

Sunday, March 11, 2012

Hand Saws, the myth and legend , and latest facts


   There is absolutely nothing that I can say about hand saws that is not covered by one of these other websites. All of which are written by folks more expert than I.

   As for me, I am using more hand tools all the time in my shop.  One of these days I will list the hand tools that I have rediscovered in the last year of so. I have good hand saws now and I am reaching for them more often, my table saw need not feel threatened but it is no longer my automatic first choice.  I can't imagine ever sharpening a hand saw myself, but then I didn't imagine having a rack of hand planes, that I use and sharpen myself either.  

   As with all edge tools, a good saw, properly sharpened in a joy to use, a joy that even the die hard gear head should try sometime.  If you go back to Dec. 16, 2011 there is a blog entry showing you how to get started with a hand saw for reasonable money.

Friday, March 9, 2012

One Man's Adventure - An Alaskan Odyssey

amazon.ca/One-Mans-Wilderness-Alaskan

  From May 1968 until September 1969 Richard Proenneke lived alone in what was to become Lake Clark National Park and Preserve in Alaska. Mr Proenneke was a very resourceful fellow and a talented wood worker.  While on his adventure he built his own cabin with a stove and fire place, the photographs show a  dutch door, windows and a stone chimney.
  
  I have talked about the tool box for living in an apartment, this is the tool kit that Richard Proenneke took to Twin Lakes Alaska to enable him to build his own home, without help:
-wood augers, he made handles once he got there, he appears to have had them in several large sizes
-files, for sharpening tools and working sheet metal
-chisels, including a large gouge used to shape the notches on the logs, also without handles
-draw knife 
-saws, cross cut, rip, and saws for cutting fire wood
-saw set
-honing stone
-vise grip
-screwdrivers
-adze
-plumb bob and line
-string level
-square
-chalk and chalk line
-carpenter's pencils
-galvanized pail containing nails, screws, wire, tape, plaster of Paris and oakum


   With these tools a cabin was built in the wilderness.  Over the course of his time in Alaska there were flights in by a local bush pilot to bring some staple food items and some building supplies.  For example the roof was covered in tar paper and the chimney  was made of local stone and concrete, the bags of concrete were flown in.


   According to the book Richard Proenneke was a well organized and thoughtful worker that had a solid plan in his mind and had scouted out the site for his cabin as well as prepared the logs the previous season.  None the less it was a grand adventure, and one that many people can only imagine themselves living.  


   Mr. Proenneke takes time out from building things to share his feelings about labour.  Clearly he has a strong work ethic and intense focus, he also believes that satisfaction comes from doing a whole job beginning to end, not being a cog in a wheel that only allows a person to do a small part of a job.


   In 2011 almost every job is just a portion of the task not the whole things anymore.  The advances in technology and the increasing complexity of nearly everything we encounter means that almost nothing is made beginning to end by one person, except what we do in our workshops.  Maybe that is the greatest attraction of home workshops and home arts and crafts. We can design the product, prepare the materials, build it and finish it, it is our work and a piece of who we are.


   I don't imagine myself on an Alaskan adventure, though I did want to build my own home, in days of yore, but I do agree with the ideas and spirit of Mr. Richard Proenneke.

Thursday, March 8, 2012

General i-Carver vs. Carvewright version C

     If you are a customer considering a Carvewright or i-Carver here may be a few things to consider.
The Carvewight is manufactured mostly of plastic with few steel and aluminium parts.  The General i-carver on the other hand is 80% steel and aluminum components.
The Carvewright uses guide rods and rails.  The i-Carver utilizes a Dry-Lin linear bearing guide system.  There are two major differences between the bearings.  The General's i-carvers Dry-Lin bearings are, linear guides that do not require any lubrication.  The Carvewright requires occasional lubrication.  Also the Dry-Lin bearings of the i-carver have a nylon bearing sleeve which can be replaced when the machine begins to show signs of wear usually( 1000-1500hours).  
The Carvewright needs a complete guide rod replacement, making it more costly and complex.
There is a dramactic difference when speaking of the noise levels of the Carvewright and the i-Carver.  The i-Carver is significantly quieter than the Carvewright. Something to consider if you are working at home.


40-915X M1 15' x 20' x 4" travel 21,000 RPM spindle (brushless motor) compatiible with most CAD design software (upgrade) including V-Carve Pro The next generation i-Carver is here! The 40-915X M1 is the latest in the General i-Carver Series. Featuring the same outstanding performance of the 40-915 M1, General has added some huge features to make sure your CNC carver is the most profitable tool in your shop. In addition to all the features of the original machine the "X" factor is the additon of smoother machining operation, a pause function to allow the operator to pause his program and resume when done. We have also added better clamping and a border function in the controller so the operator can insure his workpiece is correctly sized and configured before cutting. With a simple software upgrade the 40-915X M1 will allow the operator to use most CAD design software programs, incuding V-Carve Pro to add more functionaility to your machine.

Wednesday, March 7, 2012

Home Made Bench Vise

DIY bench vise.
shop-made workench vise


What that super clean new bench vise looks like in a commercial wood carvers  shop in Barcelona Spain.


   Clearly it is a tool that is very useful on a bench.  The threaded rod is available for sale to enable you to make your own vise, or you can buy the gear and make your own threaded wooden doweling.  
    I have the threaded rod, and made a vise years ago but it wasn't very good.  Actually the vise was about as good as my wood work skills at the time.  Now...it is time to make another vise using new skills and better tools and materials.

Monday, March 5, 2012

Coffee Machine Stand No. 2

   I guess this is actually the third version but the second one was really only the first version after an encounter with a circular saw.  We decided that the space beside the counter was 19 in wide and the new stand is to be 16 inches deep, so that it is the same depth as the IKEA china cabinet.

  There is always a battle between heart and head when we look at furniture.  In my heart, every piece of furniture in our home would be hand made and one of a kind.  In the fore ground of the photo is the rolling kitchen island that I made shortly after we moved into the house. The island has an amazing piece of granite on top of basically a rolling plywood box.  The box holds  six wine boxes on shelves on each side, the boxes have a long history with us and so after a bit of sanding and some varnish they and the granite top are the features of the rolling island, not the wooden box.  So, the box is real basic.  One day, maybe I'll make a nicer box, but it will still have to be painted white to match the cabinets in the kitchen.  

  The kitchen cabinet are very plain, easy to clean and sort of commercial looking.  It was a head decision, neither Eva or I was interested in the amount of time it take to keep fancy raised panel cup boards clean in a busy kitchen.

  The coffee stand is sort of a head/heart decision. This version is made from red elm, I started with rough lumber and ended up with a nice piece of furniture. I wanted the satisfaction of making a nice piece of furniture.  But again the feature is another wine box and the shelve needs to be sort of invisible.  Probably I will end up painting the stand white to match the cabinets, but I made it using quality materials and pocket hole joints even though it was going to be painted and could have been made with butt joints and nails.  

   The battle between heart and head is an on going battle that will probably never fully resolved. 

Friday, March 2, 2012

Coffee Machine Stand


This is a shelf unit that I built two years ago on which sits our coffee machine. The unit sits between the end of a our kitchen counter and the china cabinet, it is a prototype and so built from plywood and not very refined.  The unit was created in a hurry to fill a need with the intention of me making a nicer piece once I had time, and we decided exactly what we wanted.  Since it is a new house the layout of the kitchen/dining room needed time to solidify. We are not really house proud and so decorating takes place in stages, all subject to delay by nice weather, holidays, grand children etc. etc. etc. so we have been in our home for 3 1/2 years and things are still developing.  


  I did not rush to build a beautiful piece.  We finally decided that the shelf unit was too big.  This is a photo of the same unit cut down to size so that the china cabinet could be moved over.  The china cabinet had to move over to make room for: 


  my wife's Christmas present.  The clock had to hang there because it was the only place that it could be seen and was protected from drafts when the doors are opened, (that pendulum is amazingly sensitive and the breezes from the open door can stop the clock) and that I could drive a couple of long wood screws deeply into a stud to hang it.  I do not want the clock to fall down. (ever)


   So, I took the big shelf down to the shop and shazam, it was made into a little shelf.  It is still plywood and still looks pretty rough, but now we have decided on a size and soon I will make a nice piece of furniture;  a: to prove I can and,  b: to compliment all the other nice things in our home.